Home

Friday, June 26, 2015

Temporary hiatus...

"Life is like a box of chocolates, you never know what you're going to get." (Quoted from the film Forrest Gump.) 

Life seldom if ever turns out the way you imagine it will. Growing up, my mom and I often shared a box of Russell Stover chocolates. I bought my mom a box a couple days ago, wondering if it would be her last. She is loosing her battle with breast cancer. It's progressing very quickly now and there's nothing more the Doc's can do but try to ease her pain. I will be taking a hiatus from posting new recipes for the time being so I can spend time with her and my family.


My mom with my daughter Miriam last week.

So sorry to bring such sad news but I wanted my readers to know the 'why' behind my absence. Life is hard sometimes and I'm just keepin' it real. Church members have been extraordinary in their support. (On the upside I've got some great new recipes I will be sharing sometime in the near future.) Thanks for understanding everyone! ~Emily

Thursday, June 18, 2015

White Chocolate Mousse Holiday Trifle

I firmly believe that despite our flaws, the United States of America is still the greatest nation on the planet. I love celebrating the Fourth of July, and I'm not ashamed to say I love my country! As the fourth approaches, I have been thinking a lot about sharing some great recipe ideas with you all. I really wanted to create something great to end your holiday barbecue as you settle in to watch
fireworks light up the sky. What better way to celebrate America's birthday than with this show stopping and impressive White Chocolate Mousse Holiday Trifle?


Trifle is a really fun and easy dessert to assemble. (And I think you'll find it even more fun to eat!) I created this trifle to show love of country and love of food. The base layer is made of Red Velvet cake with sliced strawberries sprinkled in. Next, a creamy, fluffy layer of white chocolate mousse is generously applied over the layer of cake. Then the mousse is topped with fresh blueberries. Repeat the layers one more time in that order finishing off with a few whole strawberries in the center just to make it look extra pretty. Sparkler is optional, but how fun would it be to present this dessert to your guests with one lit on top! What a fun way to get everyone psyched up for fireworks!


I really love fireworks, don't you? If I had a bunch of money to blow I'd buy tons every year and put on my own show. Dead serious. Now that I live in the desert the public is limited as to the types of fireworks we can purchase, so I usually like to go to a public fireworks display somewhere in town. What's your favorite part of celebrating the Fourth of July? Parades? Parties? Food? Fireworks? It's all good! And so is this recipe, I hope you try it and let me know what you think!

White chocolate mousse holiday trifle

by The Goldilocks Kitchen
Prep Time: 45 mins
Cook Time: 10 mins
Ingredients (about 10 servings)
  • 8 oz of white chocolate chips or white baking chocolate
  • 2 and 1/2 cups of heavy cream
  • 1 box of red velvet cake mix
  • 3 large eggs
  • 1 and 1/4 cup water
  • 1/3 cup vegetable oil
  • 1 lb of fresh strawberries, sliced (save three whole as a garnish)
  • 24 oz (1.5 lbs) of fresh blueberries
Instructions
1. Bake red velvet cake mix according to directions.
2. While the cake is baking, place the white chocolate chips into a medium mixing bowl. Heat 1/2 cup of heavy cream in a small sauce pot over medium high heat stirring constantly until it reaches a simmer. Remove from heat and pour over the white chocolate chips. Stir gently until all the chips are melted and smooth. Place in the fridge to cool.
3. Pour the remaining heavy cream into the bowl of a stand mixer. Mix on medium for about 30 seconds then on high until soft peaks form. (Watch the mixer, this can go fast.)
4. When the chocolate mixture is cooled, whisk in about 1/3 of the whip cream into the bowl with the white chocolate mixture. Gently pour this mixture into the bowl of remaining whip cream. With a large spatula, gently FOLD the chocolate mixture into the whip cream, by running your spatula along the sides of the bowl holding the bowl at an angle. If you mix to rough, the mousse will deflate.
5. When the cake is cooled, slice into 1 and 1/2 inch squares. Line the bottom of a trifle bowl with two layers of cake squares and slices of strawberry. Press down gently to squish just a bit. Add a layer of chocolate mousse to cover the cake/strawberries and then a single layer of blueberries on the mousse. Repeat with a single layer of cake squares/strawberries, then mousse again and a final layer of blueberries with the whole strawberries in the center. Cover with plastic wrap and chill for 1 hour to allow the mousse to set up. Serve.
Powered by Recipage

Tuesday, June 16, 2015

Magic Slow Cooker Pot Roast

This Magic Slow Cooker Pot Roast is just that. Like magic! I wondered and wondered what to name this recipe. I have tried several slow cooker pot roast recipes. Most involve quite a bit of preparation to combat the slow cooker's tendency to create semi-blandness that is to say the least, under-whelming. This recipe is almost like magic, because this roast turns out amazing with almost no effort!


I used to think that the slow cooker was an easy way to great food. Just throw in all the ingredients and whaa laa! As I've become more educated in the world of culinary arts, I have realized that in order to get food that tastes good from a slow cooker, most of the time there is some effort required in the preparation of ingredients beforehand. I have learned that no matter the recipe for pot roast, searing or browning the outside of the roast before slow cooking is necessary for outstanding flavor. The same goes for this recipe as well. But what's nice about this recipe is that's about it. Just a couple of store bought ingredients mixed together to create superior flavor!


It's just a matter of mixing a can of cream of mushroom soup with a package of dry onion soup mix to create a gravy for your roast to cook in. At the end of the day you have an amazingly delicious meal waiting for you. Don't you love recipes like that? With three young kids to take care of, I sure do!


The veggies in this recipe are optional, but I like to throw them in so that I have a complete meal ready at the end of the day. For these photos, I used a bag of mixed potatoes, and a bag of colored carrots, both purchased at Trader Joe's. They can cook right in the gravy. I like to saute up some sliced mushrooms just' cuz I like sauteed mushrooms. And I think the little bits of mushroom in the cream soup are kind of chinsy. But again, even the sauteed mushrooms are optional if you want to skip out on those:0) Anway, try this recipe, I bet it will become your new favorite for Sunday dinner after church!


Magic Slow Cooker Pot Roast

by The Goldilocks Kitchen
Prep Time: 20
Cook Time: 6 to 10 hours
Ingredients (6 servings)
  • 1 lb. carrots, peeled
  • 1 lb. red or mixed small potatoes, cut into 1 inch chunks
  • 1 cup sliced white mushrooms
  • 1 tablespoon butter
  • 1/2 cup water
  • 1 can cream of mushroom soup
  • 1 packet of dry onion soup mix
  • 1 tbsp vegetable oil
  • 1 4 to 6 lbs beef roast
Instructions
1. In a slow cooker, whisk cream of mushroom soup and onion soup mix packet with 1/2 cup water.
2. In a skillet set to medium heat, saute mushrooms with 1 tbsp. butter until browned and soft. Stir into the cream of mushroom soup mix. Place potatoes and carrots on top.
3. Place one tablespoon of vegetable oil in a large skillet and set to medium high heat.
Pat roast dry with paper towel and season well on all sides with salt and pepper. Place in skillet and cook until well browned on all sides.
4. Place roast on top of vegetables. Set your slow cooker to low, 8 to 10 hours.
5. When slow cooker is done, remove roast and tent with foil to rest for about 15 minutes. Season vegetables with salt and pepper and serve with roast and gravy.
Powered by Recipage

Thursday, June 11, 2015

Salami Pesto Grilled Cheese

Aaahhhhh. The ever classic grilled cheese. I whip up a quick sandwich at least twice a week for lunch. And I'll often pair mine with a creamy tomato soup spiced with a few shakes of Italian seasoning. Classic American fare for sure. But there can be more than buttered bread with cheddar in between. Oh yes, much much more...like Salami Grilled Cheese with Basil Pesto! Wham bam, the classic grilled cheese has gone gourmet!


These sandwiches are absolutely delicious, and impressive too! The combination of Provolone and Monterrey Jack cheeses are a perfect match with Basil Pesto. They melt down to perfect gooiness that leave strings off every bite. I like to use a nice bakery loaf of bread here, usually some kind of Italian hearty bread, or french bread would do just fine too!


Pesto is a simple combination of fresh basil leaves, pine nuts, Parmesan, garlic and olive oil processed together. It's fabulous on just about anything. I highly recommend making your own fresh pesto at home for the best flavor. If you're looking for a recipe, try mine! But you should be able to find a jar of pesto on the shelf at your local grocery store in a pinch.


If you have a Panini press, great! Use that instead of a frying pan. Just be careful not to overload your sandwich with too much cheese. You can have so much fun with this recipe, especially when you start experimenting with different types of meats in your grilled cheese. I have even used spam. Yes I will admit it~ even spam. I did fry it up first though :0) Please try this recipe and let me know what you think! I hope you feel it's worth every bite.

Salami-Pesto Grilled Cheese

by The Goldilocks Kitchen
Prep Time: 2 mins
Cook Time: 6 mins
Keywords: fry sandwich Salami American fall spring summer winter
Ingredients (4 sandwiches)
  • 1 1/3 cups shredded provolone cheese
  • 3/4 cups shredded Monterrey Jack cheese
  • 8 slices white hearty bread
  • 4 tablespoons margarine or butter
  • 1/4 cup pesto
  • 12 slices salami
Instructions
1. Heat a large frying pan over medium heat. Toss the cheeses together in a mixing bowl. Place four slices of bread on a cutting board or plate. Lightly butter each slice. Flip two of them over and spread the other side lightly with pesto. Sprinkle a very generous pinch of cheese mixture over the pesto, then place two or three slices of salami over the cheese. Sprinkle more cheese over the meat, then place the empty slice of bread on top.
2. Gently place sandwiches in frying pan. Cook until golden brown, about two or three minutes per side, carefully flipping over with a spatula. Repeat with the remaining bread and filling. Slice in half and serve immediately.
Powered by Recipage

Wednesday, June 10, 2015

Classic Basil Pesto

Basil is one amazing herb. It's a member of the mint family, and is commonly grown and featured in the cuisine of India, Southeast Asia Northern Africa and Italy. Some even call it Holy Basil because it has some great properties besides just tasting really good; antibacterial, stress fighting, good for your digestive system type properties :0) There are many reasons to eat basil, so let me introduce you to one of the yummiest~ Classic Basil Pesto!


If you have never tried or heard of Pesto, it's a tasty culinary invention for sure! A simple blend of herbs (usually basil), pine nuts, garlic and olive oil. Pesto can be used on sandwiches, in soups, or pasta dishes. Best of all, it's deeeeeeelicious!


Since I've been on a fresh herb kick this week with my posts, I thought I'd whip up some Classic Basil Pesto to share with the world. I don't actually have enough for the world, but if everyone who read this post made some, and shared it with friends, and the friends made some, well, we just might get to share pesto with the whole world...


Note: You will need a food processor to create classic basil pesto. I have never attempted to make it in a blender. If anyone of you is daring enough to try, please let me know how it turns out!
Some Ideas: I hope you truly enjoy pesto. You can easily freeze individual portions in an ice cube tray and just pop them out as needed. You could stir it into the lovely Baked Risotto with Zucchini that I featured yesterday. Even my picky kids will eat it on grilled cheese. Mmmm, there's a little hint for tomorrow's recipe :0)

Classic Basil Peso

by The Goldilocks Kitchen
Prep Time: 10 minutes
Cook Time: none
Ingredients (about 3/4 cup)
  • 3 garlic cloves, peels left on
  • 1/4 cup pine nuts (no shells)
  • 2 cups fresh basil leaves
  • 6 tablespoons extra-virgin olive oil
  • 1/4 cup grated Parmesan cheese
  • Salt and pepper
Instructions
1. Place Garlic cloves in a skillet over medium heat. Stir often and toast until just starting to get brown in spots, about 5 minutes. Add the pine nuts and stir together with the garlic, just until they start to get golden brown 3 to 5 minutes more. Remove from heat.
2. In a food processor, toss in the basil leaves. Make sure they don't have water on them. (Dry them well with paper towels if you have recently rinsed them in water.) Add the pine nuts, oil, and Parmesan cheese. When the garlic is cool enough to handle, peel it and toss it into the food processor as well.
3. Process all ingredients well, stopping to scrape the bowl down as needed. Add salt and pepper to taste. Chill in the fridge for about 30 minutes and serve. Pesto will keep in the fridge for about 5 days or freeze in ice cube tray.
Powered by Recipage

Tuesday, June 9, 2015

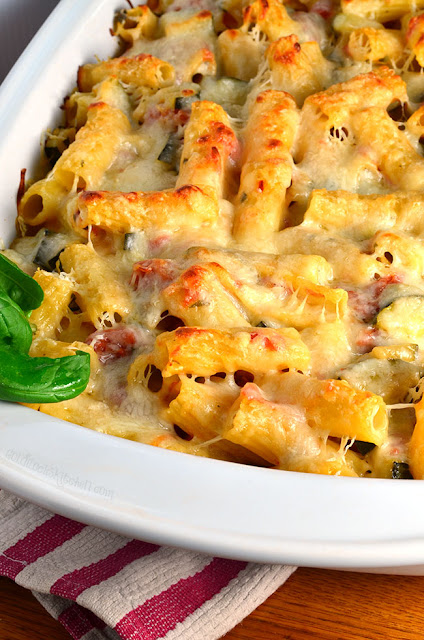
Baked Rigatoni with Zucchini

Baked Rigatoni with Zucchini is a delightful Italian pasta that is delicious to eat and fun to make too!
If you happen to have lots of zucchini on your hands this summer, invite family and friends over to help you make this recipe and enjoy this fabulous summer pasta made for sharing.


This recipe starts out with a quick saute of onion and then the zucchini, but what makes it fun is the addition of the tomatoes. You'll empty a 28oz can of whole San Marzano tomatoes into a large bowl, then stick your hand in (or invite the kids's to use their hands) and start squishing them! Yes it sounds weird and maybe creepy...but it's really fun! Crush up the whole can of tomatoes with your bare hand. Somehow this makes me feel like a kid again. Playing in the mud and getting messy...with no care in the world...except catching the ice cream truck...oh summertime fun...


You'll need a fair amount of fresh large leaf basil for this recipe, about a cup. If you read my last post you'll know how much I love fresh herbs, and I won't get on my soap box this time. Most grocery stores will carry a carton of fresh basil~ use this if you don't grow your own or have a handy dandy farmers market nearby. Oh how I love fresh basil! I love the way my fingers smell after picking off a few leaves. Mmmmm!


I found the use of Fontina and Parmigiano-Reggiano cheeses were a nice change from the usual Parmesan or Mozzarella cheese most think of when cooking Italian fare. They can be a bit difficult to find~ check the specialty cheese isle. If you can't find one or the other, substitute another Italian hard cheese. Just make sure you use two different kinds, it really helps to add depth of flavors to this dish.
I hope you enjoy it along with the special people in your life. That's true Italian cooking!


Baked Rigatoni with Zucchini

by The Goldilocks Kitchen
Prep Time: 35 mins
Cook Time: 20
Ingredients (6 servings)
  • 1/2 teaspoon salt, plus 2 tablespoons for the pot of water
  • 2 tablespoons olive oil
  • 1/2 medium onion, diced
  • 1 lb medium zucchini, sliced
  • 1/2 teaspoon red pepper flakes
  • 1 28oz can San Marzano tomatoes crushed by hand
  • 1 cup loosely packed fresh basil leaves, chopped
  • 1 lb rigatoni pasta
  • 8 oz Fontina cheese, shredded
  • 1 cup Parmigiano-Reggiano cheese, grated
Instructions
1. Set your oven to heat to 400 degrees. Bring a large pot of water to boil, adding the salt. In a 12" inch skillet with deep sides, heat the olive oil over medium heat. Add the onion and cook for about 5 minutes, or until softened and just starting to brown. Add the zucchini and cook, stirring frequently, for another 5 minutes or it begins to soften. in the meantime, pour the can of tomatoes into a mixing bowl and crush by hand. Save the can.
2. Add the 1/2 teaspoon of salt, the red pepper flakes to the skillet and stir for about 30 seconds then add the crushed tomatoes to the skillet, filling the empty can with water and pour into the skillet as well. Bring the sauce to boil, and cook for about 10 minutes, or until the sauce thickens. Don't let the zucchini over cook and fall apart.
3. While the sauce is cooking, add the pasta to the boiling water and cook until al dente, about 8 to 10 minutes. Drain pasta and add to the skillet. The sauce should be about done at this point. It's okay if it needs to cook for one to two minutes more with the pasta in it to thicken. Remove from heat and stir in the basil.
4. Spray a 9 X 13 inch pan with cooking spray. Ladle one half of the contents of the skillet into the pan. Sprinkle 1/2 of the cheeses onto the top. Ladle the second half of the pasta and sauce into the pan and sprinkle the remaining cheese on top. Bake in the oven for about 20 minutes, until brown and bubbly.
5. Serve. Sprinkle individual servings with additional cheese if any is left over.
Powered by Recipage

Monday, June 8, 2015

Greek Chopped Salad

This lovely Greek Chopped Salad is perfect for those who wish to incorporate more healthy options into their diet without sacrificing flavor or quantity. Grill some chicken breast and serve it together with the salad and you have a fantastic filling dinner bursting with intense favor. Or skip the chicken and serve a smaller portion of Greek Chopped Salad as an appetizer or side to a great entree.


Have you ever tried Kalamata olives? They are a purple olive with a stronger, richer flavor than black olives. They grown primarily around the city of Kalamata in Greece. (Hence the name.) I do love olives, and will eat black olives whole, right out of a can. These Greek olives however, are usually kept in a brine or a wine vinegar making their flavor very, very strong. When eating them in this salad I usually will slice them up a bit to spread the flavor around.


The dressing used for this salad is equal parts extra virgin olive oil and fresh lemon juice whisked together with some oregano. I am always a fan of fresh herbs, so I recommend using them whenever you can. The oregano really sets this salad apart and brings all the amazing flavors together. There are options at most grocery stores to purchase little containers of fresh herbs, which I think is great! At one point in Idaho I had planted and maintained an herb garden. 'Sigh'. Oh how I miss my herb garden... but I digress. Becoming familiar with fresh herbs has been one of the highlights for me in my culinary endeavors. I love them! Use them if you can!


As I continue blogging about my favorite recipes I am going to try to incorporate more of my favorite 'healthy' recipes for y'all to enjoy; sprinkled in with all the really good stuff :0)  I hope you enjoy this salad, as always please let me know what you think in the comments!


Greek Chopped Salad

by The Goldilocks Kitchen
Prep Time: 10 mins
Ingredients (Serves 4 as a side)
  • 6 cups chopped romaine lettuce
  • 1 cup diced tomato
  • 1 cup sliced cucumber
  • 1 cup sliced red onion
  • 4 tablespoons reduced fat feta cheese
  • 2 tablespoons olive oil
  • 2 tablespoons fresh lemon juice
  • 3 teaspoons fresh minced oregano (or 2 teaspoons of dried)
  • 8 Kalamata olives
Instructions
Combine olive oil, lemon juice and oregano in a large mixing bowl. Whisk vigorously to combine.
Place all other ingredients into the mixing bowl and toss to coat. Serves 4 as a side salad or appetizer. Serves two as a main course salad topped with a boneless, skinless grilled chicken breast.
Powered by Recipage

Thursday, June 4, 2015

Dark Chocolate Almond Lacey cookies (Trader Joe's knockoff)

I was recently at work one evening, and a container of cookies from Trader Joe's had been left out on the counter in a break room for anyone to try. Whoever was kind enough to leave it their for coworkers probably didn't intend housekeeping staff to partake as well, but I couldn't help myself. :0) A thin, bumpy wafer type cookie with dark chocolate looked quite appealing. I'd never seen this type of cookie before, but after my first crunchy bite I knew I had found my next love! Cookie love that is!


That night after I got home from work I went strait to the computer to see if I could find a recipe for Dark Chocolate Almond Laceys'. There were several for these types of cookies, also called 'Florentines'. I checked one of my recipe books too, and there they were! Bonus~ there are delightful shape variations for the cookies that are very simple to make!


Chopped almonds and flour mixed in with a sugary buttery syrup (not unlike toffee), a little vanilla, a quick chill to solidify the dough and you're ready to go! Parchment paper or a silicone baking mat are essential for this recipe!! Do not attempt without! These little cookies will stick like glue to anything but these. Trust me....
When they come out of the oven you MUST let them cool on the baking sheet for a couple minutes until they set up a bit before removing them. Then if you act quickly, they are mold-able into any shape you can imagine. If they cool too much and become brittle, just pop them back in the oven for a minute or two.


These shapes I created with the top of my pepper grinder (roundish) and a wooden spoon handle. There are endless possibilities for these. The rolled ones could be a lovely addition to your morning coffee or tea. Or as a garnish for a banana split or a slice of pecan pie...
Imagine little Lacey 'bowls' filled with a scoop of homemade ice cream, or a summer fruit compote... Now that I think about it I should have been more prepared with these things to share in my photos... Hind sight is 20/20... anyway I hope you get the picture. I will be adding these to my Christmas cookie baking bonanza for sure. They are wonderful. Try them!

Dark Chocolate Almond Lacey Cookies (Trader Joe's knockoff)

by The Goldilocks Kitchen
Prep Time: 45 mins (30 to chill)
Cook Time: 11 minutes per batch
Keywords: bake dessert cookie
Ingredients (about 45-50 cookies)
  • 1 1/2 cups sliced almonds
  • 3 tablespoons all-purpose flour
  • 1/4 teaspoon salt
  • 3/4 cup white sugar
  • 1/4 teaspoon cinnamon
  • 2 tablespoons heavy cream
  • 2 tablespoons light corn syrup
  • 5 tablespoons unsalted butter, room temperature
  • 1 teaspoon vanilla extract
  • 1 cup Hershey's or other dark chocolate chips
Instructions
1. Pulse almonds in a food processor until finely chopped. Add to a mixing bowl along with the flour, salt and cinnamon. Whisk to combine.
2. Combine sugar, cream, corn syrup and butter in a small saucepan. Cook over medium heat, stirring occasionally until the mixture comes to a rolling boil and sugar is dissolved. Boil for one minute, then remove from heat. Stir in vanilla.
3. Pour sugar mixture into the dry ingredients and mix until combined. Chill dough for about 30 minutes.
4. While the dough is in the fridge, set your oven to heat to 350 degrees. Line a baking sheet with parchment paper or a silicone baking mat.
5. Scoop round balls approximately a teaspoon in size (or 1/2 to 3/4 inch in diameter) and place on baking sheet at least 2 inches apart. They need plenty of room to spread. Bake one sheet at a time until light golden brown, about 10 minutes.
6. Let cookies cool for 2 or 3 minutes on baking sheet before removing them and shaping them if desired.
7. To create classic cookies, melt chocolate chips in a heat proof container in the microwave for 30 seconds at a time until melted, stirring in between. Spread a thin layer of chocolate over the underside of a cookie and squish another cookie of the same size/shape on top. Let chocolate harden and serve.
Powered by Recipage

Wednesday, June 3, 2015

Smothered Apple Cider Pork Chops

Once in a while, a recipe comes along in your life that is so good, you just have to make it over and over. It becomes a regular for your family or when entertaining guests. Smothered Apple Cider Pork Chops is such a recipe. Let me tell you how much we love these chops!


My mouth starts to water just looking at these pictures. Juicy, thick cut pork chops cooked and then smothered in the most delicious sweet caramelized onion, bacon, and apple cider sauce; tangy, bright, and full of flavor that tastes incredible! For the onion hater... I hate onions too. Really. I make this confession because I LOVE them in this recipe. They are delicious and I don't feel like I'm eating onion. Seriously, this recipe is an absolute joy to cook! Smothered Apple Cider Pork Chops will make you feel like a skilled chef whipping up a masterpiece; yet with a little prep it's super easy and fast~about 30 minutes. Your home will be filled with a mouth watering aroma that foretells of greatness to come. I am being dramatic, but it's true! It's hard to describe just how lovely this recipe turns out until you try it for yourself. You'll never serve pork chops the same way again.


This recipe calls for thick cut pork chops; they should be about one-inch thick. I sometimes have difficulty finding thick chops, most are cut to just half the thickness needed. I've had success most times at good ol' Walmart. I purchase the chops specifically marked "Thick cut". Thin chops just don't withstand the cooking time in this recipe and will over cook~ turning into the standard 'dry as leather' pork chop.


The other main ingredient in this recipe is the apple cider. When in season, you have lots of varieties to choose from. Go for cider that is opaque, (you can't see through the juice) thick with apple pulp. I've found this creates the most exceptional flavor for this recipe. Out of season it can be near impossible to find this kind of cider. Not to fret, I turn to a supermarket staple that is always around- Martinelli's Sparkling Cider. It does great in a pinch. Plus you can drink the rest with your meal and it makes a lovely pairing with the main dish!


My most favorite part of cooking these up is frying the bacon, onion, bay leaves and Thyme for the sauce. There is something about cooking this combination of ingredients together that sends a heavenly aroma into the air. I am a lover of fresh herbs and they are amazing in this dish. If you can't find some sprigs of thyme at the store, use ground/powdered thyme. It will dissolve into the liquids yet still flavor the sauce well. This is one recipe that you definitely should read through entirely before starting. I like to prep all my ingredients for this recipe before I start. Doing so ensures you have a great experience with it. Enjoy!


Smothered Apple Cider Pork Chops

by The Goldilocks Kitchen
Prep Time: 10 mins
Cook Time: 30 mins
Ingredients (4 servings)
  • 4 boneless, skinless pork loin chops, about 1 inch thick
  • Salt and fresh ground pepper
  • 1 tablespoon vegetable oil
  • 2 or 3 slices of bacon, minced
  • 1 sweet or yellow onion, halved and sliced thin
  • 2 teaspoons sugar
  • 2 bay leaves
  • 1 sprig fresh thyme
  • 1 1/2 cups apple cider
  • 2 tablespoons water
  • 2 teaspoons cornstarch
  • 2 teaspoons Dijon mustard
  • 2 teaspoons apple cider vinegar
Instructions
1. Pat meat dry on both sides with paper towels and season with salt and pepper. Heat oil in a 12 inch metal skillet (try to avoid non-stick for this recipe) on medium high. Brown the chops well on just one side, about 5 minutes. Transfer to a plate and set aside.
2. Add the minced bacon to the skillet and cook until fat begins to render, about 2 minutes. Mix in onion, sugar, thyme, bay leaves and a pinch of salt, scraping up any browned bits on the bottom. Cover and cook for about 5 minutes, stirring often. The onion should just be beginning to brown. Remove the lid and continue cooking and stirring often for another 5 minutes or until the onion is well browned.
3. Gently stir in the cider, again scraping up browned bits. Nestle pork chops into the pan, browned side up. Reduce the heat to medium, cover, and cook until center of chop registers 140 degrees, about 10 minutes.
4. Transfer pork chops to a plate and cover with foil to rest. As it rests, return onion sauce to a simmer. Whisk together the corn starch, water and mustard, then whisk the mixture into the sauce. Continue to simmer until slightly thickened, about 3 minutes. Discard the bay leaves and thyme sprig. Stir in the vinegar and season with salt and pepper to taste. Pour onion sauce over chops and serve.
Powered by Recipage

Tuesday, June 2, 2015

The Best Whole Wheat Bread

For my birthday this year I requested a wheat grinder, since I have accumulated quite a few cans of red wheat for food storage. I really wanted to start turning those wheat berries into whole wheat flour, which if eaten right away, is super healthy. I'm here to tell you...I have been blessed! I have a new wheat grinder!!


I love baking, I really do! Yet some recipes really try my patience when they don't turn out the way they're supposed to. This recipe for Whole Wheat Bread definitely was one of those recipes. I think a lot of my problems came from my new altitude here in the high desert of New Mexico. But I didn't give up. I was determined to create fabulously tasting and healthy wheat bread from my freshly ground whole wheat flour!


Turns out there are a few secret ingredients to create the ultimately delicious wheat bread. One of them is a portion of white flour. (Yes I know it sounds like cheating, but it helps lighten the texture of the loaf.) Another is toasted wheat germ and a bit of rye flour, which give the bread a depth of flavors and heartiness. I have reworked and reworked this recipe to get it just right. Altitude can make a huge difference in your baking, especially with breads and cakes. The higher the elevation, the less air pressure. Less pressure means your breads will rise more quickly. My loaves would fall flat in the oven. They would rise beautifully, then just cave in like a balloon that lost all it's air! Completely deflated!


After doing a little research, I now believe I was letting the dough rise too long, and the gluten eventually over came the gasses from the yeast and deflated the loaf. I shortened the rise time and the amount of yeast just a bit. Finally~ perfect loaves of deliciously hardy wheat bread! Perfect texture and the heartiness of American bread in a classic loaf. Mind you this recipe is tailored to 5600 feet above sea level :0)


The Best Whole Wheat Bread

by The Goldilocks Kitchen
Prep Time: 1 hr 45 minutes
Cook Time: 40 minutes
Keywords: bread healthy
Ingredients (2 loaves)
  • 2 1/3 cup warm water about 110 degrees
  • 1 1/4 tablespoons instant yeast
  • 1/4 cup honey
  • 4 tablespoons unsalted butter, melted
  • 2 1/2 teaspoons salt
  • 1/4 cup rye flour
  • 1/2 cup toasted wheat germ
  • 2 tablespoons dough enhancer
  • 3 cups whole wheat flour
  • 2 1/2 cups white flour, plus more for dusting
Instructions
1. In the bowl of a stand mixer, combine the water, yeast, honey, butter, dough enhancer and salt with a rubber spatula.
2. Mix into your liquids 1 cup each of the whole-wheat and white flour.
3. Add the rest of both flours, attach the dough hook and knead at low speed until the dough is smooth and elastic, about 8 minutes. Transfer the dough to a lightly floured surface and knead by hand for a few seconds to create a smooth and soft ball of dough.
4. Place the dough into a large bowl lightly sprayed with nonstick spray. Turn the dough so it is coated all around with oil. Cover tightly with plastic wrap and place in a warm oven. (I turn my oven on warm setting when I start compiling the ingredients, then turn it off and place the dough in the oven to rise.) Let dough rise for about 50 minutes, or until doubled in size.
5. Empty dough onto clean surface. Divide in half. With a rolling pin, roll each piece of dough (one at a time) into a rectangle approximately 8 or 9 inches by 15 to 18 inches. Roll the dough short side to the other short side and crimp the edges and ends together. Place dough seam side down into a greased (or sprayed) loaf pan and gently press it to touch all four sides.
6. Cover loaves lightly with sprayed plastic wrap and let rise in a draft free place for about 20-30 minutes. In the mean time, set your oven to heat to 375 degrees.
7. Slowly remove the plastic wrap and place loaves into oven. Bake for about 40 minutes, or until the loafs reach an internal temp of 200 degrees. Dump them out immediately onto a wire rack to cool.
Powered by Recipage

Monday, June 1, 2015

Sweet Potato Pancakes (great for pregnancy)

In celebration of my return to food blogging and my new baby, this first recipe is one that's great for the pregnancy diet! Or anyone who wants to sneak nutrition into not-so-nutritious food :0) Sweet Potato Pancakes are a delicious and healthy way to start your day guilt free with lots of nutrition and a full stomach.


One serving (three pancakes) of my Sweet Potato Pancakes contain one serving of fruit, veggies, and whole grain. You can also boost your intake of vitamin C by using fortified juice concentrate in the recipe as well! Of course you want to have a strong immune system, especially when you're pregnant. If you get sick, you can't take any medicine except Tylenol. Getting a cold during pregnancy is the pits for sure!


Something else I love about these Sweet Potato Pancakes is that my kids eat them too (if I leave the nuts out of the batter) and they have no idea these are really healthy! Hah! I love it! So sneaky....
One other thing I really love about this recipe is that these Sweet Potato Pancakes are really, really filling~ great for the hungry tummy eating for two :0)


Sweet Potato Pancakes (for pregnancy)

by The Goldilocks Kitchen
Prep Time: 10
Cook Time: 15
Keywords: fry breakfast entree healthy
Ingredients (12 pancakes)
  • 1 cup whole wheat flour
  • 1/4 cup toasted wheat germ
  • 1/3 cup chopped toasted walnuts
  • 2 teaspoons baking powder
  • 1 teaspoon ground ginger
  • 1/4 teaspoon ground nutmeg
  • 1/2 cup milk
  • 1/2 cup apple juice concentrate
  • 3/4 cup mashed sweet potato
  • 2 tablespoons canola oil, plus 2 teaspoons
  • 2 large eggs, slightly beaten
  • 1 teaspoon vanilla extract
  • 2/3 cup very finely chopped dried apricots
Instructions
1. In a large mixing bowl whisk together the flour, wheat germ, walnuts, baking powder, cinnamon, ginger and nutmeg.
2. In a separate bowl, whisk the milk, juice concentrate, sweet potato, 2 tablespoons of oil, eggs and vanilla together until smooth.
3. Pour the bowl of wet ingredients into the bowl of dry ingredients. Stir to combine, then stir in the apricots.
4. In a large nonstick skillet or griddle, heat a teaspoon of oil. Spoon batter onto surface using 1/4 cup measuring cup. Batter will be thick, and if you wish you can spread it around a bit to create thinner pancakes. Flip when edges are done, about 2 1/2 to 3 minutes. Cook other side for about 1 1/2 to 2 minutes, or until golden brown. Repeat with remaining batter and add oil to the cooking surface as needed.
Powered by Recipage
09 10