Home
Showing posts with label chocolate. Show all posts

Thursday, March 27, 2014

Non-alcoholic Black Bottom Pie


Non-alcoholic Black Bottom Pie is a great way to liven up plain old chocolate cream pie. Typical Black Bottom Pie consists of a chocolate cookie crumb crust, a layer of chocolate cream topped with an airy rum-chiffon layer, and a final layer of whipped cream. My recipe substitutes the rum with a lovely caramel-infused chiffon layer. The contrast of flavors and textures in this pie make it a delightful treat.

It's very important that you read through the entire recipe, and prep/measure out all your ingredients before you begin. Trust me on this. Also take note that the amounts of sugar and water can be tricky; the amount listed in the ingredient section is the total amount used, but in the instructions the water and sugar are both divided and used at different steps in the recipe.

Equipment needed: A food processor, hand held mixer, and at least two medium-sized identical mixing bowls (you'll divide the pie filling evenly between the bowls; you just have to 'eye ball it' and it's easier to divide evenly if the bowls are identical.)


This recipe adapted from: Cooks Country magazine.


Non-Alcoholic Black Bottom Pie

by The Goldilocks Kitchen
Prep Time: 1 1/2 hours
Cook Time: 50 minutes
Ingredients (8 to 10 servings)
    crust
    • 28 Oreo cookies, broken into rough pieces
    • 4 tablespoons unsalted butter, melted
    pie filling
    • 2/3 cup sugar
    • 4 teaspoons cornstarch
    • 2 cups half-and-half
    • 4 large egg yolks plus 1 egg white
    • 5 ounces semisweet chocolate, chopped fine
    • 3 tablespoons Torani caramel syrup flavoring
    • 2 tablespoons water
    • 1 teaspoon unflavored gelatin
    • 1/4 teaspoon cream of tartar
    • 3 cups sweetened whipped cream
    Instructions
    1. Move an oven rack to middle position and set oven to heat to 350 degrees. Grind the broken cookies in a food processor to fine crumbs. Drizzle melted butter over crumbs. Replace lid and process for about 10 seconds to evenly distribute the butter. (It may be necessary to scrape down the sides once, I had to.) Pour the moist crumbs into a pie plate and press evenly over the bottom and up sides. I like to use a flat bottomed, metal measuring cup for this. Place in the fridge for 20 minutes before placing in the oven to bake for about 10 minutes. Set aside to cool.
    2. Moving on to the filling: whisk 1/3 cup sugar, cornstarch, half-and-half and egg yolks in a saucepan. Cook over medium heat, stirring constantly, until mixture comes to a boil, about 8 minutes.
    3. Divide the custard evenly as best you can between two identical bowls. Whisk chocolate into one bowl until smooth, then pour into the now cooled pie crust and use a spatula to create an even surface. Place in the fridge. Whisk caramel syrup, 1 tablespoon water, and gelatin into a small bowl and let mixture sit for 5 minutes. Then stir it into the plain custard. Set the bowl of caramel custard in the fridge for about 20 minutes, stirring occasionally until it's wobbly, but not set.
    4. Combine the remaining sugar, egg white, remaining water and cream of tartar in a large heatproof bowl set over a medium saucepan filled with 1 inch of barely simmering water. (Do not let the bowl touch the water.) Using a hand held mixer, beat the mixture on medium high to soft peaks, about 2 minutes. Remove the bowl from the heat and continue to beat until until the mixture is very thick and glossy and has cooled to room temperature, about 3 minutes.
    5. Bring out the caramel custard from the fridge and whisk the cooled egg white mixture in until smooth. Pour into the pie plate over the chocolate layer. Refrigerate at least 3 hours. Top with the sweetened whipped cream and serve.
    Powered by Recipage

    Tuesday, January 21, 2014

    Strawberry Chocolate Chip Cookies


    Anyone that knows me knows my absolute favorite treat ever is chocolate dipped strawberries. I have to credit Sallysbakingaddiction.com for this fantastic recipe for Strawberry Chocolate Chip cookies. She has a fabulous blog and I recommend you check it out. I got a little side tracked when I found this recipe and jumped off the diet bandwagon for a bit. But it's all good, I'll just be jumping right back on...

    Sally has discovered a fabulous technique for using boxed cake mixes to make cookies~ genus idea for sure. These cookies would be perfect for a Valentines day treat, or heck, whenever you want to treat yourself! 

    These cookies will bake up very very soft and it's important to let them cool on the baking sheet a bit before removing them to a cooling rack. I think they look much cuter when chocolate chips are actually pressed into the tops of each dough ball before baking, and I've specified that in the recipe. I usually put more chocolate chips in my chocolate chip cookie recipes than is called for, because I am a professed chocoholic. But I actually found that less is more when using the strawberry cake batter. I found my taste buds overwhelmed with chocolatiness and I wanted to taste more of the strawberry flavor, so I re-wrote the recipe a bit to reflect my tastes. You will love how simple and quickly these cookies will go from a picture to your plate. Gotta try em! 
    Enjoy :0)


    Strawberry Chocolate Chip Cookies

    by The Goldilocks Kitchen
    Prep Time: 10 minutes
    Cook Time: 10 to 12 minutes
    Ingredients (2 dozen)
    • 1 box of strawberry cake mix
    • 1 teaspoon baking powder
    • 2 large eggs
    • 1/3 cup vegetable oil
    • 1/2 teaspoon vanilla
    • 1 cup semi-sweet chocolate chips
    • 1/4 cup chocolate chips for garnish
    Instructions
    1. Adjust oven racks to upper middle and lower middle position. Set oven temp to 350 degrees. Line two large baking sheets with parchment paper.
    2. In a large mixing bowl, whisk together the cake mix and baking powder.
    3. In a smaller bowl, or a stand mixer bowl, mix eggs, oil, and vanilla. Slowly incorporate the dry cake mix into the wet ingredients. The dough will be stiff. Mix in 1 cup of chocolate chips.
    4. Place cookie dough balls on prepared baking sheets. Press the remaining 1/2 cup of chocolate chips into the tops of the dough balls.
    5. Bake for 10 to 12 minutes, rotating your baking sheets from upper to lower and spinning back to front. Pull them out if you see any cookies begin to brown. ( There's nothing wrong with a touch of brown, they just don't look as pretty.) Let the cookies cool on the baking sheet for 5 minutes and transfer to a wire rack to cool completely. They will be very soft. Serve.
    Powered by Recipage

    Tuesday, January 14, 2014

    Big and Chewy Low-fat Chocolate Chip Cookies


    I love sneaky healthy recipes. You know what I mean, the ones that are so delicious you have no idea it's healthy or low-calorie/low-fat? If you're one of the millions who've made new years' resolutions to get healthy, then you will welcome this recipe for Big and Chewy, Low-Fat Chocolate Chip Cookies. With 120 Calories, 3 grams of fat/2 grams saturated fat each, you can absolutely reward yourself with one of these cookies and stay within your daily calorie allowance. No guilt!

    The sun highlights melty chocolate chips on
    Big and Chewy Low-Fat Chocolate Chip Cookies.
    Here at the Goldilocks Kitchen, I regularly cook with real butter, and add a generous amount of salt, pepper and other seasonings to my food. I make no excuses for it, I want to make and eat savory and delicious food. However, I had to change my ways last summer when my husband joined a special weight-loss program called 'The Biggest Winner'. (Yes, obviously based after a very popular TV show with a similar name.) He was limited to 1500 calories a day, and a daily work out with his team made his already busy days even more demanding. Since I packed his lunches and made dinner most nights, who ended up doing most of the calorie counting?
    Me :0) 

    So often recipes labeled 'healthy' are void of flavor,
    making eating them about as joyful as eating cardboard. I found some fantastically delicious recipes that didn't sacrifice flavor for health factor. Our favorites will be featured over the next few weeks on The Goldilocks Kitchen to help you reach your healthy goals! Starting with Big and Chewy, Low-Fat Chocolate Chip Cookies.

    I enjoy this recipe so much that it's become my go-to recipe whenever I get a hankerin' for chocolate chip cookies. And the dough is the best part- I'm totally a raw-egg cookie dough addict. It will probably kill me someday. But hey, we all choose our poison right?  Muahahaha.... :0) 

    The main reason this recipe is so stinkin' good is that much
    of the butter in a standard chocolate chip cookie is replaced with.....
    Browned butter. It makes your kitchen
    smell yummy!
    drum roll......dates! In this recipe you'll learn how to create a date puree to cut back on fat and calories. AND they're delicious too. The second reason you'll love this recipe is that the rest of the butter you do use will be browned on the stove top. If you've never done it before, just check out the picture of the melted butter at right and let that be your guide. You simply melt the butter in a small pan over medium heat, swirling often, until the aroma smells a bit nutty and the butter browns. (The color pictured is what you're aiming for.) You'll see darker particles sink to the bottom~ those are just fat molecules getting cooked and is normal. I love what browned butter does for cookie recipes. It adds a really fantastic depth of flavor.

    Learning these two techniques will be a great help for you on your journey to becoming a culinary expert. By the way, my husband lost about 30 pounds in 3 months and won second place in the competition! I was so proud of him :0)
    And I'm sure it had nothing to do with these Low-Fat Chocolate Chip Cookies. (Wink, wink.)

    Big and Chewy Low-Fat Chocolate Chip Cookies

    by The Goldilocks Kitchen
    Prep Time: 30 minutes
    Cook Time: 15 to 18 minutes
    Ingredients (18 cookies)
    • 1 cup water
    • 4 tablespoons chopped dates
    • 4 tablespoons unsalted butter
    • 2 cups all-purpose flour
    • 1/2 teaspoons baking soda
    • 1/2 teaspoons table salt
    • 1 1/2 cup packed light brown sugar
    • 1 large egg
    • 2 teaspoons vanilla extract
    • 1/2 cup semisweet chocolate chips
    Instructions
    1. Set oven temperature to 325 degrees. to Bring water to a boil in a small saucepan and add the dates. Simmer, uncovered, until most of the water has evaporated and the dates are tender, about 18 to 20 minutes.
    2. While the dates are simmering, whisk flour, baking soda and salt in a medium bowl and set aside. Place butter in a small saucepan and cook over medium heat, gently swirling often, until aroma becomes nutty and the butter is brown, about 4 minutes. (If you are using a dark or nonstick pan, pour out the butter into a heatproof bowl to properly assess the color and whether the butter is sufficiently cooked or not. I do this two or three times to make sure I have the right color.) When done, set aside.
    3. When dates are done simmering, remove from heat. Pour contents of saucepan into a fine-mesh strainer over a bowl. Using a spatula or wooden spoon, press the liquid out into the bowl. Discard the liquid and scrape the remaining puree from the strainer into the bowl.
    4. With a stand or hand held mixer, beat browned butter, brown sugar and date puree until blended, scraping down the bowl if needed. Beat in egg and vanilla. Add flour mixture (If using a stand mixer, switch to paddle for this step) and mix on low speed until just combined. Reserve two tablespoons of chocolate chips from the 1/2 cup and set aside. Stir the remaining chips into the dough.
    5. Form dough into 18 cookies (about 3 tablespoons each for size) and space 2 inches apart on two baking sheets lined with parchment or wax paper. Press 3 or 4 chocolate chips into the top of each ball of dough. Bake until the edges are light golden brown and the centers are soft and puffy, 15 to 18 minutes, rotating your cookie sheets front to back and upper to lower. Cool cookies on baking sheets. Serve.
    Powered by Recipage

    Thursday, January 9, 2014

    Yum-Yum Dessert


    A lovely slice of Yum-yum dessert to finish off our pick-nick.

    This dessert is a classic in my family. Once you make Yum-yum dessert, it's sure to become a favorite for you and your family too!

    My husband and his family grew up with this dessert. It's practically a tradition to end Sunday dinner with this tasty treat. It's a bit of a 70's throwback, with toasted coconut sprinkled on top and pistachio or chocolate pudding as part of the filling. A foundation of homemade shortbread with chopped nuts is topped with layers of sweetened cream cheese, pudding, whipped topping and toasted coconut. It's a mix of flavors that are sweet, buttery and delightful.

    Here you can see all the layers of flavor in Yum-yum dessert.

    At first I struggled with getting the bottom layer of shortbread-like crust to bake correctly in the oven. It's a bit difficult to judge when it's done baking. I made the recipe several times to make sure it would come out just right for you. There are definitely some no-no's when making Yum-yum: Don't melt the butter, just use softened instead. Also the baking time changes quite a bit depending on which type of pan you use. A metal baking pan will shorten your baking time by almost 10 minutes in some ovens. The crust should be firm to the touch and just barely golden brown when done. Make sure you let it cool completely before continuing on to the other layers.

    Once you have the shortbread crust baked, making the rest of the dessert is fast and easy. Just make a layer, spread it on, and pop it in the fridge while you make the next layer.

    When you serve it to your friends and family, make sure to save a piece for yourself; or you may not get one! It goes fast :0) I hope you enjoy making and eating Yum-yum dessert as much as my family does.

    Equipment needed: A 13 by 9 inch casserole dish. A food processor is very handy for making the crust, and a hand-held mixer for whipping up the middle layers. Either one is not essential though , a fork and a whisk work too, it just takes a little longer.

    Yum-yum Dessert

    by The Goldilocks Kitchen
    Prep Time: 25 minutes
    Cook Time: 20 to 30 minutes
    Keywords: bake dessert American
    Ingredients (15 servings)
    • 1 cup all-purpose flour
    • 8 separate tablespoons salted sweet cream butter at room temperature
    • 1/2 cup of chopped walnuts or pecans
    • 8 oz package of cream cheese, softened to room temperature
    • 1 cup of powdered sugar (confectioner's sugar)
    • 1 12 oz. container of whipped topping such as Cool Whip
    • 2 3.9 oz boxes of instant chocolate pudding or (2) 3.4 oz boxes of instant pistachio pudding
    • 3 cups of milk
    • 1/2 cup of shredded coconut, toasted in the oven for about 5-7 minutes, or until portions turn golden brown.
    Instructions
    First layer
    Set oven to 350 degrees. Combine flour, nuts and butter in a food processor. Process until one or two solid clumps of dough form, about 10 seconds. Press into the bottom of a 9 by 13 inch baking dish using a spoon or by hand.
    Bake for 20 minutes if using a metal baking pan, or 25 to 30 minutes if using a glass dish. Remove when the crust has just begun to golden and is firm to the touch. Let cool 20 minutes before proceeding with the other layers.
    Second layer
    In a mixing bowl, place softened cream cheese, powdered sugar, and one cup of whipped topping. Mix until smooth. Spread over crust in pan, and place in the refrigerator.
    Third layer
    In a mixing bowl, add both pudding packets and milk together. Mix until smooth and thick, about three minutes. Pour and spread out over the cream cheese mixture. Place in the refrigerator.
    Fourth layer
    Set your oven to 350. on a baking sheet, spread out the coconut. Toast in the oven until portions are golden brown, about 5 minutes. It toasts fast, so watch carefully not to burn it.
    While the coconut is toasting, spread the rest of the whip topping over the pudding. When the coconut is done toasting and cooled a bit, sprinkle it over the top. Serve.
    Powered by Recipage

    Saturday, December 28, 2013

    Chocolate Flan Cake

    Chocolate Flan Cake
    This, my friends, is the dessert you've been searching for! A fabulous and tasty addition to any gathering or party, you'll love this cake because it's fun and easy to make. This dessert consists of deeply flavored chocolate cake topped with smooth, creamy flan and caramel sauce.
    What is flan you ask? Modern flan is a type of egg custard flavored with caramel. It's an old European treat, originating from the middle ages and was served in pastry crust (which would be really yummy too). Here in the US most flan is treated as a pudding of sorts topped with caramel. 
    I thought this cake was really fun and easy to make. It's fairly simple, and even does a magic reversal in the oven. The flan and cake layers switch places while baking! You can use any type of caramel topping, whatever you like best, as long as you can warm it in the microwave so it's easy to pour. An important thing to consider when making Chocolate Flan Cake is that it needs two hours to cool after baking and another eight hours to set in the fridge. So plan well the time you bake it! I also recommend a high quality chocolate to use in the cake. Ghirardelli and Callebaut are my favorites. I always use dutch processed cocoa in my baking as it's the number one choice in taste tests for cocoa. The chocolate cake is a great pairing for the flan, and should be it's equal in depth of flavor. 

    Equipment needed: A large Bundt pan, roasting pan and blender.


    Chocolate Flan Cake

    by The Goldilocks Kitchen
    Prep Time: 25 minutes
    Cook Time: 90 minutes
    Ingredients (16 slices)
      Cake
      • 1/2 cup caramel sauce or topping
      • 1/2 cup plus 2 tablespoons of all-purpose flour
      • 1/3 cup dutch processed cocoa
      • 1/2 teaspoon baking soda
      • 1/8 teaspoon salt
      • 4 ounces bittersweet chocolate, chopped
      • 6 tablespoons butter
      • 1/2 cup buttermilk
      • 2/3 cup sugar
      • 2 large eggs
      • 1 teaspoon vanilla extract
      flan
      • 2 cans sweetened condensed milk (14 oz)
      • 2 cups whole milk
      • 5 oz cream cheese
      • 5 large eggs plus 4 egg yolks
      • 1 teaspoons vanilla extract
      Instructions
      1. Set an oven rack at middle position and heat oven to 350 degrees. Grease a large nonstick Bundt pan well. Heat the caramel topping in the microwave for about 20 to 30 seconds and pour into the bottom of the pan.
      2. Whisk the flour, cocoa, baking soda and salt in a mixing bowl. In another large mixing bowl, microwave the chocolate and butter. Mix every twenty to thirty seconds until fully melted and smooth. Whisk in the sugar, buttermilk, eggs and vanilla into the melted chocolate. Then stir in the flour mixture until fully incorporated. Pour over caramel in the bundt pan.
      3. In a large blender, process all the ingredients for the flan until smooth, about a minute. (If a blender is not available, you can beat the mixture on high for about 3 to 4 minutes until smooth.) Place the Bundt pan in a deep roasting pan and gently pour flan over the cake mixture. Fill the roasting pan with water until it reaches about half-way up the Bundt pan. Place in the oven and bake for 75 to 90 minutes, or when a toothpick inserted into the cake comes out clean.
      4. Remove the Bundt pan and place it on a cooling rack for 2 hours. Then refrigerate for at least 8 hours to set the flan. When ready to serve, place the bottom half of the pan in a bowl of hot water for about a minute and run a knife gently around the edges (conforming to the shape of the pan) to make sure no cake is sticking to the edge. Place your serving platter over the cake, and holding it firmly, flip the cake over and slowly lift off the Bundt pan. Slice the flan and serve.
      Powered by Recipage

      Tuesday, December 24, 2013

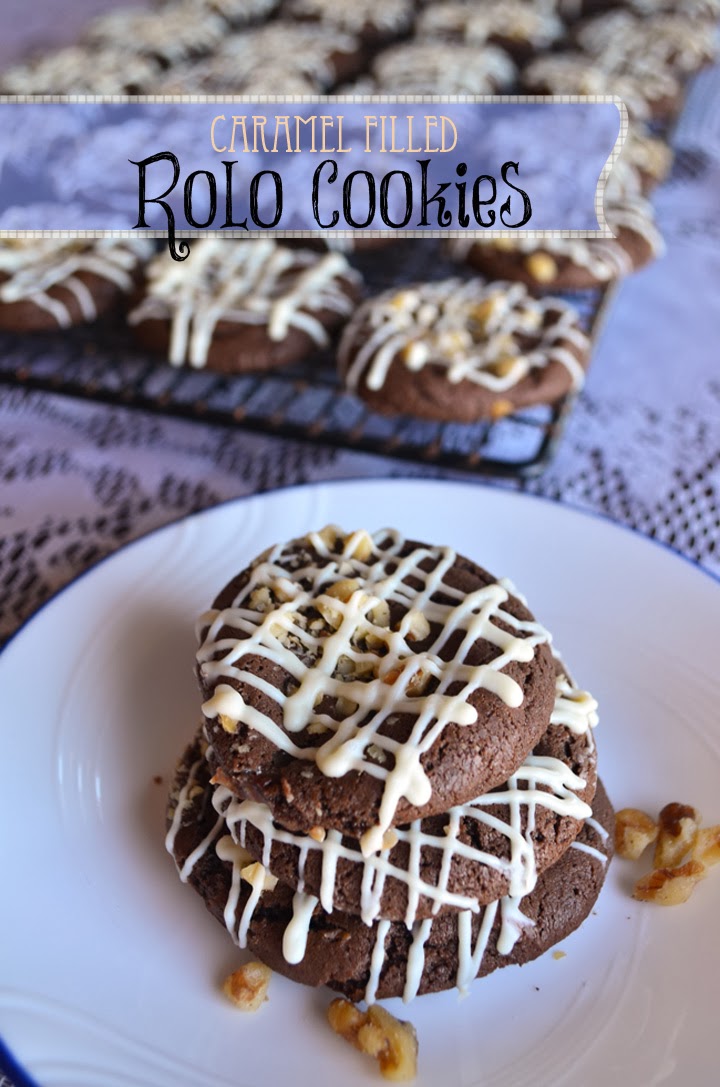
      Rolo Cookies

      Delightful little Rolo Cookies

      In the midst of all the cookie recipes out there, I found this little gem and wanted to share it with you. These Rolo cookies are not just lovely to look at, but have a surprise center of ooey gooey chocolate and caramel. The recipe I'm sharing would be great for the holidays, (it makes 50+ cookies!) however these Rolo Cookies can be enjoyed any time of the year.

      The process of getting a piece of Rolo candy inside a cookie isn't as hard as I thought it would be. I rolled a medium/smallish ball of dough in my hand and pushed that candy right down inside it. I then 'smooshed' the dough over the end of the candy and rolled it in my hand again. It perfectly encased the candy in a nice round dough ball. After a couple tries, I would scoop out just the right amount of cookie dough to completely cover the chocolate candy. Don't make the coating too thin, or the candy may burst out and ooze caramel all over your cookie sheet. (Ask me how I know...)

      For the melted white chocolate drizzle, I purchased Ghiradelli white chocolate melting wafers. I just poured some in a bowl and microwaved it until it had sufficiently melted. I tried using a spoon to drizzle, but the chocolate just fell off in blobs. So I turned to a zip lock bag. By snipping just the tiniest bit of corner and pouring the melted chocolate inside, I had a makeshift piping bag. Drizzling the white chocolate on the cookies was super fast and easy after that. I hope you enjoy these great cookies as much as I have!


      Rolo Cookies

      by The Goldilocks Kitchen
      Prep Time: 40 minutes
      Cook Time: 8 to 10 minutes
      Keywords: bake cookie
      Ingredients (serves 50)
      • 2 1/2 cups all-purpose flour
      • 1 teaspoon baking soda
      • 3/4 cup cocoa powder
      • 1 cup unsalted butter, room temperature
      • 1 cup sugar
      • 1 cup brown sugar
      • 2 large eggs
      • 2 teaspoons vanilla extract
      • 2/3 cup finely chopped walnuts
      • 8 oz white chocolate melted
      • 50 Rolo Candies
      Instructions
      1. Place oven racks in upper middle and lower middle position and set oven to heat to 350 degrees. In a large mixing bowl, whisk the flour, baking soda and cocoa together.
      2. In a separate bowl, cream the sugars and butter together. Whisk in the eggs and vanilla until fully incorporated. Mix the flour/cocoa mixture into the wet ingredients to make the cookie dough.
      3. Roll a roughly 1 to 1 1/2 inch diameter ball of dough in your hand. Press one Rolo candy into the center until the edges of the dough are higher than the edge of the chocolate candy. Roll the dough again in your hand. It should completely surround the Rolo. The candy must be completely covered by the dough or the caramel will leak out while baking. Lightly touch the top of the dough ball into the chopped nuts. Place on a cookie sheet with the nut side up. Repeat with the remaining dough and candy until you have filled two cookie sheets.
      4. Place cookie sheets in the preheated oven and bake for 8 to 10 minutes, rotating front to back and upper to lower halfway through baking.
      5. Remove cookies to a cooling rack. When baking sheets are emptied, bake the next two batches. When the cookies are cool, drizzle with the melted chocolate using a spoon, or squeeze out of a ziplock bag with a tiny hole cut in the corner. Let the chocolate cool and set. Serve.
      Powered by Recipage

      Saturday, December 7, 2013

      DIY Peppermint Marshmallows


      These homemade marshmallows are a blast! Fluffy and springy they are tons of fun to make, especially with children. The best part is getting to cut them out. But I also love the versatility of what can be created. The possibilities are endless. I recent watched a cooking show that featured mango flavored marshmallows! Wow!
      For now, to suit my holiday purposes I'll stick to vanilla or peppermint flavored marshmallows to melt into my hot chocolate. Yum!

      You can flavor these DIY marshmallows with anything you like. You can color them any color you like. You can cut them out into any shape you want. You can use cookie cutters to cut out initials and then coat them in chocolate as a gift! My mind could go on and on and on. Mmmmm,  I do love chocolate covered marshmallow...


      Coming back to reality, this recipe is a real treat. You've got to try it. Plus it makes tons of marshmallows to last you a very long time. My children had a hay day with my cookie cutters, cutting out all sorts of shapes. I would have pictured them here but the 'mallows didn't last long enough :0)

      Some important things to know before creating these marshmallows at home. You will need either a candy thermometer or an instant-read thermometer. You don't need a stand mixer, but using a hand held mixer will definitely take longer to whip up the ingredients. AND this can get super messy if you try to get all the marshmallow cream out of the bowl when you are transferring to the cookie sheet. Don't worry if there is some left in the bowl. The stickiness is intense and it will leave threads of marshmallow on everything. 
      I hope you enjoy these marshmallows and that you get creative with them. It's really a treat!


      DIY Peppermint Marshmallows

      by The Goldilocks Kitchen
      Prep Time: 30 minutes
      Cook Time: chill 3 hours
      Ingredients (80-100 marshmallows)
      • Crisco shortening (for oiling the pan)
      • 12 1/2 X 17 inch rimmed baking sheet (can use 13 X 9 for thicker marshmallows)
      • about 1 cup of powdered sugar
      • 2 tablespoons plus 2 1/2 teaspoons of powdered unflavored gelatin
      • 1 cup cold water, divided into 1/2 cups
      • 2 cups granulated sugar
      • 1/2 cup light corn syrup
      • 1/4 teaspoon salt
      • 2 large egg whites
      • peppermint flavoring extract
      • Optional: food coloring
      Instructions
      Start by thoroughly greasing a 12 1/2 by 17 inch rimmed baking sheet with crisco. Dust with powdered sugar and set aside.
      In the bowl of a stand mixer, mix 1/2 cup of cold water and gelatin and set aside.
      In a 3 quart heavy sauce pan, combine the other 1/2 cup of water, granulated sugar, corn syrup and salt and heat on medium low. Stir until the sugar is dissolved. Bring up the heat to medium and boil until the mixture reaches a temperature of 240 degrees. Remove from heat and pour over the gelatin. Stir to combine.
      With the whisk attachment, beat the mixture until it is white, thick and nearly tripled in volume, about 5 minutes.
      In a separate mixing bowl, whip the egg whites until stiff peaks form. Add them to the whipped sugar. Add three drops of concentrated peppermint oil. (I used LorAnn brand in a .125 oz bottle). If you are using a flavoring syrup, like Torani, which is in a large bottle, a tablespoon would be adequate to flavor the batch of marshmallows.
      Whip until combined and pour out onto your greased/dusted baking sheet. Use a frosting spatula to smooth the top. With red food coloring, drop about five drops onto the mixture and swirl around with a skewer or knife to create red streaks. Sift powdered sugar over the top (about 1/8 to 1/4 cup) and chill, uncovered in the fridge for 3 hours.
      Run a hot knife around the edges and invert onto a large cutting board. Cut out shapes with cookie cutters, or squares with a pizza cutter. I used the inside of a doughnut cutter to create the small rounds pictured.
      Powered by Recipage

      Real Hot Chocolate, Really Fast!


      I love hot chocolate. Love it, love it, love it! Since I'm not a coffee drinker, hot chocolate is my go-to hot drink. This recipe for REALLY FAST Real Hot Chocolate is perfect for anyone who has a busy schedule and can't afford to stand stirring over a stove top. I always kept my pantry stocked with powdered hot chocolate mix, even in the summertime. But now I keep my freezer/fridge stocked with hot chocolate mix instead. What? Why the freezer, you ask? Well, let me share this recipe with you and all will become clear...

      It is so ridiculously simple :0) All you do is purchase your favorite brand of Semi-sweet Chocolate chips (I prefer Ghiradelli.) and melt them in the microwave with heavy cream. The result is a lot like an extra thick chocolate ganache that ends up the consistency of cookie dough. Once it's cooled you can take a large spoon or ice cream scoop and create individual sized portions to keep wrapped in your fridge or freezer. When you're ready just open and gently plop a ball of delicious real chocolate into a steaming cup of milk, stir, and you have instant, real, hot chocolate to enjoy on a cold snowy day, or any time of year you may fancy. Enjoy :0)
      Instant Real Hot Chocolate

      by The Goldilocks Kitchen
      Prep Time: 2 minutes
      Cook Time: 2 hours in fridge
      Keywords: chocolate
      Ingredients (10 servings)
      • 1 bag of chocolate chips (12 oz)
      • 1 cup of heavy cream
      • pinch of salt
      Instructions
      Empty the bag of chocolate chips into a microwave safe mixing bowl. Add the cream and microwave for about 2 to 2 1/2 minutes (stirring every 30 seconds) until the mixture has blended together.
      Chill for 2 hours, or until the mixture sets up and becomes solid.
      Using a spoon or ice cream scoop, create balls about 2 inches in diameter (about 3 tablespoons each) and wrap them individually in plastic wrap. Place several in a large zip-lock bag. The chocolate will keep in the fridge for 5 days or freezer for up to 2 months.
      Powered by Recipage

      Friday, November 22, 2013

      Chocolate Pecan Pie

      This Recipe for easy southern chocolate pecan pie is the best homemade dessert for any party or holiday celebration! A classic with a chocolate twist. Because everything is better with chocolate. Top with caramel flavored whipped cream for the perfect garnish!

      Holiday pie made from scratch? There is rarely a thing in the world more delicious or rewarding!
      I am the type of person who feels chocolate can make anything better, especially pie :0) Adding chocolate to Pecan pie just takes it to a whole new level! Plus a dollop of Caramel whipped cream on top puts this pie over the top. (See recipe below.) It's the perfect complementary flavor for the pecans and the caramel matrix in which they lay.
      This Recipe for easy southern chocolate pecan pie is the best homemade dessert for any party or holiday celebration! A classic with a chocolate twist. Because everything is better with chocolate. Top with caramel flavored whipped cream for the perfect garnish!

      I will never forget the first time I had a slice of Pecan pie. It was just after I had moved to Kingston, Ontario Canada. Some friends of mine had me over for a lovely dinner. Afterwards, I was offered a piece of pee-can pie.
      "What's that?" I said.
      My friend stared at me for a moment with eyebrows raised.
      "You've never heard of pee-can pie before?!"
      "No, I really haven't. I'm thinking it must be a Canadian dish?"
      "I'm pretty sure people from the states eat it too...here, try it."
      She place a slice of Pecan pie on my plate. Boy I felt stupid then!
      "Oh!" I said. "Pecan pie! I was totally confused~ you guys just pronounce it differently here, ha ha, My bad."
      I was mentally kicking myself the rest of the evening; feeling so stupid for not picking up on that! And I guess some in 'the states' pronounce it that way too :0) Even as I ate the pie that night, I decided I wasn't a huge fan of Pecan pie. I've just never been one to love nuts in my food. (Unless it's chocolate cashew or peanut clusters, I love them! See there's that whole adding chocolate to stuff makes it better thing :0)

      This Recipe for easy southern chocolate pecan pie is the best homemade dessert for any party or holiday celebration! A classic with a chocolate twist. Because everything is better with chocolate. Top with caramel flavored whipped cream for the perfect garnish!

      Anyway, I naturally gravitate towards the chocolate pies during the holidays or whenever I have a choice of pie. So when I was watching an episode of Cake Boss on Netflix and saw them making Chocolate Pecan Pie (among other pies), my curiosity was piqued. I'd never herd of chocolate pecan pie before. I had to try it! And there, in one of my baking books I found a recipe for it. Bada-bing, bada-bang, bada-boom! After I tasted the first bite I wanted more and more!

      I also think I enjoyed this pie so much because the pecans are roasted in the oven, softening them a bit and adding a new dimension of flavor. They are also chopped, which texture I preferred to whole nuts. Plus, adding in three different types of chocolate, semi-sweet, milk and white really was a delight for my taste buds. An important note: an instant read thermometer is essential to creating this pie. If you don't have one, see if you can borrow one from a friend!

      Want to know a great trick for creating a gourmet pie? Flavor your whipped cream topping! Yes, a simple but delightful addition of flavored whipped cream can complement just about any pie. I love Caramel flavored Whipped Cream on my Pumpkin and Pecan pie. Whip it up just before you are ready to serve your slices. Find the recipe following the one below for Chocolate Pecan pie.


      Chocolate Pecan Pie

      by The Goldilocks Kitchen
      Prep Time: 30 minutes
      Cook Time: 55 to 65 minutes
      Ingredients (8 to 10 servings)
      • 1 recipe for prebaked Pie Shell
      • 1/3 cup of semi-sweet chocolate chips
      • 1/3 cup of milk chocolate chips
      • 1/3 cup of white chocolate chips
      • 3 tablespoons unsalted butter, cut into 1 inch pieces
      • 3/4 cup packed dark brown sugar
      • 2 large eggs
      • 1/2 cup light corn syrup
      • 1 teaspoon vanilla
      • 1 cup pecans, toasted and chopped into small pieces
      Instructions
      1. While preheating your oven to bake the pie shell, roast the whole pecans on a rimmed baking sheet for about 5 to 7 minutes. Watch carefully so they don't burn and stir them every couple minutes. Chop them up when they have cooled sufficiently.
      2. Follow the directions for partially baking the pie crust. Melt the butter in the bowl of your stand mixer by placing it in a pot of water set over medium low heat. The water should not simmer.
      3. Remove the bowl when the butter is completely melted and mix in the sugar and salt with a wooden spoon. Stir until all the butter is absorbed. Attach the bowl to the stand mixer. With the whisk attachment, beat in the eggs, then corn syrup and vanilla.
      4. Return the bowl to the pot of hot water and stir the mixture until it reaches 130 degrees on an instant read thermometer. This can take anywhere from 10 to 15 minutes. (The mixture should be shiny and hot.) Remove from the heat and stir in the toasted chopped pecans.
      5. When the pie shell comes out of the oven, pour the pecan mixture into the pie shell. Sprinkle the chocolate chips over the pie filling and use the back of a spoon to push them down into the filling. Adjust the oven temperature to 275 degrees and move an oven rack to the middle position. Bake the pie for 55 to 65 minutes, when the filling is set but soft when pressed with the back of a spoon. Transfer to a wire rack to cool for 4 hours.
      Powered by Recipage


      Caramel Whipped Cream

      by The Goldilocks Kitchen
      Prep Time: 5 minutes
      Cook Time: about 3 to 5 minutes
      Ingredients (8 servings)
      • 1 1/3 cup whipped cream
      • 1 tablespoon brown sugar
      • 1 tablespoon of Torani Caramel syrup or other flavor or liquor of your choice
      Instructions
      1. Chill bowl and beater(s) in a freezer for about 10 minutes. Add all ingredients into the bowl and whip at low speed for about 30 seconds, or until the mixture gets frothly with bubbles. Increase the speed to medium for another 30 seconds. Then turn the speed to high and whip until the cream is nearly doubled in volume, smooth, thick, and soft peaks form when you remove the beaters or whisk, about 1 to 2 minutes. (Soft peaks are when the point of the peak falls over and touches the whipped cream. A stiff peak will stand up strait.)
      Powered by Recipage

      Saturday, October 26, 2013

      Chocolate Pudding Cake

      When I really want to indulge myself, I whip up a pan of Chocolate Pudding Cake. It's not the prettiest of desserts for serving to guests (unless you bake it up in ramekins as shown below), it's usually baked in an 8X8 square baking dish and is a little lumpy on the surface. But this dessert isn't about looks, it's all about taste!

      A chocolate cake with deep chocolate flavor is hiding a secret below, for it rests on a layer of delicious chocolate-pudding-like fudge at the bottom. Plus, this cake will even do a magic trick for you! When assembling the cake for baking, you place the pudding layer on top! Fascinatingly,  this cake inverts itself in the oven. Really its all about the science, and you know I love science :0)

      Cooking/baking is all about the science of chemistry. A subject which was actually my least favorite in college. (Funny because it is so intertwined with Geology. I didn't have a problem with it when applied to mineral and magma compositions, but that's for another time...) If those teachers just had us cooking real food for our experiments, instead of random chemical compounds,  I definitely would have taken more interest in it! In a nutshell, a good amount of chemical leavener (baking powder) causes the cake to rise up above the heavier pudding, and it sinks down to the bottom as the cake makes space for it to go there. It's also important to use dutch processed cocoa and good quality chocolate chips in the batter. (I go for Ghirardelli or Nestle chips) 'Dutch processed' is cocoa that has some if it's natural acidity neutralized. In taste tests, products made with dutch processed cocoa vs. natural cocoa won almost every time. You should be able to find it in most supermarkets. For this recipe, the chocolate flavors are magnified, and if a poor quality chocolate is used, you will be able to taste it.

      It is super important you don't overbake this cake. The pudding will dry up and you'll have little to none for eating. After pulling this cake out of the oven, it's also important to let it rest for at least 10 minutes. The pudding at the bottom needs this time to cool and thicken up a bit. Don't worry, the cake will still be deliciously warm for serving. This cake simply begs for a scoop of vanilla ice cream to go with it too. I just love the combination of hot cake and cold ice cream in my mouth!
      Chocolate Pudding Cake

      by The Goldilocks Kitchen
      Prep Time: 15 minutes
      Cook Time: 20-25 minutes
      Keywords: bake dessert Chocolate cake
      Ingredients (6 to 8)
      • 1 cup sugar
      • 1/2 cup Dutch-processed cocoa powder
      • 1 cup all-purpose flour
      • 2 teaspoons baking powder
      • 1/4 teaspoon salt
      • 1/2 cup milk
      • 4 tablespoons unsalted butter (1/2 stick), melted
      • 1 large egg yolk
      • 2 teaspoons vanilla extract
      • 1/2 cup semi-sweet chocolate chips
      • 1 cup boiling water
      • Vanilla ice cream
      Instructions
      1.Set oven temperature to 350 degrees and move oven rack to the middle position. Spray an 8-inch square baking dish(metal or glass) with cooking spray.
      2. Whisk 1/2 cup sugar with 1/4 cup cocoa in a small bowl. Whisk flour, 1/2 cup sugar, 1/4 cup cocoa, baking powder, and salt in a large mixing bowl. Whisk milk, melted butter, egg yolk, and vanilla in a medium mixing bowl until smooth. Stir the milk mixture into the flour mixture and fold in the chocolate chips.
      3. with a spatula, scrape batter into your prepared baking dish and spread into corners. Sprinkle reserved cocoa mixture evenly over the top. Gently pour boiling water over the cocoa. Do NOT stir.
      4. Bake until the top of the cake looks cracked, sauce is bubbling and toothpick inserted into cake areas comes out with a few moist crumbs attached, about 20 to 25 minutes. It's very important to not overbake this cake, or you won't have any or vary little pudding on the bottom. Cool for at least 10 minutes before serving. Serve with a scoop of vanilla ice cream.
      Baby Cakes in Ramekins
      Spray eight 6-ounce, ovenproof ramekins with cooking spray. (Can use coffee mugs too.) Fill each cup with 2 tablespoons of batter. Top each with 1 and 1/2 tablespoons cocoa mixture, followed by 2 tablespoons boiling water. (The water turns into pudding, so if you like more pudding, add more water.) Arrange cups on a baking sheet and bake until tops are just cracked, about 20 minutes.
      Powered by Recipage

      Saturday, October 5, 2013

      John Hoosier Cake


      I am so proud to be able to share this deliciously moist, time-honored chocolate cake recipe with all of you! It has been handed down through at least 4 generations in our family, possibly more. It's a simple looking sheet cake, with fantastic rich, tangy, chocolaty flavor. Who is John Hoosier you ask? Great question. When this recipe was given to me by my mother-in-law I asked her the same question, and she had no idea! I always wondered about the name every time I made this classic Sunday dessert. But then I would get busy making it, eating it and then the distractions of life would call my thoughts another way. My childhood A.D.D. comes back to haunt me I swear! :0)

       So in sharing this recipe with you I decided I better do a little research. I expected to find some notable
      'John Hoosier' from antiquities that did something, or was something, that would cause a simple but delicious cake to forever bear his name. I could not find any notable 'John Hoosier' in history. However, the moniker 'Hoosier' is well know to local southern Indiana residents and is said to originate there in the mid to late 1800's. The term then, some would argue, was used for various simple folk from dock workers to backwoods-type immigrant settlers. Some think that it started when they would yell out "who'sh'ere?" So as not to shoot a friend or family member approaching in the forest :0) As the years progressed into the early 1900's if you were called a Hoosier it was not a nice thing to say; more like saying you were a lazy redneck! Well now, hold on just a minute! I do recall Grandma Kreps referring to this cake as 'a poor man's cake'. So we've come to the answer to the question: the cake's not named after a person, but rather it's a label for a poor, back-woods redneck cake!

       The evidence is there; the cake is made with butter-milk (sour milk), a traditional old-time family's milk. After milking the cow the fresh milk was left to sit for a time so the cream could separate and be skimmed off for churning butter. The remaining milk usually had soured a bit. Nowadays you can purchase cultured buttermilk, in which bacteria is added to create the tart flavor.
      When I received this recipe I was informed that there's an easy substitute for buttermilk if you don't have any handy.
      Adding 1 and 1/2 tablespoons of apple cider vinegar to one cup of milk will curdle it and give a similar tartness. I made it using this method many times and the cake is wonderful! So moist and flavorful. Honestly, I've made this twice with store bought buttermilk and it tasted so bland! The 'substitute buttermilk' wins hands down for my family as being the tastier cake, and I won't make it any other way.

       Here's the recipe for you to enjoy, and may it become a family favorite for your go-to easy and delicious Sunday night dessert. Top off a hot slice of frosted cake with a scoop of vanilla bean ice cream. Those old-timers may have been poor but they sure knew how to make the best of it! :0)

      John Hoosier Cake

      by The Goldilocks Kitchen
      Prep Time: 20 minutes
      Cook Time: 30
      Ingredients (16 to 20 slices)
        Cake
        • 1 cup milk
        • 1 and 1/2 tablespoons apple cider vinegar
        • 2 cubes (1 cup) salted butter or margarine
        • 1 cup water
        • 4 tablespoons cocoa powder, and 2 more for dusting your pan
        • 2 cups all-purpose flour
        • 1 and 2/3 cup sugar
        • 3/4 teaspoon baking soda
        • 3/4 teaspoon salt
        • 2 eggs
        • 1 teaspoon vanilla
        frosting
        • 1 cube of salted butter or margarine
        • 4 tablespoons of cocoa powder
        • 1 pound of powdered sugar
        • 1/2 teaspoon vanilla
        • 1 cup of chopped nuts (optional)
        Instructions
        1 Mix the vinegar into the milk to create your buttermilk substitute and let it sit as you continue with the recipe.
        2.Move the oven rack to middle position and preheat oven to 350. Grease a 15.5 by 10.5 by 1.5 inch rimed baking sheet with Crisco and dust the entire surface with cocoa powder, tapping out the excess.
        3.In a small saucepan over medium heat bring to boil the butter, water and cocoa, stirring occasionally and remove from heat when boiling.
        4. In a large mixing bowl or the bowl of a stand mixer, combine and sift together the flour, sugar baking soda and salt. pour in the cocoa mixture and mix until combined. Add 2/3 cup buttermilk substitute, eggs and vanilla and mix until combined.
        5. Pour into your prepared baking sheet, tapping the bottom gently on the counter top a few times to release any trapped bubbles. Bake for about 30 minutes.
        6. While the cake bakes, prepare the frosting by combining the butter or margarine, what's left of your buttermilk substitute and 4 tablespoons of cocoa in a medium saucepan and bring to a boil. Remove from heat and add to the bowl of a clean stand mixer (or a large mixing bowl). With the paddle attachment on medium low speed add in the powdered sugar and vanilla. Beat on medium high for 2 minutes, scraping down the sides and bottom of the bowl half way through. Pour over a very warm cake, spreading out evenly with a spatula or knife and serve.
        Powered by Recipage

        Tuesday, September 17, 2013

        My most favorite dessert ever is...

        This recipe for Triple Chocolate Mousse cake is created with a base layer of dark chocolate mousse cake, followed by layers of rich milk chocolate and white chocolate mousse. A decadent indulgence :0)
        Gluten Free Triple Chocolate Mousse Cake

        Manna from heaven. Seriously. This is the dessert of all desserts!
        Recently I was asked to cook two cakes for a BSA (Boy Scouts of America) cake auction and this cake sold for the highest amount...$135! I was so happy to help out, and the folks that took this cake home said it was worth every penny.
        You will feel like you've died and gone to heaven when you take your first bite of Triple Chocolate Mousse Cake, which happens to be gluten free.
        I will always remember when I discovered this ultimate chocolate masterpiece while dining at one of my favorite restaurants in New Mexico. I thought that it was a one-of-a-kind restaurant creation until years later I stumbled across a recipe for it by Cooks Illustrated.  I was thrilled; then I read the instructions. A stand mixer was a requirement, and unfortunately I didn't own one. However, having this recipe in hand was certainly motivation to purchase one! Just last Christmas I finally added a KitchenAid stand mixer to my kitchen counter top and christened it with this recipe.

        This recipe for Triple Chocolate Mousse cake is created with a base layer of dark chocolate mousse cake, followed by layers of rich milk chocolate and white chocolate mousse. A decadent indulgence :0)

        This dessert is a real showstopper and absolutely a crowd favorite. Your friends and family will be so impressed with your cooking abilities when you serve them a slice! The base is made of modified chocolate souffle/flourless cake, sturdy enough to hold up the milk chocolate and white chocolate mousse layers on top. Again, a stand mixer and a springform pan are required for this recipe. So get the equipment you need and make it!


        Triple Chocolate Mousse Cake

        by The Goldilocks Kitchen
        Prep Time: 45 minutes
        Cook Time: 3 hours
        Ingredients (16 slices)
          Bottom Layer
          • 6 tablespoons of unsalted butter, cut into several pieces
          • 7 ounces of semi-sweet (or bittersweet, same thing just different names) bakers chocolate, chopped up/broken into small pieces
          • 1 and 1/2 teaspoons of vanilla extract
          • 4 large eggs, separated
          • a pinch of table salt
          • 1/3 cup of packed light brown sugar (crumble with fingers to remove any lumps
          Middle Layer
          • 2 tablespoons of cocoa powder
          • 5 tablespoons of hot water
          • 7 ounces of semi-sweet (or bittersweet) bakers chocolate, chopped up/broken into small pieces
          • 1 and 1/2 cups cold heavy cream
          • 1 tablespoon of granulated sugar
          • 1/8 teaspoon table salt
          Top Layer
          • 1 teaspoon powdered gelatin
          • 1 tablespoon of water
          • 6 ounces of white chocolate chips
          • 1 and 3/4 cups cold heavy cream
          • Chocolate curls or strawberries to garnish (or both)
          Instructions
          First Layer
          Spray a 9 and 1/2 inch springform pan generously with cooking spray. Adjust your oven rack to the middle position and preheat the oven to 325 degrees. Melt the butter and chocolate together in a heatproof bowl over a pot of just simmering water, stirring occasionally. The pot should only have about 1 inch of water.(The water should NOT touch the bottom of the bowl, or it will scorch the chocolate.) The steam from the simmering water gives the right amount of heat. When smooth, remove from heat and let it cool for about 5 minutes. Then whisk in the vanilla and egg yolks.
          In a stand mixer, beat the egg whites and salt with the whisk attachment at medium speed until lots of bubbles appear about 30 seconds. This texture is called 'frothy'. Add half the brown sugar and mix for another 15 seconds or so. Then add the remaining brown sugar and switch the speed to high, beating until soft peaks form when whisk is lifted, about a minute to minute and a half. Scrape down the bowl with a spatula half way through if needed. Watch carefully so as to not over-whip to stiff peaks.
          Using a whisk, gently mix one-third of beaten egg whites into the chocolate mixture to lighten it. Switching to a rubber spatula, and fold (do not mix) in the remaining whipped egg whites until no white streaks remain. Gently poor the mixture into the springform pan and smooth the top with an offset spatula.
          Bake for 13 to 18 minutes, when the cake has risen, is firm around the edges and the center springs back after a gentle touch of the finger. Remove from the oven and cool on a wire rack for about an hour. The cake will collapse as it cools and pull away from the edge of the pan. This is normal, don't freak out :0) Wash your stand mixer and whisk attachment for the next layer.You're done with the first layer!
          Middle Layer
          Mix the cocoa powder into the hot water and set aside. Melt the chocolate in a heatproof bowl and stir the chocolate occasionally until completely melted and smooth. Remove from heat and set aside to cool. While waiting, whip cream, granulated sugar and salt with the whisk attachment at medium until frothy. move speed to high and whip until soft peaks form when whisk is lifted, about a minute. This goes fast so watch carefully!
          Next, whisk the cocoa powder-water into the melted chocolate until smooth and shiny. Then using a whisk, fold 1/3 of the whipped cream into the chocolate mixture to lighten. With a rubber spatula, gently fold in the remaining cream until no white streaks remain. Gently pour the mousse into the springform pan over the bottom layer and tap the bottom on the counter a few times to remove any air bubbles. Smooth the top and refrigerate at least 15 mins while preparing the top layer. Wash your stand mixer equipment again.
          Top Layer
          In a small container, sprinkle the gelatin over the water. Place white chocolate into a medium sized mixing bowl. Bring 1/2 cup cream to simmer in a small saucepan over medium-high heat, stirring constantly. Remove from heat and mix in the gelatin mixture. Stir until fully dissolved. Pour the cream over the white chocolate and stir until melted and smooth. Cool to room temperature, mixing occasionally.
          Whip remaining cream in the bowl of your stand mixer at medium speed until frothy, and then increase the speed to high and whip until soft peaks form when whisk is lifted, about one minute. Using a whisk, fold 1/3 whipped cream into white chocolate mixture until thoroughly combined. Then using a rubber spatula, gently fold in the remaining whipped cream until fully incorporated. (It's a little hard to tell since you're mixing white into white essentially, just do your best to watch it and not fold to much or it will deflate.) Gently pour out onto the middle layer and smooth the top. Refrigerate until set, approximately 2 and 1/2 hours.
          +To remove and serve+ Run a thin knife between the cake and the side of the springform pan. Remove the side of the pan. Run a clean hot knife along the outside of the cake to smooth the sides. Use a clean hot knife or wire to slice and serve with a garnish of chocolate curls or strawberries.
          Powered by Recipage
          09 10