Home

Thursday, February 27, 2014

Easy Baked Risotto


This Easy Baked Risotto recipe takes all the guesswork and stirring out and puts the quick and easy in; while still keeping all the delicious creamy flavors. And it will still turn out just as good as if a seasoned chef prepared it the traditional way.


Traditional Risotto is a delicious, but labor intensive dish. I learned my lesson when I made some myself over the stove top. Whew! Thankfully I could employ my husband to help me stir so my arm wouldn't fall off. Was it delicious? Absolutely. But their has to be an easier way. Well, here it is!


Science comes to our aid, along with the wonderful invention of Aluminum foil. Uncooked Arborio rice is sauteed with melted butter in a large dutch oven for a couple minutes, and then all the broth is added in at once. Placing a large sheet of foil directly to the entire surface of the liquid and folding the edges over the pot keeps the steam from rising above the rice and drying it out. The foil prevents the liquid from evaporating and instead is absorbed by the rice. So you just pop it in the oven for about 15 minutes and it's basically done. Just stir in some cheese and parsley... and... voila! It's like magic.


I will tell you that I have altered this recipe and left out the onion. After cooking up several batches, the onion always tasted off. Like it didn't belong. I know a lot of Risotto recipes will tell you to use it, but I think the onion way over powers all the other delicious, creamy flavors. My whole family likes it much better when I leave out the onion. I have also left out the white wine, and replaced it with my substitute~ 1/2 cup of chicken broth with a tablespoon of the aforementioned liquor's vinegar (white wine vinegar). I like this substitution because it still provides a bit of that bitterness the wine would give, and also gives a broader spectrum of flavors.

I also love this recipe because baking in the oven allows me to cook another dish (such as a protein) on the stove top while the risotto is baking. You can serve a simple, yet fancy meal without the hassle.

Creamy Baked Risotto


by The Goldilocks Kitchen
Prep Time: 10 minutes
Cook Time: 15 minutes
Keywords: bake saute side Italian
Ingredients (Serves 6 to 8)
  • 5 cups low-sodium chicken broth
  • 1 cup water
  • 2 bay leaves
  • 4 tablespoons unsalted butter
  • Salt and pepper
  • 2 cups Arborio rice
  • 3 garlic cloves, minced or pressed
  • 1 and 1/4 cups grated Parmesan cheese
  • 1 tablespoon white wine vinegar
  • 1 tablespoon minced fresh parsley
Instructions
1. With the oven rack in the middle position, heat the oven to 400 degrees. Bring broth, water and bay leaves to simmer in a medium saucepan over medium-high heat. Cover and keep warm over the lowest possible heat.
2. When broth is hot, melt the butter in a large dutch oven over medium heat. Saute the rice for about 2 minutes, or until the ends of the rice become translucent. Stir in the garlic and cook for about 30 seconds. Combine the vinegar with 1/2 cup of broth and add to the rice and cook, stirring until completely absorbed, about 1 minute.
3. Pour the rest of the broth over the rice. Cover the dutch oven with a large sheet of aluminum foil, pressing down so that it rests on top of the surface of the broth. (Careful, it will be very warm. I would suggest wearing oven mittens.) The aluminum foil should overlap all sides of the dutch oven. Crimp foil around the edges and cover with the lid for a tight seal. Bake until the rice is tender and liquid is absorbed, about 15 minutes. Discard the bay leaves. Stir in Parmesan cheese and parsley and season with salt and pepper to taste. Serve.
Powered by Recipage

Tuesday, February 25, 2014

Zuppa Toscana Soup


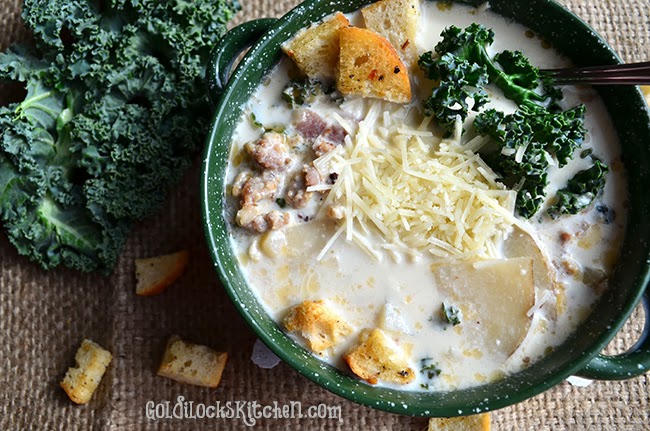
Zuppa Toscana (Tuscan Soup) is one of the best recipes for soup that I've ever eaten. Ever. The ingredients are simple enough~ and there's nothing fancy about the way you cook them. But when they come together magic happens in your mouth. Even thinking about it now causes some cravings; I'm probably going to have to make up another batch after I write this post!


This recipe originated from 'The Olive Garden' restaurant. It was so popular people started to experiment at home to see if they could come close to cooking up a batch that tasted like the original. In doing research for this recipe, I came across a few variations. This one I'm sharing with you in my opinion, is the most accurate.


The ingredients for this soup are simple, yet lovely together. Italian sausage, bacon and minced onion are sauteed and combined with chicken stock, potato slices, coarsely chopped kale and cream (half and half). I will admit: I don't eat kale very often, but this is one recipe that it is perfect for. Don't leave it out! All these flavors combine to create a savory and flavorful soup that you just can't get enough of. Seriously.


A few tips: I have written the recipe instructions so that you slice the potato while the meat is cooking on the stove top. I noticed that if I did it before I started cooking, during recipe prep, that the potatoes had started to turn brown before I got them in the pot. Just remember while slicing the potato, to take some time to stir your sauteing meet around frequently, so it cooks evenly.

Also a word about olive oil: In this recipe the olive oil called for is not Extra Virgin Olive Oil (or EVOO). It is the less refined plain old 'olive oil' as stated below. There is a difference. When a recipe calls for olive oil and you're not sure which one to use, check to see if it's going to be cooked. You don't want to heat EVOO. Yep Rachel Ray, I said it. EVOO is extra extra refined (hence the name) and is made to be served at room temperature. Because it's so refined, it burns at a much lower temperature that regular olive oil.  If you'd like to use olive oil to saute your meets or veggies~ that's great. Just make sure you have a bottle of 'olive oil' on hand to use. The smoking point is higher (the point at which it's the correct temperature to add your ingredients to saute) and it's made for cooking. EVOO is best in vinaigrette, salad, bread dipping, or drizzled over your Italian entree just before serving for an extra dimension of flavor.
Whew. I'll get of my soap box now :0) 

If I could jump out of the screen and tell you to try this soup today, I would! I love it and it's my new favorite. I truly hope you enjoy it as much as I do. Give it a try!


Zuppa Toscana Soup


by The Goldilocks Kitchen
Prep Time: 10 minutes
Cook Time: 45 minutes
Keywords: saute soup/stew Italian
Ingredients (6 to 8 servings)
  • 2 tsp olive oil
  • 1 pound Italian sausage, hot or mild
  • 4 oz bacon, diced into 1/2 inch pieces
  • 1 small onion, minced
  • 5 cups low sodium chicken broth
  • 2 cups water
  • 2 medium russet potatoes, skins washed
  • 1 1/2 tsp sugar
  • salt and fresh ground pepper
  • 2 1/2 cups half and half
  • 1 cup packed kale chopped into bite size pieces
  • 1 cup finely shredded Romano cheese for serving
Instructions
1. Heat olive oil in a large dutch oven over medium heat until shimmering. Crumble sausage (remove casings) and cook, breaking large clumps apart, until sausage is fully cooked and browned. Remove with a slotted spoon onto a paper towel lined plate or bowl. Remove all but 1 teaspoon fat from the pan. Add diced bacon and saute for about 5 minutes. Add onion and sprinkle with a pinch of salt. Saute until the bacon is cooked through (not crunchy) and onions are soft, about 5 minutes more.
2. While the sausage and bacon cook, slice the potatoes lengthwise, and slice each half lengthwise again. Slice each portion crosswise into thin slices approximately 1/8 inch thick.
3. Add the chicken broth, water, sliced potatoes, sausage, kale, sugar, salt and pepper to the bacon/onion mixture. Bring soup just to a boil, then reduce heat to medium low and simmer, covered, for 20 minutes or until the potatoes are very tender. Remove excess fat from the surface with a large spoon or ladle. Stir in the half and half. Season with salt and pepper to taste. Sprinkle about 1 tablespoon of cheese over individual servings. Garnish with seasoned croutons if desired. Serve.
Powered by Recipage

Thursday, February 20, 2014

From the Freezer Stuffed Bell Peppers


Freezer meals are fantastic for quick and easy eating, but the harsh environment of the freezer can have a real impact on taste. This recipe avoids the freezer burn and is packed with great flavor! And what's even better~ It makes 12 servings, so you do the work once and it will feed you several times over.


Green bell peppers are the norm for stuffed bell pepper recipes, but in this one you'll ditch the unripened pepper's harsher taste for ripe peppers' sweeter taste and great color. The filling flavors have to be able to withstand the freezer's harsh conditions and still be great tasting once's they've been cooked. Ground meat combined with Italian sausage and fresh herbs does the trick and can withstand the freezer and still have bold delicious flavor.


You may have noticed that these peppers are sliced a bit differently than most recipes~ They are sliced pole to pole. There's a good reason for this~ they stay put. There's more flat surface area to keep them from rolling around when they are laying face down, especially on a broiler pan, which is the preferred way to cook them.

Strait from the freezer, still wrapped.
Stuffed bell peppers can often be soggy, and this is remedied by cooking them pepper-side up. The filling is held in place by a layer of tin foil poked with a few holes to allow steam to escape out. This way the peppers can roast properly and their flavors can really shine along with the rest of the ingredients. 

Once unwrapped, a smaller piece of foil sprayed with cooking spray is placed over the filling.
It's then poked with a skewer a few times to vent.
Peppers are then placed filling side down, and
brushed with olive oil. A couple generous pinches of salt and pepper
are sprinkled on the bell peppers.
When the peppers are done baking, they are turned over and the
foil removed. Heap lots of Mozzarella cheese on top and pop them back in
the oven to melt it. They are done!
I hope you enjoy them! Please let me know about your experience, I'm relatively new to recipe blogging and I'd love the feedback :0)

From-the-Freezer Stuffed Peppers


by The Goldilocks Kitchen
Prep Time: 40 minutes
Cook Time: 35 minutes
Ingredients (12 servings)
    Peppers and Stuffing
    • 1 tablespoon olive oil
    • 1 medium onion, chopped fine
    • 8 ounces ground beef
    • 4 ounces Italian sausage, hot or mild
    • 2 tablespoons Salt and Pepper each
    • 4 garlic cloves, minced or pressed
    • 2 cups cooked long grain rice
    • 1 (14.5 oz) can diced tomatoes, drained
    • 1 cup shredded mozzarella cheese
    • 1/2 cup grated Parmesan cheese
    • 3 tablespoons fresh minced parsley leaves
    • 6 orange, red, or yellow bell peppers
    For Serving
    • 2 tablespoons olive oil
    • Salt and Pepper
    • 1 and 1/4 cups shredded mozzarella cheese
    Instructions
    1. Heat oil in large skillet over medium high heat until shimmering. Cook onion until soft and lightly browned. Add beef and sausage and season the meet with a pinch of salt and pepper. Cook, breaking meat into small pieces with a wooden spoon, until the meat is browned. Mix in the garlic and cook just for 30 seconds. Remove from heat and drain mixture in a colander for at least 1 minute.
    2. Transfer the meat to a large mixing bowl and mix in the rice, both cheeses, tomatoes, parsley and 1/2 teaspoon salt and 1/4 teaspoon pepper. Place in the fridge and chill for at least 20 minutes. (If you are cooking the peppers right away, skip the fridge and wrapping the peppers in step 3.)
    3. Spoon filling into each half pepper. Wrap each pepper in two layers of plastic wrap and one final layer of tin foil. Place in the freezer until firm. The peppers can then be placed in large zip lock bags and stored for up to three months.
    4. When ready to serve, adjust oven rack to middle position and heat oven to 450 degrees. Unwrap the bell peppers and save a couple pieces of foil. Cover filling sides with cut or torn pieces of foil that are sprayed with cooking spray (so the cheese in the stuffing won't stick). Using skewer or fork, pierce the foil with a few holes to vent. Place them foil side down over the vents of a broiler pan-top or, if you don't have a broiler pan handy, on a wire rack set inside a baking sheet. Brush the peppers with olive oil and season generously with salt and pepper.
    5 Bake until the peppers are spotty brown, about 25 to 35 minutes. Flip them over with tongs and remove the foil. Cover the filling with shredded mozzarella and return to the oven for about 5 minutes, or until the cheese is melted and bubbly. Let rest 5 minutes before serving.
    Powered by Recipage

    Wednesday, February 12, 2014

    THE Best Tuna Salad Ever


    Okay everyone, so I've been making this Tuna fish salad for a few years now, and it never gets old! If you're not a fan of Tuna fish salad, you will be after you try this recipe. Even my picky kids request it if I go too long without making it for lunch.

    A good Tuna fish salad starts with good Tuna. I use nothing but solid white Albacore tuna packed in water. The solid Tuna can be drained and dried of canning liquids so you can marinate it with your own flavors. Plus it has less of a 'Tuna' smell as the chunk Tuna. I enjoy eating Tuna fish salad.The intense smell left over in my kitchen- not so much.


    Didn't I mention a few posts back how I love capers? They are a surprise addition to my Tuna fish salad that add a fantastic element of flavor. I also add roasted red pepper for another great flavor boost and a pop of color. Different dimensions of flavor are key to making this recipe so good.


    Of course I also add in time honored mayonnaise and some celery for crunch and color too. But not until the Tuna has marinated a bit in the great flavors mentioned above. If you combine all ingredients at once, the fish is coated in a layer of mayo and it wouldn't be able to marinate properly.


    If you're wondering where to find jarred roasted red pepper (which is completely mild by the way, no heat) and jarred capers, I find them in the specialty foods isle or sometimes by the canned olives or pickles at my local grocery store. They are common items that can be found in most all grocery stores and are usually packaged by Italian manufacturers.

    A few tips for making this recipe: Make sure you have plenty of paper towels or napkins handy for all the 'drying' you need to do for the Tuna and the roasted peppers. I just get a big wad and blot the moisture off. You'll also want to have a good sharp chef's knife for mincing several of the ingredients. To "mince" is to cut into very small pieces, as small as you can. This is a great recipe to practice your knife skills :0) I hope you find this recipe as delightful as I do. Enjoy!


    THE Best Tuna Salad Ever

    by The Goldilocks Kitchen
    Prep Time: 20 minutes
    Ingredients (about 4 or 5 sandwiches)
    • 3 (5 ounce) cans solid white albacore tuna packed in water
    • 1/4 cup minced onion
    • 2 tablespoons olive oil
    • 2 teaspoons lemon juice
    • 1/4 cup finely chopped jarred roasted red peppers (patted dry)
    • 2 tablespoons drained and minced capers
    • salt and pepper
    • 1/2 teaspoon sugar
    • 1/2 cup plus 2 tablespoons mayonnaise
    • 1 celery rib, chopped fine
    Instructions
    1. Microwave the onion and oil in a small container for about 2 minutes. Set aside to cool. Drain tuna in a fine mesh strainer and blot dry with paper towels. Combine the tuna in a mixing bowl with the onion olive oil mixture, the lemon juice, 1/2 teaspoon salt, 1/2 teaspoon pepper, sugar, red pepper and capers. Mix with a fork until well incorporated and tuna is finely flaked. Marinate for 10 minutes.
    2. Stir in mayonnaise and celery. Season with salt and pepper to taste and serve.
    Powered by Recipage

    Saturday, February 8, 2014

    Easy Three Step Strawberry Cream Pie


    Sweet strawberries enveloped by billowy whipped cream create a dreamy pie that is a cinch to make. If you want to impress a special someone for Valentines Day with a fabulous home cooked meal, top it off with this sinfully sweet treat. Of if you're just looking for a new pie flavor to shake things up for Sunday night dinner, this one is delightfully easy.


    There's only three simple steps to create this pie~ stirring, folding and freezing. Frozen strawberries are stirred together with sweetened condensed milk, a jar of strawberry preserves, and a touch of lemon juice to blend the flavors.


    Then you fold in an entire container of thawed whipped topping. Remember, folding is not stirring~ use a spatula and scoop along the sides of the bowl, gently and repeatedly folding over the top center of the whipped cream so it doesn't deflate.


    When there's no more streaks of red or white, spoon it into store bought graham cracker crusts and freeze it to firm up. Just before you're ready to serve it, pull it out of the freezer and let it soften for about 10 minutes. I like to top it off with additional whipped cream, strawberries or chocolate curls for a garnish. I hope you truly enjoy this recipe!


    Strawberry Cream Pie

    by The Goldilocks Kitchen
    Prep Time: 10 minutes
    Cook Time: freeze for 6 hours
    Keywords: dessert Strawberries pie
    Ingredients (2 pies, 12 servings each)
    • 1 (18 ounce) Jar of strawberry preserves
    • 1 (14 ounce) can of sweetened condensed milk
    • 1 (10 ounce) bag of frozen strawberries
    • 1 tablespoon lemon juice
    • 1 (16 ounce) container of frozen whipped topping, thawed
    • 2 ready made graham cracker crumb pie crusts
    Instructions
    1. Thaw the strawberries in the microwave. Place them in a strainer over a sink or bowl and mash them, pressing the liquids out.
    2. Combine the strawberries in a large bowl with the sweetened condensed milk, jar of strawberry preserves, and lemon juice and thoroughly combine,
    3. Fold in the whipped topping gently (do not stir) until evenly combined. Spoon the filling into the ready made pie crusts and freeze for six hours or until firm. Before serving, let the pie soften at room temperature for about 10 minutes and add additional whipped topping and fresh strawberries or chocolate curls if desired to garnish.
    Powered by Recipage

    Thursday, February 6, 2014

    THE Best Potato Bread


    Have you ever enjoyed a warm piece of freshly sliced potato bread fresh out of the oven, slathered in melting honey-butter? Seriously, a little slice of heaven. Because who doesn't want a little slice of heaven now and again? Right? Or who wants the feeling like you're being wrapped in a fuzzy warm blanket on a cold winter's morning enjoying a fresh slice of homemade bread with your breakfast and hot chocolate?

    I am super excited to share THE Best Potato Bread recipe out there with you guys. I've worked to make this the best there is. So light and fluffy~ and easy! There really is nothing that can beat the delicious taste and aroma of fresh, homemade bread. You'll love baking this recipe and sharing it with friends and family. And get some practice in the fine art of baking bread too.


    I used to be scared to death to even attempt to make bread. I had no idea how yeast worked, and kneading for 10 minutes strait just sounded like so much fun! Not. Even being scared to death, that little 'self-reliant' part of me always had the desire to learn. I always thought to myself, "how cool would that be if I could actually make bread at home from scratch? Then I wouldn't have to buy it at the store anymore...' When I finally received a heavy duty kitchen aid stand mixer for Christmas a couple years ago, it gave me the courage to finally start my bread baking journey.


    Potato bread is great because the potato itself adds moisture to the bread, giving it an extra softness too. In this recipe, you can use left over mashed potato, or even instant mashed potato. In this post, I'll go over a few important tips I've learned when making basic bread recipes.

    The first thing I would recommend is purchasing an instant read food thermometer if you don't already have one. This tool is the number one tool I always recommend to anyone who has a desire to become a good cook. It will seriously save your life! (Plus countless recipes too.)

    Yeasted breads can be tricky because of, well, yeast. When making bread, you want the temperature of your liquid ingredients to be about 110 degrees F. This makes the yeast very happy (the perfect temperature to activate it) and it will do what it's supposed to do; create bubbles that will 'leaven' or raise your dough. In the past I always burned my yeast to death by using milk/water that was too hot, and I'd have an epic fail on my hands.

    If you've never baked home made bread in a loaf pan (in the oven) before, there's a technique to properly placing the dough in the pan for the second rise.

    Divide the dough in half equally. Take one half of the dough and roughly shape it into a rectangle that's about as wide as your loaf pan. Roll the dough out so it's about 1/2 to 1/4 inch thick, doing your best to maintain the width of the rectangle.


    Then gently roll it from one short end to the other. Turn the dough up and pinch shut the seams on the bottom and sides. Place the rolled dough seam side down in the loaf pan, pressing it gently so the dough touches all sides. Repeat with the remaining portion. I put the loaf pans back in the warm oven to rise again, loosely covering them with plastic wrap to keep them from drying out. Don't use a towel. I know that's the way grandma used to do it, but that's because grandma didn't have plastic wrap :0)


    When baking your bread, it's done when the internal temperature reaches 190 degrees F. Once again our handy instant read thermometer is a life saver. Insert it just above the rim of the loaf pan down towards the center of the bread.

    Baking really is an art form that has a million different techniques and variants that can have a significant impact on how your loaves turn out. The bread can be affected by the type of flour you use to the humidity in your home. Even the altitude can influence the way your bread bakes. Don't let these factors intimidate you! Just keep trying, and you'll learn something new each time you bake. I think that baking bread is an excellent skill that everyone should learn :0) Enjoy the journey!

    THE Best Potato Bread

    by The Goldilocks Kitchen
    Prep Time: about 2 hrs 45 minutes
    Cook Time: 25 to 35 minutes
    Ingredients (2 loaves)
    • 1 cup mashed potatoes
    • 2 eggs, lightly beaten
    • 1/2 cup soft butter
    • 1/2 cup sugar
    • 1 tsp salt
    • 1 package of Rapid Rise active dry yeast
    • 1/2 cup milk, heated to 110 degrees
    • 3 1/2 cups bread flour (about), more for dusting work surface
    Instructions
    1. Begin by turning your oven to the warm setting and move an oven rack to the center position. In the bowl of a stand mixer fitted with the paddle attachment, mix the mashed potatoes, eggs and butter. Next, Mix in the sugar, salt, yeast and warm milk until fully incorporated.
    2. At this time, switch the warm setting off on your oven. Switch out the paddle of your stand mixer and replace with the dough hook. On low speed (2), slowly add the first three cups of flour, one cup at a time, until the dough comes together around the hook. Knead for 5 minutes. If the dough is still sticking to the bottom, then add a tablespoon more flour. Continue to let the machine kneed the dough for about 4 more minutes, adding more flour a tablespoon at a time if needed, until the dough no longer sticks. The dough should knead for about 8 to 10 minutes total. With the machine off and unplugged, gently press your finger into the dough. If it 'bounces back' a bit and doesn't stick to your finger, it's done. If not, add another tablespoon to 1/4 cup flour and knead for another 1 to 2 minutes, until the dough firms up and isn't sticky.
    3. Dump out the dough ball onto a lightly floured surface. Round the dough with your hands and place it in a lightly greased mixing bowl. Turn the dough over so the side with grease on it now faces up. Cover tightly with plastic wrap, and let it rise in the warm oven until doubled in size, about 45 minutes to 1 hour.
    4. Remove the dough from the oven and punch it down to deflate. Turn it out onto a lightly floured surface large enough to roll it out. Divide the dough into two even halves. Roll the dough into a long rectangle. It should be about as wide as the loaf pan you plan to bake it in. Carefully roll the dough from short end to short end, and pinch and fold the ends underneath along the seam. Place the dough, seam side down, in a lightly greased bread/loaf pan. Cover lightly (aka don't pull tight the edges) with plastic wrap that has been sprayed with cooking spray. Repeat for the other loaf and place pans back in the warm oven to rise again for 45 minutes to 1 hour. You're ready to bake it when the dough has risen about 1 inch above the rim.
    5. Gently remove the loaf pans from the oven, placing them somewhere draft free, and heat it to 375 degrees. Bake the loaves on the middle rack for 25 to 35 minutes, or until internal temp reaches 190 degrees. Remove and dump out onto a wire rack to cool on their sides for approximately 1 hour. Slice and serve, or wrap tightly with plastic wrap and then tin foil to store in the freezer.
    Powered by Recipage

    Saturday, February 1, 2014

    Baked Gnocchi with Basil Tomato Sauce


    Here it is, my favorite recipe for gnocchi!

    The gnocchi is baked in a tomato and fresh basil sauce made from scratch, topped with a heaping portion of shredded Mozzarella (the good kind, not that low-moisture skim stuff). If you've never heard of gnocchi, see my last post on Easy Fresh Gnocchi.

    This is so fast and easy to make, you'll love that it can be cooked up any week night you feel like comfort food. It goes from the cupboard to the dinner plate in less than 30 minutes!

    You can use store bought or your own home made gnocchi. If using my recipe for gnocchi and you've frozen it, boil it first before making this recipe. Keep in mind this will add about 10 extra minutes of prep time to your schedule. If you are using store bought, you can proceed immediately with the recipe. Partially cooked packaged gnocchi can be found in most supermarkets in the pasta isle.

    For this recipe, the gnocchi is sauteed in olive oil in a NON STICK SKILLET (please make sure you use a nonstick skillet, ask me how I know) until lightly browned and crunchy on the exterior, (Which is absolutely fabulous on it's own; think fried potatoes.) A simple fresh tomato sauce is then made with minced onion, garlic, a sprinkle of red pepper flakes, a can of crushed tomato and lots of freshly chopped basil. The fried gnocchi are tossed in this sauce, and topped off with shredded mozzarella. The the whole shebang is popped into the oven just long enough to melt the cheese.

    If you have a large oven safe nonstick skillet, you can pop the whole thing into the oven. If not, simply transfer the tossed gnocchi and sauce into a dish that is oven safe. The cheese is melted into bubbly gooiness in the oven, really putting this dish over the top! Italian cooking at it's finest. A meal you'd probably spend $18 bucks on at some fancy restaurant, and you can enjoy it at home for about $2 a serving! Great cooking at home comes with practice, but a great recipe will give you a tremendous head start :0)


    Baked Gnocchi with Basil Tomato Sauce

    by The Goldilocks Kitchen
    Prep Time: 20 minutes
    Cook Time: 8 to 10 minutes
    Ingredients (4 servings)
    • 3 tablespoons extra virgin olive oil
    • 1 pound vacuum packed gnocchi or homemade
    • 1/2 onion minced
    • 6 garlic cloves, pressed or minced
    • 1/8 teaspoon red pepper flakes
    • 1 (15 oz) can crushed tomatoes
    • 1/2 cup water
    • 1/2 cup chopped fresh basil
    • 2 cups shredded mozzarella cheese
    Instructions
    1. Adjust oven rack to upper middle and set oven to heat to 475 degrees.
    2. Heat 2 tablespoons of oil in a large nonstick skillet (If you have one that is oven safe, use it.) over medium heat. When the oil is shimmering, add the gnocchi and saute until golden brown and crispy on the outside, transfer to a dish.
    3. Increase the heat to medium high and add the remaining olive oil and the onion. Sprinkle a pinch of salt over the onion and cook, stirring frequently, until softened and beginning to brown. Stir in garlic and pepper flakes and cook for 30 seconds. stir in the crushed tomato and water and cook until slightly thickened, about 5 minutes.
    4. Add the basil and browned gnocchi to pan. Reduce the heat to low and simmer, until the gnocchi is heated through about 5 minutes. Transfer the mixture to an oven safe dish and sprinkle with the mozzarella, or if using an oven safe dish, sprinkle the cheese over the pan, and slide into the oven. Bake the gnocchi for about 8 minutes, or until the cheese is melted, bubbling and browned in some spots. Serve.
    Powered by Recipage
    09 10