Home

Saturday, December 28, 2013

Chocolate Flan Cake

Chocolate Flan Cake
This, my friends, is the dessert you've been searching for! A fabulous and tasty addition to any gathering or party, you'll love this cake because it's fun and easy to make. This dessert consists of deeply flavored chocolate cake topped with smooth, creamy flan and caramel sauce.
What is flan you ask? Modern flan is a type of egg custard flavored with caramel. It's an old European treat, originating from the middle ages and was served in pastry crust (which would be really yummy too). Here in the US most flan is treated as a pudding of sorts topped with caramel. 
I thought this cake was really fun and easy to make. It's fairly simple, and even does a magic reversal in the oven. The flan and cake layers switch places while baking! You can use any type of caramel topping, whatever you like best, as long as you can warm it in the microwave so it's easy to pour. An important thing to consider when making Chocolate Flan Cake is that it needs two hours to cool after baking and another eight hours to set in the fridge. So plan well the time you bake it! I also recommend a high quality chocolate to use in the cake. Ghirardelli and Callebaut are my favorites. I always use dutch processed cocoa in my baking as it's the number one choice in taste tests for cocoa. The chocolate cake is a great pairing for the flan, and should be it's equal in depth of flavor. 

Equipment needed: A large Bundt pan, roasting pan and blender.


Chocolate Flan Cake

by The Goldilocks Kitchen
Prep Time: 25 minutes
Cook Time: 90 minutes
Ingredients (16 slices)
    Cake
    • 1/2 cup caramel sauce or topping
    • 1/2 cup plus 2 tablespoons of all-purpose flour
    • 1/3 cup dutch processed cocoa
    • 1/2 teaspoon baking soda
    • 1/8 teaspoon salt
    • 4 ounces bittersweet chocolate, chopped
    • 6 tablespoons butter
    • 1/2 cup buttermilk
    • 2/3 cup sugar
    • 2 large eggs
    • 1 teaspoon vanilla extract
    flan
    • 2 cans sweetened condensed milk (14 oz)
    • 2 cups whole milk
    • 5 oz cream cheese
    • 5 large eggs plus 4 egg yolks
    • 1 teaspoons vanilla extract
    Instructions
    1. Set an oven rack at middle position and heat oven to 350 degrees. Grease a large nonstick Bundt pan well. Heat the caramel topping in the microwave for about 20 to 30 seconds and pour into the bottom of the pan.
    2. Whisk the flour, cocoa, baking soda and salt in a mixing bowl. In another large mixing bowl, microwave the chocolate and butter. Mix every twenty to thirty seconds until fully melted and smooth. Whisk in the sugar, buttermilk, eggs and vanilla into the melted chocolate. Then stir in the flour mixture until fully incorporated. Pour over caramel in the bundt pan.
    3. In a large blender, process all the ingredients for the flan until smooth, about a minute. (If a blender is not available, you can beat the mixture on high for about 3 to 4 minutes until smooth.) Place the Bundt pan in a deep roasting pan and gently pour flan over the cake mixture. Fill the roasting pan with water until it reaches about half-way up the Bundt pan. Place in the oven and bake for 75 to 90 minutes, or when a toothpick inserted into the cake comes out clean.
    4. Remove the Bundt pan and place it on a cooling rack for 2 hours. Then refrigerate for at least 8 hours to set the flan. When ready to serve, place the bottom half of the pan in a bowl of hot water for about a minute and run a knife gently around the edges (conforming to the shape of the pan) to make sure no cake is sticking to the edge. Place your serving platter over the cake, and holding it firmly, flip the cake over and slowly lift off the Bundt pan. Slice the flan and serve.
    Powered by Recipage

    Tuesday, December 24, 2013

    Rolo Cookies

    Delightful little Rolo Cookies

    In the midst of all the cookie recipes out there, I found this little gem and wanted to share it with you. These Rolo cookies are not just lovely to look at, but have a surprise center of ooey gooey chocolate and caramel. The recipe I'm sharing would be great for the holidays, (it makes 50+ cookies!) however these Rolo Cookies can be enjoyed any time of the year.

    The process of getting a piece of Rolo candy inside a cookie isn't as hard as I thought it would be. I rolled a medium/smallish ball of dough in my hand and pushed that candy right down inside it. I then 'smooshed' the dough over the end of the candy and rolled it in my hand again. It perfectly encased the candy in a nice round dough ball. After a couple tries, I would scoop out just the right amount of cookie dough to completely cover the chocolate candy. Don't make the coating too thin, or the candy may burst out and ooze caramel all over your cookie sheet. (Ask me how I know...)

    For the melted white chocolate drizzle, I purchased Ghiradelli white chocolate melting wafers. I just poured some in a bowl and microwaved it until it had sufficiently melted. I tried using a spoon to drizzle, but the chocolate just fell off in blobs. So I turned to a zip lock bag. By snipping just the tiniest bit of corner and pouring the melted chocolate inside, I had a makeshift piping bag. Drizzling the white chocolate on the cookies was super fast and easy after that. I hope you enjoy these great cookies as much as I have!


    Rolo Cookies

    by The Goldilocks Kitchen
    Prep Time: 40 minutes
    Cook Time: 8 to 10 minutes
    Keywords: bake cookie
    Ingredients (serves 50)
    • 2 1/2 cups all-purpose flour
    • 1 teaspoon baking soda
    • 3/4 cup cocoa powder
    • 1 cup unsalted butter, room temperature
    • 1 cup sugar
    • 1 cup brown sugar
    • 2 large eggs
    • 2 teaspoons vanilla extract
    • 2/3 cup finely chopped walnuts
    • 8 oz white chocolate melted
    • 50 Rolo Candies
    Instructions
    1. Place oven racks in upper middle and lower middle position and set oven to heat to 350 degrees. In a large mixing bowl, whisk the flour, baking soda and cocoa together.
    2. In a separate bowl, cream the sugars and butter together. Whisk in the eggs and vanilla until fully incorporated. Mix the flour/cocoa mixture into the wet ingredients to make the cookie dough.
    3. Roll a roughly 1 to 1 1/2 inch diameter ball of dough in your hand. Press one Rolo candy into the center until the edges of the dough are higher than the edge of the chocolate candy. Roll the dough again in your hand. It should completely surround the Rolo. The candy must be completely covered by the dough or the caramel will leak out while baking. Lightly touch the top of the dough ball into the chopped nuts. Place on a cookie sheet with the nut side up. Repeat with the remaining dough and candy until you have filled two cookie sheets.
    4. Place cookie sheets in the preheated oven and bake for 8 to 10 minutes, rotating front to back and upper to lower halfway through baking.
    5. Remove cookies to a cooling rack. When baking sheets are emptied, bake the next two batches. When the cookies are cool, drizzle with the melted chocolate using a spoon, or squeeze out of a ziplock bag with a tiny hole cut in the corner. Let the chocolate cool and set. Serve.
    Powered by Recipage

    Friday, December 20, 2013

    Easy Fresh Flour Tortillas


    Fresh Flour Tortillas that are super easy!
    Have you ever eaten a freshly cooked flour tortilla? If so, you know that store bought tortillas are dry and can be quite flavorless at times. They just don't hold a candle to fresh. Have you ever considered making them at home yourself? It's not as hard as you think. And you don't have to claim any cultural heritage to make great flour tortillas right in your own kitchen!
    These Tortillas are made with flour, shortening, water and a pinch of salt. The dough is rolled by hand into small balls that are refrigerated until firm. They will keep for 5 days in the fridge. When you're ready to serve fresh tortillas with dinner, simply pull out a few dough balls, roll them out on a clean surface, and cook them until they bubble and brown a bit in a hot oiled nonstick pan. That's it! They are great for quesadillas or try them with Posole!

    Easy Fresh Flour Tortillas

    by The Goldilocks Kitchen
    Prep Time: 15 minutes
    Cook Time: 20 minutes
    Keywords: fry bake side entree Mexican
    Ingredients (12 tortillas)
    • 2 3/4 cups of flour
    • 1 1/2 teaspoons salt
    • 6 tablespoons vegetable shortening, cut into 6 pieces
    • 3/4 cup plus 2 tablespoons warm water (110 degrees if you have a thermometer)
    • 1/2 teaspoon vegetable oil
    Instructions
    1. Whisk flour and salt in a large mixing bowl. Add the pieces of shortening and, using your hand, mix the shortening into the flour mixture until it resembles coarse meal. Stir in the water with a mixing spoon until combined into cohesive dough.
    2. Turn dough out onto a clean surface and briefly hand knead until it's a smooth ball. Pull apart approximately 2 to 3 tablespoons sized portions of dough and roll into balls. Place dough balls on a plate, cover and refrigerate at least 30 minutes to firm. They can be stored in the fridge up to 3 days.
    3. On a lightly floured surface, thinly roll out a ball of dough (should be about 8 inches across). Heat oil a large non-stick skillet just over medium low heat. When just smoking, wipe out the oil with a large wad of paper towels. Lay the round in the skillet and cook until it begins to bubble, about a minute. Flip and cook on the other side until browned and puffed, about another minute. Transfer to a plate and cover with a kitchen towel to keep warm. Repeat with the remaining dough balls. Serve. (The cooked tortillas can be layered between parchment paper, covered with plastic wrap and kept in the fridge for a few days. Just re-heat in the microwave and serve.)
    Powered by Recipage

    Tuesday, December 17, 2013

    Canadian Butter Tarts


    If you're not from The Great White North, then chances are you've never heard of a Butter Tart. Well let me introduce you to the most popular pastry of Canada! They are so simple and really deliciously sweet. Butter Tarts are mini-pies you hold in your hand that are filled with a sweet and creamy mixture of butter, brown sugar, cream and eggs. It's all held together with a light and flaky pastry crust. Many have a surprise in the filling~ either raisins or chopped nuts can add a delightful extra bit of tastiness. Or you can just make them plain. (That's the way I like them best!)

    I was almost immediately introduced to these lovely treats when I arrived in Toronto. I do have to say, after eating many Butter Tarts I learned that they should be enjoyed fresh and warm.
    If you're the kind of person that really likes the taste of cookie dough, you'll love these little delights. I think the best thing about cookie dough is the creamy, sugary butter taste. And these 'tarts' are essentially that, unsalted butter and brown sugar are creamed along with eggs and half and half. But you get that sugary butter taste after they're cooked, so no worries about eating raw egg :0) They are really simple to make, especially if you purchase ready made pie dough for the crust. I used my recipe for foolproof pie dough, and they were light, flaky and perfectly delicious. I had to make a second batch because we ate too many and I didn't have enough to photograph!
    As you can see in the pictures, they are fallen in the middle, and this is the normal look for any butter tart. The filling will rise up quite a bit when they are baked, and will be domed up above the rim of the pie crust. Once they are removed from heat they cool and collapse a bit.

    Butter Tarts

    by The Goldilocks Kitchen
    Prep Time: 30 minutes
    Cook Time: 20 minutes
    Ingredients (12 tarts)
    • 1/3 cup unsalted butter, room temperature
    • 1 cup light brown sugar
    • 2 large eggs
    • 1 teaspoon vanilla
    • 1 teaspoon real maple syrup
    • 1/4 cup light cream
    • optional: 1/2 cup raisins or chopped nuts like walnuts or pecans
    Instructions
    1. Roll out pastry dough to approx 1/8 inch thickness. Cut into 4 inch rounds using a 4" cookie cutter (or small bowl or large lid). Gently press pastry rounds into the cups of a mini-muffin tin. Knead remaining dough and roll and cut again until you fill all twelve cups. Place in the refrigerator and continue with the filling.
    2. Set an oven rack to middle position and set oven to heat to 375 degrees. In the bowl of a stand mixer, whip butter at medium speed until light for about a minute. Scrape down the bowl if needed. With the whisk on medium, add in the brown sugar and mix until fully incorporated. Scrape down bowl if needed. Next add each egg one at a time, then vanilla and maple syrup, then the half and half. Run the mixer on high for about 30 seconds. Scrape down bowl (especially the very bottom) and mix on high again for another 30 seconds.
    3. Transfer filling to a two cup measuring cup (or something easy to pour filling from). If raisins or chopped nuts are desired, sprinkle a few in the bottom of each pastry cup. Fill each pastry cup 2/3 full with filling. Try to fill each cup as evenly as possible.
    4. Place in the oven and bake for 17-20 minutes. The filling will puff way up and should be slightly browned at the edges, along with the pastry dough. Remove the butter tarts and cool on a wire rack for 10 minutes. Gently remove them by running a knife around the edges. Push the knife underneath and lift them out. Place on a wire rack to cool for 15 additional minutes. Serve warm or room temperature.
    Powered by Recipage

    Thursday, December 12, 2013

    New Mexican Posole


    If you have ever visited Albuquerque Old Town Plaza on Christmas eve, its quite an enchanting experience! It's a tradition in my family, and for many others as well. There you'll find luminarias lining every sidewalk, adobe wall, and rooftop. A live nativity is displayed, including stable animals. Live music is performed on street corners while people file in and out of all the gift shops and restaurants that line the plaza. A huge Christmas tree made from smaller trees (you have to see it to believe it) glitters in the night. There are adobe alleyways paved with saltillo tile that lead to charming courtyards off the beaten path. Christmas lights and chili ristras are everywhere. I love to wander around with a steaming hot cocoa in my hands, just enjoying the atmosphere. And most important of all, I always stop to eat a bowl of  Posole to warm me from the inside out.

    Made with hominy, pork, and flavored with red chile, it's a mix of Native American and Hispanic flavors. It
    pops up especially around the holidays. You'll love this recipe even if you've never had a hot bowl of Posole before. Plus there are a few techniques in this recipe that really help to squeeze every ounce of incredible flavor from these fabulous ingredients.

    Traditional Posole is made with water, but we're going to replace that with chicken broth, which is a no-brainer for flavor. I've learned that replacing water with chicken broth can make a HUGE difference with almost every recipe I cook. It adds tons of yummy flavor. The pork in this recipe is browned on all sides before cooking in the broth (remember color = flavor) and the Hominy is also cooked a bit in the pork fat, enhancing the great corn taste. The chiles called for in this recipe (Ancho) are the dried chile pods of Poblano chiles. This isn't a spicy stew, so if you're worried about your mouth catching on fire, worry no more. They are quite mild as far as chiles go and can be found in most supermarkets in the Mexican food isle. Look for them hanging in clear bags. Also take note to remember to discard all fat from the meat as you're shredding it. It's really un-appealing to have any chewy pieces of pork fat in this stew. And don't forget to remove the fat/grease that rises to the top when you are at the last step in the recipe. That can also be rather un-appealing.
    You can garnish the stew with a mix of chopped avocado, radish and cabbage, but I like mine just the way it is, served with fresh tortillas on the side. Enjoy!
    New Mexican Posole

    by The Goldilocks Kitchen
    Prep Time: 30 minutes
    Cook Time: 2 1/2 hours
    Ingredients (8 -10 Servings)
    • 3 dried Ancho chiles
    • 8 cups low-sodium chicken broth
    • 2 pounds boneless country-style pork ribs
    • salt and pepper
    • 3 tablespoons vegetable oil
    • 3 (15oz) cans white hominy, rinsed and drained well
    • 2 onions chopped
    • 5 garlic cloves, minced or pressed
    • 1 tablespoon minced fresh oregano
    • 1 tablespoon lime juice
    Instructions
    1. Set the oven to heat at 350 degrees and move an oven rack to the middle position.
    Place the chiles on a baking sheet and bake them for about 6 minutes, or until puffy and fragrant. Remove and set aside to cool.
    2. In a Dutch oven, set 2 tablespoons of oil to heat on medium-high. While warming, pat pork dry with paper towels and season with salt and pepper. When the oil just starts to smoke, place the meat in and brown all sides well, about 10 minutes. Transfer pork to a plate and set aside.
    3. While the pork is browning (being careful to check on it often so it doesn't burn), remove the stems and seeds from the chiles. Place chiles and one cup of broth in a microwave safe bowl. Cover with plastic wrap and microwave 2 minutes. Set aside to soften and finish searing the pork.
    4. Add in the hominy to the empty pork pot and stir frequently until it is fragrant and begins to darken, about 2 to 3 minutes. Transfer the hominy to a bowl and set aside.
    5. Heat the remaining oil in the now empty pot and cook the onion until softened, about 5 minutes. Stir in the garlic and cook for 30 seconds. Scoop out the onion garlic mixture and put into a blender. Add the Chiles and broth and puree mixture.
    5. Pour the remaining broth, red chile mixture, pork, oregano, 1/2 teaspoon salt and 1/2 teaspoon pepper and bring to a boil. Reduce heat to medium low and simmer covered for 1 1/2 hours.
    6. To finish the stew, transfer the pork to a clean cutting board or plate. Add in the hominy and simmer covered for about 30 minutes. Using a large spoon or ladle, skim as much fat from the top of the broth as possible. Using two forks, shred the pork into bite sized pieces, discarding any fat. Return to the pot and add the lime juice and season with additional salt and pepper to taste. Serve.
    Powered by Recipage

    Tuesday, December 10, 2013

    Authentic New Mexican Sopaipillas (Sopa-pee-ya)


    Drizzled with Honey,  Sopaipillas are a great way to start any fiesta feast!
    Anyone who has ever lived in New Mexico knows what a Sopaipilla is.
    A delicious New Mexican spin on Native American fry bread, these 'little pillows' puff up with air when fried. And I do mean puff up!

    You talk about being full of hot air, the pocket inside is perfect for filling with honey, frijoles con carne (refried beans and meat), or even ice cream. They can be eaten as an appetizer, main course, or even dessert! They are as unique as the area they originate from. (And no, they are not scones!!!)

    Next to Hatch Green Chile, the Sopaipilla is the iconic symbol of New Mexican food and can be found in just about every Mexican restaurant. One of the amazing things I love about the Southwest is the history and cultures of the area. The integration of Hispanic and Native American traditions permeates everything from architecture to food. Take a drive by one of the Pueblos on a summer weekend and you'll probably be able to buy fresh Indian fry bread roadside. Make sure you stop and try some; I love it! Indian fry bread is the same shape and size as a dinner plate, with lots of 'bubbles' formed when the dough is fried. Sopaipillas are a bit different in that the dough is rolled thinner and cut into square pieces. It fries up extra puffy and totally hollow inside.


    This sopaipilla dough is just starting to puff in the hot oil.

    This one's about ready for the bowl. Or my mouth...

    There is no secret ingredient in making these little delights. They are actually quite simple. The most important thing to remember is to keep the dough moist. If it dries out, it will loose it's elasticity and just fry up as a really big tortilla chip. If the dough is over-kneaded, too much gluten will form and you won't be able to roll the dough out to the proper thickness either. If you follow my instructions they should turn out just right every time! And thank you so much to my friend Genevieve who taught me this recipe so long ago.  :0)

    Authentic Sopaipillas

    by The Goldilocks Kitchen
    Prep Time: 10 minutes
    Cook Time: 30 minutes
    Keywords: fry appetizer New Mexican
    Ingredients (10 to 12)
    • 4 cups sifted flour
    • 1 tablespoon baking powder
    • 2 teaspoons salt
    • 1 tablespoon sugar
    • 2 tablespoons vegetable oil
    • 1 1/3 cup warm water
    • More vegetable oil for frying (at least 2 1/2 cups)
    Instructions
    1. In the bowl of a stand mixer (or a regular mixing bowl if making by hand) whisk the flour, baking powder, salt and sugar together. Create a small depression in the center and pour in the 2 tablespoons of vegetable oil. Whisk in the oil. (I use the paddle attachment on my stand mixer.) It will incorporate unevenly into little clumps, this is okay.
    2. Gently pour in the warm water and knead the dough until it is smooth. It only takes one to two minutes using the dough hook in a stand mixer. If kneading by hand, gently knead in the bowl until the dough sticks together. Place on a lightly floured surface and continue until the dough is smooth.
    3. Divide the dough in half, and seal each half in a zipper lock bag to rest the dough while you heat the oil for frying.
    4. Heat frying oil in a stove top dutch oven, or in a heavy duty frying pan, to around 340 to 350 degrees. The oil should be at least 2 inches deep.
    5. Remove one portion of dough and roll out on a clean, flourless surface. Roll the dough to a thickness of 1/8 inch. Using a pizza cutter, cut the dough into squares approximately 4 X 4 for a nice restaurant look. (I personally don't mind frying up the extra triangles that are left.) Place a sheet of plastic wrap over the rolled out dough. It's very important the dough stay moist and not dry out, or it won't puff.
    6. Gently place an individual square of dough into the hot oil. It should begin to puff up within about 5 seconds. I like to use a large spoon or tongs to carefully splash oil over the top, this really seems to help the sopaipilla puff. Once it's finished puffing up, fry until it reaches a light golden brown on both sides. Place in a large bowl lined with paper towels. Repeat with the remaining dough. Serve immediately with honey.
    Powered by Recipage

    Saturday, December 7, 2013

    DIY Peppermint Marshmallows


    These homemade marshmallows are a blast! Fluffy and springy they are tons of fun to make, especially with children. The best part is getting to cut them out. But I also love the versatility of what can be created. The possibilities are endless. I recent watched a cooking show that featured mango flavored marshmallows! Wow!
    For now, to suit my holiday purposes I'll stick to vanilla or peppermint flavored marshmallows to melt into my hot chocolate. Yum!

    You can flavor these DIY marshmallows with anything you like. You can color them any color you like. You can cut them out into any shape you want. You can use cookie cutters to cut out initials and then coat them in chocolate as a gift! My mind could go on and on and on. Mmmmm,  I do love chocolate covered marshmallow...


    Coming back to reality, this recipe is a real treat. You've got to try it. Plus it makes tons of marshmallows to last you a very long time. My children had a hay day with my cookie cutters, cutting out all sorts of shapes. I would have pictured them here but the 'mallows didn't last long enough :0)

    Some important things to know before creating these marshmallows at home. You will need either a candy thermometer or an instant-read thermometer. You don't need a stand mixer, but using a hand held mixer will definitely take longer to whip up the ingredients. AND this can get super messy if you try to get all the marshmallow cream out of the bowl when you are transferring to the cookie sheet. Don't worry if there is some left in the bowl. The stickiness is intense and it will leave threads of marshmallow on everything. 
    I hope you enjoy these marshmallows and that you get creative with them. It's really a treat!


    DIY Peppermint Marshmallows

    by The Goldilocks Kitchen
    Prep Time: 30 minutes
    Cook Time: chill 3 hours
    Ingredients (80-100 marshmallows)
    • Crisco shortening (for oiling the pan)
    • 12 1/2 X 17 inch rimmed baking sheet (can use 13 X 9 for thicker marshmallows)
    • about 1 cup of powdered sugar
    • 2 tablespoons plus 2 1/2 teaspoons of powdered unflavored gelatin
    • 1 cup cold water, divided into 1/2 cups
    • 2 cups granulated sugar
    • 1/2 cup light corn syrup
    • 1/4 teaspoon salt
    • 2 large egg whites
    • peppermint flavoring extract
    • Optional: food coloring
    Instructions
    Start by thoroughly greasing a 12 1/2 by 17 inch rimmed baking sheet with crisco. Dust with powdered sugar and set aside.
    In the bowl of a stand mixer, mix 1/2 cup of cold water and gelatin and set aside.
    In a 3 quart heavy sauce pan, combine the other 1/2 cup of water, granulated sugar, corn syrup and salt and heat on medium low. Stir until the sugar is dissolved. Bring up the heat to medium and boil until the mixture reaches a temperature of 240 degrees. Remove from heat and pour over the gelatin. Stir to combine.
    With the whisk attachment, beat the mixture until it is white, thick and nearly tripled in volume, about 5 minutes.
    In a separate mixing bowl, whip the egg whites until stiff peaks form. Add them to the whipped sugar. Add three drops of concentrated peppermint oil. (I used LorAnn brand in a .125 oz bottle). If you are using a flavoring syrup, like Torani, which is in a large bottle, a tablespoon would be adequate to flavor the batch of marshmallows.
    Whip until combined and pour out onto your greased/dusted baking sheet. Use a frosting spatula to smooth the top. With red food coloring, drop about five drops onto the mixture and swirl around with a skewer or knife to create red streaks. Sift powdered sugar over the top (about 1/8 to 1/4 cup) and chill, uncovered in the fridge for 3 hours.
    Run a hot knife around the edges and invert onto a large cutting board. Cut out shapes with cookie cutters, or squares with a pizza cutter. I used the inside of a doughnut cutter to create the small rounds pictured.
    Powered by Recipage

    Real Hot Chocolate, Really Fast!


    I love hot chocolate. Love it, love it, love it! Since I'm not a coffee drinker, hot chocolate is my go-to hot drink. This recipe for REALLY FAST Real Hot Chocolate is perfect for anyone who has a busy schedule and can't afford to stand stirring over a stove top. I always kept my pantry stocked with powdered hot chocolate mix, even in the summertime. But now I keep my freezer/fridge stocked with hot chocolate mix instead. What? Why the freezer, you ask? Well, let me share this recipe with you and all will become clear...

    It is so ridiculously simple :0) All you do is purchase your favorite brand of Semi-sweet Chocolate chips (I prefer Ghiradelli.) and melt them in the microwave with heavy cream. The result is a lot like an extra thick chocolate ganache that ends up the consistency of cookie dough. Once it's cooled you can take a large spoon or ice cream scoop and create individual sized portions to keep wrapped in your fridge or freezer. When you're ready just open and gently plop a ball of delicious real chocolate into a steaming cup of milk, stir, and you have instant, real, hot chocolate to enjoy on a cold snowy day, or any time of year you may fancy. Enjoy :0)
    Instant Real Hot Chocolate

    by The Goldilocks Kitchen
    Prep Time: 2 minutes
    Cook Time: 2 hours in fridge
    Keywords: chocolate
    Ingredients (10 servings)
    • 1 bag of chocolate chips (12 oz)
    • 1 cup of heavy cream
    • pinch of salt
    Instructions
    Empty the bag of chocolate chips into a microwave safe mixing bowl. Add the cream and microwave for about 2 to 2 1/2 minutes (stirring every 30 seconds) until the mixture has blended together.
    Chill for 2 hours, or until the mixture sets up and becomes solid.
    Using a spoon or ice cream scoop, create balls about 2 inches in diameter (about 3 tablespoons each) and wrap them individually in plastic wrap. Place several in a large zip-lock bag. The chocolate will keep in the fridge for 5 days or freezer for up to 2 months.
    Powered by Recipage

    Tuesday, December 3, 2013

    The spice of Life

    Pheasant tail feathers gathered by my son. We
    released about 50 birds for a hunt taking place
    the following day in a wildlife management area.


    Now that I've been blogging for two months, I think it would be fun to share a bit more about myself with my readers! When I check out other people's blogs, I'm always drawn to the 'about me' section. I want to know what drives them to run a whole website (which takes TONS more time than I realized), and what they're like as a person. I think it's the same for many of you out there.

    My hubby and I at Fairy falls in Yellowstone National Park.
    It's fantastic to live so close; we camp here every summer.
    Looking back, I feel I have been blessed in my life by meeting some of the most talented and wonderful people in the world. I feel I've learned something from each person and in some way I've received a bit of wisdom from them. Either directly from that person, or some circumstance in their life that has affected them for good or ill. I've always lived my life with this mantra. I also believe each person that comes into my life is meant to, that God orchestrates our lives far more than we realize.
    This year has been full of ups and downs for me and my family. Life was great one minute, and then it fell apart the next. I have always felt a surety in what I was doing, that I was meant to be where I was and what I was doing. But I lost that surety when my husband and I lost our jobs as housing managers and we had to move out of our place. It didn't feel right, like it wasn't meant to happen. I felt like we were being punished for no reason. Though it's been difficult, there is hope for the future. Camron only has two more semesters until he graduates with a bachelor's degree in wildlife management. Much of my new hope also comes from this new adventure of mine, in creating 'The Goldilocks Kitchen". I know you're thinking that sounds really sappy, but it's 100% true, even if it is sappy! :0)


    I've wanted to try this whole 'food blogging' thing for some time, but I always felt I just didn't have the time
    One of the first pics I took with my new DSLR camera. The
    wind was blowing my son's streamers, but I didn't quite catch it
    in time for the shot.
    or resources to do it. Now that I have more free time on my hands, I really wanted to try it! Cooking became one of my favorite things to do a few years ago, and I often browsed the web for new recipes to try. My husband and I love to entertain and have people over to our home for dinner. We enjoy visiting with folks and getting to know them better.
    One of my dearest friends started a food and craft blog a while ago called 'Love and Laundry', and she is now what I would consider a blogging pro. She would often tell me about the ups and downs of running her own blog. I started to consider it too, as a way to share my most favorite recipes and make a few 'bonus' dollars on the side by placing advertisements on my blog.
    My son Aidan waiting for his brother Shiloh to count out
    rounds for their dad's .22 rifle. This was their first
    opportunity to learn the importance of gun safety.
    When I made the decision to start this blog, I had an incredible resource in my friend Shatzi. She has been essential in helping get this blog started and making it successful. I am so thankful to have her in my life. I had a wonderful launch the beginning of last month with a debut party to celebrate. Of course I was an idiot and forgot to take my camera! But the party was a hit! With some help I prepared some of my favorite recipes for folks to come and try, and I had way more people show up that expected! It was wonderful and I look forward to turning that into an annual event.
    As for right now, I have great plans for December's posts by featuring some specialty dishes for all of you! My thoughts are concentrated on our return home to New Mexico for the last half of the month, and I plan on cooking up some great New Mexican food to share with all of you. I feel there is no greater place to celebrate Christmas than in the Southwest. There are many ethnic traditions that have continued into the modern day, bringing such charm to celebrating the holidays there! I'll share more with you about them as I post the recipes for this month.
    Trumpeter swans flying south for the winter. We've seen loads of them! Our part of Idaho must be a major highway for the fall migration. Moose are mighty plentiful here too. We see at least one every time we drive into the mountains.
    And Thank you, thank you, to all of you who read and try these recipes, and who support this blog. I am anxious to connect with my readers and would welcome any feedback you have on my recipes. I want to learn and continue to improve my efforts. I am a person who loves making friends and taking the time to talk and get to know people. This adventure has been so exciting for me and I look forward to the blessings I know it will bring.

    Tuesday, November 26, 2013

    Green Beans and Mushrooms Braised in Cream


    Who loves green bean casserole? If you answered 'Me!', this recipe is for you!
    When you have a fabulous main course roasting in the oven, this recipe is a perfect accompaniment. It's made on the stove top and can be timed so it's ready when your main course is ready.
    I found this recipe while looking for vegetarian dishes to serve our guests that we invited to dinner. It was well received, and our guests asked for a copy of the recipe. So here it is!

    'Braised' means cooked or steamed with a flavorful broth or cream. This recipe uses all fresh ingredients, nothing canned. So it's a bit of a departure if you're used to the canned green beans and cream of mushroom soup topped with french fried onions. This is definitely a recipe in which you must prepare/measure out all ingredients before you begin. If not, you may end up with burnt or over cooked elements (or both).
    It's fairly simple in that you make your own french fried shallots~ a nice change from the traditional onion. They are mellow and more sweet in flavor, especially when fried in this manner.
    After setting aside your garnish of shallots, you'll cook/steam the green beans and mushrooms in cream, a little lemon juice, minced thyme, salt and pepper. The beauty of this recipe really is the simplicity of it all :0)
    I hope you enjoy Green Beans and Mushrooms Braised in Cream as much as my family and I do.

    Green Beans and Mushrooms Braised in Cream

    by The Goldilocks Kitchen
    Prep Time: 25 minutes
    Cook Time: 35 minutes
    Keywords: side vegetarian
    Ingredients (6 servings)
    • 2 tablespoons unsalted butter
    • 1 tablespoon olive oil
    • 3 medium shallots, peeled and sliced thin crosswise
    • 1/2 pound domestic mushrooms, wiped clean, sliced thin
    • 2/3 cup heavy cream
    • 2 teaspoons lemon juice
    • 1 1/2 teaspoons fresh minced thyme
    Instructions
    1. Heat butter and olive oil over medium heat in a large saute pan. When the oil and butter is hot, add in the shallots and saute until golden brown, about 7 minutes. Transfer to a paper towel lined plate with a slotted spoon.
    2. In the same pan, add mushrooms, green beans, cream, lemon juice and thyme. Bring to a boil and cover; reduce heat to low and simmer, stirring occasionally, until the beans are tender, about 15 to 20 minutes. Remove the cover, and simmer for a few minutes to thicken the cream if necessary. Transfer to a serving bowl and garnish with the fried shallots. Serve warm.
    Powered by Recipage

    Friday, November 22, 2013

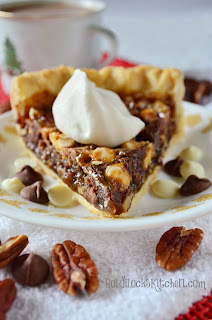
    Chocolate Pecan Pie

    This Recipe for easy southern chocolate pecan pie is the best homemade dessert for any party or holiday celebration! A classic with a chocolate twist. Because everything is better with chocolate. Top with caramel flavored whipped cream for the perfect garnish!

    Holiday pie made from scratch? There is rarely a thing in the world more delicious or rewarding!
    I am the type of person who feels chocolate can make anything better, especially pie :0) Adding chocolate to Pecan pie just takes it to a whole new level! Plus a dollop of Caramel whipped cream on top puts this pie over the top. (See recipe below.) It's the perfect complementary flavor for the pecans and the caramel matrix in which they lay.
    This Recipe for easy southern chocolate pecan pie is the best homemade dessert for any party or holiday celebration! A classic with a chocolate twist. Because everything is better with chocolate. Top with caramel flavored whipped cream for the perfect garnish!

    I will never forget the first time I had a slice of Pecan pie. It was just after I had moved to Kingston, Ontario Canada. Some friends of mine had me over for a lovely dinner. Afterwards, I was offered a piece of pee-can pie.
    "What's that?" I said.
    My friend stared at me for a moment with eyebrows raised.
    "You've never heard of pee-can pie before?!"
    "No, I really haven't. I'm thinking it must be a Canadian dish?"
    "I'm pretty sure people from the states eat it too...here, try it."
    She place a slice of Pecan pie on my plate. Boy I felt stupid then!
    "Oh!" I said. "Pecan pie! I was totally confused~ you guys just pronounce it differently here, ha ha, My bad."
    I was mentally kicking myself the rest of the evening; feeling so stupid for not picking up on that! And I guess some in 'the states' pronounce it that way too :0) Even as I ate the pie that night, I decided I wasn't a huge fan of Pecan pie. I've just never been one to love nuts in my food. (Unless it's chocolate cashew or peanut clusters, I love them! See there's that whole adding chocolate to stuff makes it better thing :0)

    This Recipe for easy southern chocolate pecan pie is the best homemade dessert for any party or holiday celebration! A classic with a chocolate twist. Because everything is better with chocolate. Top with caramel flavored whipped cream for the perfect garnish!

    Anyway, I naturally gravitate towards the chocolate pies during the holidays or whenever I have a choice of pie. So when I was watching an episode of Cake Boss on Netflix and saw them making Chocolate Pecan Pie (among other pies), my curiosity was piqued. I'd never herd of chocolate pecan pie before. I had to try it! And there, in one of my baking books I found a recipe for it. Bada-bing, bada-bang, bada-boom! After I tasted the first bite I wanted more and more!

    I also think I enjoyed this pie so much because the pecans are roasted in the oven, softening them a bit and adding a new dimension of flavor. They are also chopped, which texture I preferred to whole nuts. Plus, adding in three different types of chocolate, semi-sweet, milk and white really was a delight for my taste buds. An important note: an instant read thermometer is essential to creating this pie. If you don't have one, see if you can borrow one from a friend!

    Want to know a great trick for creating a gourmet pie? Flavor your whipped cream topping! Yes, a simple but delightful addition of flavored whipped cream can complement just about any pie. I love Caramel flavored Whipped Cream on my Pumpkin and Pecan pie. Whip it up just before you are ready to serve your slices. Find the recipe following the one below for Chocolate Pecan pie.


    Chocolate Pecan Pie

    by The Goldilocks Kitchen
    Prep Time: 30 minutes
    Cook Time: 55 to 65 minutes
    Ingredients (8 to 10 servings)
    • 1 recipe for prebaked Pie Shell
    • 1/3 cup of semi-sweet chocolate chips
    • 1/3 cup of milk chocolate chips
    • 1/3 cup of white chocolate chips
    • 3 tablespoons unsalted butter, cut into 1 inch pieces
    • 3/4 cup packed dark brown sugar
    • 2 large eggs
    • 1/2 cup light corn syrup
    • 1 teaspoon vanilla
    • 1 cup pecans, toasted and chopped into small pieces
    Instructions
    1. While preheating your oven to bake the pie shell, roast the whole pecans on a rimmed baking sheet for about 5 to 7 minutes. Watch carefully so they don't burn and stir them every couple minutes. Chop them up when they have cooled sufficiently.
    2. Follow the directions for partially baking the pie crust. Melt the butter in the bowl of your stand mixer by placing it in a pot of water set over medium low heat. The water should not simmer.
    3. Remove the bowl when the butter is completely melted and mix in the sugar and salt with a wooden spoon. Stir until all the butter is absorbed. Attach the bowl to the stand mixer. With the whisk attachment, beat in the eggs, then corn syrup and vanilla.
    4. Return the bowl to the pot of hot water and stir the mixture until it reaches 130 degrees on an instant read thermometer. This can take anywhere from 10 to 15 minutes. (The mixture should be shiny and hot.) Remove from the heat and stir in the toasted chopped pecans.
    5. When the pie shell comes out of the oven, pour the pecan mixture into the pie shell. Sprinkle the chocolate chips over the pie filling and use the back of a spoon to push them down into the filling. Adjust the oven temperature to 275 degrees and move an oven rack to the middle position. Bake the pie for 55 to 65 minutes, when the filling is set but soft when pressed with the back of a spoon. Transfer to a wire rack to cool for 4 hours.
    Powered by Recipage


    Caramel Whipped Cream

    by The Goldilocks Kitchen
    Prep Time: 5 minutes
    Cook Time: about 3 to 5 minutes
    Ingredients (8 servings)
    • 1 1/3 cup whipped cream
    • 1 tablespoon brown sugar
    • 1 tablespoon of Torani Caramel syrup or other flavor or liquor of your choice
    Instructions
    1. Chill bowl and beater(s) in a freezer for about 10 minutes. Add all ingredients into the bowl and whip at low speed for about 30 seconds, or until the mixture gets frothly with bubbles. Increase the speed to medium for another 30 seconds. Then turn the speed to high and whip until the cream is nearly doubled in volume, smooth, thick, and soft peaks form when you remove the beaters or whisk, about 1 to 2 minutes. (Soft peaks are when the point of the peak falls over and touches the whipped cream. A stiff peak will stand up strait.)
    Powered by Recipage

    Monday, November 18, 2013

    Lamb Stew with Dried Plums


    This recipe for Lamb Stew with Dried Plums is perfect for your Catching Fire premiere party! It feeds 8 to 10 people and will smell so good while it simmers on your stove top. It certainly will be the most rich and decadent stew you've ever tasted; everything representing the capitol of Panem.  It's relatively simple to make, packs incredible flavor, and will become your favorite stew too, just like Katniss!

    A word on purchasing Lamb:
    I'll get strait to the point, it's not the cheapest on the pocket book.
    But as soon as you take your first bite you'll see why Lamb is expensive. It's dang good! So tender and juicy! The recipe calls for Lamb fillet, which can be difficult to find and is $$. If fillet isn't available, you'll have to purchase bone-in leg or shoulder/neck pieces, which are usually priced less. Plan on spending some time cutting the meat away from the bone, in addition to the listed preparation time.

    Lamb searing in the dutch oven before being slow cooked on the stove top.
    I love all the beautiful color!


    The Lamb chunks are tossed in seasoned flour and seared to lock in the juices and create more flavor. The lamb is then slow cooked in beef stock for an hour and a half. Then you'll just add all the additional ingredients and simmer for about 30 minutes longer. I love the color of all the veggies and the plums together. Ding! It's done :0) It comes out just right every time.

    If you're a fan of the Hunger Games (like me) this meal is a real treat. I hope you enjoy watching and reading. And may the odds be ever in your flavor!


    Lamb Stew with Dried Plums

    by The Goldilocks Kitchen
    Prep Time: 40 minutes
    Cook Time: 2 hours
    Keywords: roast
    Ingredients (8 to 10 servings)
    • 4 lbs. of lamb fillet, shoulder or leg, cut into 1" pieces
    • 2 teaspoons salt
    • 1/2 teaspoon ground black pepper
    • 1/2 cup all-purpose flour
    • 2 tablespoons olive oil
    • 3 cloves of garlic, minced or pressed
    • 1 large onion, diced
    • 4 1/2 cups beef broth
    • 2 tablespoons white sugar
    • 3 tablespoons brown sugar
    • 3 cups diced carrots
    • 1 cup diced zucchini
    • 1 1/2 cups diced celery
    • 3 potatoes, cubed into 1" pieces
    • 3 cups dried plums (prunes)
    • 2 teaspoons dried thyme
    • 3 teaspoons minced fresh rosemary
    • 2 teaspoons minced fresh basil
    • 2 bay leaves
    • 1 cup ginger ale
    • 1 teaspoon minced fresh Italian parsley
    Instructions
    1. In a large mixing bowl, place flour, salt and pepper and briefly whisk together. In a large stove top dutch oven, add the olive oil and set the burner to medium heat. Place the pieces of lamb into the mixing bowl with the flour and toss to coat evenly.
    2. When the oil is shimmering, pour in one half of the lamb pieces and saute until nice and brown on the outside, about 5 minutes. Remove onto a plate and cover with foil. Repeat with the remaining lamb pieces.
    2. Add the onion to the pot and saute until the onion softens and starts to turn golden. Add the garlic and cook for about 30 seconds. Pour in 1/2 cup of beef stock and scrape up all the brown bits off the bottom of the pan. This is called fond and it's terrific for adding flavor. Cook for about 5 minutes more to reduce the stock. Pour in the remaining beef stock and add the lamb and any accumulated juices back into the pot. Stir in the sugars. Bring the mixture to a boil, reduce to low, and cover. Simmer for 1 and 1/2 hours.
    3. Add the vegetables, dried plums, herbs, and ginger ale to the pot. Simmer for 30-40 minutes, until the meat and veggies pierce easily with a fork. Dish up and serve.
    Powered by Recipage
    09 10