Home
Showing posts with label pie. Show all posts

Thursday, March 27, 2014

Non-alcoholic Black Bottom Pie


Non-alcoholic Black Bottom Pie is a great way to liven up plain old chocolate cream pie. Typical Black Bottom Pie consists of a chocolate cookie crumb crust, a layer of chocolate cream topped with an airy rum-chiffon layer, and a final layer of whipped cream. My recipe substitutes the rum with a lovely caramel-infused chiffon layer. The contrast of flavors and textures in this pie make it a delightful treat.

It's very important that you read through the entire recipe, and prep/measure out all your ingredients before you begin. Trust me on this. Also take note that the amounts of sugar and water can be tricky; the amount listed in the ingredient section is the total amount used, but in the instructions the water and sugar are both divided and used at different steps in the recipe.

Equipment needed: A food processor, hand held mixer, and at least two medium-sized identical mixing bowls (you'll divide the pie filling evenly between the bowls; you just have to 'eye ball it' and it's easier to divide evenly if the bowls are identical.)


This recipe adapted from: Cooks Country magazine.


Non-Alcoholic Black Bottom Pie

by The Goldilocks Kitchen
Prep Time: 1 1/2 hours
Cook Time: 50 minutes
Ingredients (8 to 10 servings)
    crust
    • 28 Oreo cookies, broken into rough pieces
    • 4 tablespoons unsalted butter, melted
    pie filling
    • 2/3 cup sugar
    • 4 teaspoons cornstarch
    • 2 cups half-and-half
    • 4 large egg yolks plus 1 egg white
    • 5 ounces semisweet chocolate, chopped fine
    • 3 tablespoons Torani caramel syrup flavoring
    • 2 tablespoons water
    • 1 teaspoon unflavored gelatin
    • 1/4 teaspoon cream of tartar
    • 3 cups sweetened whipped cream
    Instructions
    1. Move an oven rack to middle position and set oven to heat to 350 degrees. Grind the broken cookies in a food processor to fine crumbs. Drizzle melted butter over crumbs. Replace lid and process for about 10 seconds to evenly distribute the butter. (It may be necessary to scrape down the sides once, I had to.) Pour the moist crumbs into a pie plate and press evenly over the bottom and up sides. I like to use a flat bottomed, metal measuring cup for this. Place in the fridge for 20 minutes before placing in the oven to bake for about 10 minutes. Set aside to cool.
    2. Moving on to the filling: whisk 1/3 cup sugar, cornstarch, half-and-half and egg yolks in a saucepan. Cook over medium heat, stirring constantly, until mixture comes to a boil, about 8 minutes.
    3. Divide the custard evenly as best you can between two identical bowls. Whisk chocolate into one bowl until smooth, then pour into the now cooled pie crust and use a spatula to create an even surface. Place in the fridge. Whisk caramel syrup, 1 tablespoon water, and gelatin into a small bowl and let mixture sit for 5 minutes. Then stir it into the plain custard. Set the bowl of caramel custard in the fridge for about 20 minutes, stirring occasionally until it's wobbly, but not set.
    4. Combine the remaining sugar, egg white, remaining water and cream of tartar in a large heatproof bowl set over a medium saucepan filled with 1 inch of barely simmering water. (Do not let the bowl touch the water.) Using a hand held mixer, beat the mixture on medium high to soft peaks, about 2 minutes. Remove the bowl from the heat and continue to beat until until the mixture is very thick and glossy and has cooled to room temperature, about 3 minutes.
    5. Bring out the caramel custard from the fridge and whisk the cooled egg white mixture in until smooth. Pour into the pie plate over the chocolate layer. Refrigerate at least 3 hours. Top with the sweetened whipped cream and serve.
    Powered by Recipage

    Tuesday, March 4, 2014

    Baked Apple Dumplings


    These cute and sweet Baked Apple Dumplings are little gifts of love. A piece of home sweet home wrapped up like a present, just begging to be opened. Drizzled with cider sauce, wrapped in buttery pastry dough, a Baked Apple Dumpling is your own personal apple pie. Inside each dumpling you'll be surprised to find an oh so sweet filling in the middle. Trust me, if you present these dumplings for dessert to your guests, they'll be quite the show stopper. Talk about an impressive display of your homemaking skills! After all, the Seven Dwarfs were bursting with joy when Snow White said she could whip up a batch of these. And if you try them, you'll see why.


    This recipe will be easier for someone who is comfortable in the kitchen and has made pies before, but my instructions are detailed enough that even a beginner shouldn't have trouble making these. The first thing I would suggest is making the Cider sauce and the pastry dough a day or two ahead of when you plan to bake the dumplings.

    Just imagine sitting down to a breakfast smorgasbord with  these
     Baked Apple Dumplings as the star of the show.
    This pastry dough is made from scratch, using a food processor to do most of the work for you, which is really nice. A combination of chilled butter and shortening are processed into the flour until the contents look like wet sand. This took me a good couple minutes, stopping periodically to scrape down the sides. My food processor is on the small side and a bit wimpy, so if you have a large capacity one it probably won't take that long. Just remember 'wet sand'.  Then, you'll combine the contents in a bowl with buttermilk (use store bought, not homemade clabbered milk) and mix it together. You should have a sticky dough. Dump it out and knead it on a floured surface a few times and it should be soft and lost it's stickiness. Work quickly, you don't want the dough to become warm. Shape it according to the directions, wrap it and put it in the fridge right away.


    When I make the cider sauce, I keep my Pyrex 2 cup glass measuring cup next to the stove. While reducing the syrup down to the correct consistency, I periodically pour the contents from the pot into the measuring cup until it measures to 1 and 1/2 cups.

    As for the apples themselves, use Golden Delicious, as suggested in the recipe. If you want to try a different type, be sure it's a crisp apple. Some apples, like McIntosh, can't take the heat of the oven and will just turn into mush. A strong apple must be used. I tried Ambrosia apples (which are my new favorite, and shown in the photographs below), and they were still hard after the recommended baking time. I had to cover the dumplings with foil so they wouldn't burn and bake for an additional 14 minutes before they were soft.

    I used my teaspoon to cut the core and seeds out of these apples. Do you see the hole at the bottom of the one in the
    center? No worries, I just plugged it with a small piece of apple.
    The apples in this recipe are cored and cut at the equator. This way they are stable and won't wobble, spilling the filling. Use a melon baller or metal round teaspoon to remove the seeds and core. Be sure to remove stems, and if you don't like the remnants of the blossoms, you can remove them too. Just be sure to fill the whole with small slices of apple so the filling won't leak. I will sometimes get carried away with removing too much core and create a whole in the bottom. If you do this, no biggie, just fill it in with small bits of apple as mentioned above. No matter how fast I work, inevitably the first apples I have done are turning brown by the time I finish with the rest. Not to worry, it won't affect taste once they are baked. but I still try to work quickly anyway.


    When I'm ready to assemble the dumplings, I have my filling already made and my dough just out of the fridge. Using some elbow grease, I roll it out cold on a lightly floured surface. Using a pizza cutter, I'll divide the dough into four equal parts. It may split apart at the edges, but this is okay, you can mush it back together once you wrap the apple halves. It's so much easier to work with cold dough.


    To avoid the dough sloughing off the apples in the oven, lightly apply the egg wash around the edges of your dough square and make sure you pinch, crimp and smooth the edges together well. I'll even smoosh some thicker parts of dough (usually on top) to thinner parts of the apple (tends to be the bottom) for a more even distribution. Check the bottoms for holes in the dough. Don't forget to apply egg wash and cinnamon sugar to the tops before popping them in the oven! (Ask me how I know...)

    Make sure you have some vanilla ice cream on hand to serve with these amazing dumplings. And please let me know how your experience goes with this recipe. I'd love to hear your feedback. I hope you find the end results worth the effort. Enjoy!

    Equipment needed:  A food processor, rolling pin, small rounded scoop, and a baking sheet. Pizza cutter helpful but not necessary.

    Apple Dumplings

    by The Goldilocks Kitchen
    Prep Time: 1 hour
    Cook Time: 20 to 25 minutes
    Keywords: bake dessert apple pie American fall
    Ingredients (8 servings)
      Dough
      • 2 and 1/2 cups all-purpose flour
      • 3 tablespoons sugar
      • 2 teaspoons baking powder
      • 3/4 teaspoon salt
      • 10 tablespoons unsalted butter, cut into 1/2 inch pieces and chilled
      • 5 tablespoons vegetable shortening, cut into 1/2 inch pieces and chilled
      • 3/4 cup cold buttermilk
      Apple Dumplings
      • 6 tablespoons sugar
      • 1 teaspoon ground cinnamon
      • 3 tablespoons unsalted butter, sofened
      • 3 tablespoons golden raisins, chopped
      • 4 Golden Delicious apples
      • 2 egg whites, lightly beaten
      Instructions
      1. Pulse flour, sugar, baking powder, and salt in a food processor until combined. Scatter butter and shortening over flour mixture and process until mixture resembles wet sand. You may have to stop periodically and scrape down the sides. Transfer to a large bowl. Stir in buttermilk until a sticky dough forms. Turn out onto lightly floured surface and knead briefly until dough is soft and not sticky. Press dough into 8 by 4 inch rectangle, using a ruler to measure. Cut in half, wrap each half tightly in plastic, and refrigerate until firm, at least 1 hour.
      2 Adjust oven rack to middle position and heat oven to 425 degrees. Combine sugar and cinnamon in a small bowl.
      3. In second bowl, combine softened butter, raisins, and 3 tablespoons of the cinnamon sugar mixture from step 2. Peel apples and halve through center equator. Remove the core with a melon baller or metal rounded teaspoon and pack butter mixture into each apple half.
      3. On lightly floured surface, roll each dough half into approximately a 12 inch square. Cut each 12 inch square into four equal squares. Working one at a time, lightly brush edges of dough square with egg white and place apple, cut side up, in center of each square. Gather dough one corner at a time on top of apple, crimping edges to seal. Using pairing knife, cut vent hole in top of each dumpling.
      4. Line rimmed baking sheet with parchment paper. Arrange dumplings on prepared baking sheet, brush tops with egg white, and sprinkle with remaining cinnamon sugar. Bake until dough is golden brown and juices are bubbling, 20 to 25 minutes. Cool on baking sheet 10 minutes. Serve with cider sauce and ice cream.
      Powered by Recipage


      Cider Sauce

      by The Goldilocks Kitchen
      Prep Time: 5 minutes
      Cook Time: 20 minutes
      Keywords: dessert
      Ingredients (1 and 1/2 cups)
        Cider Sauce
        • 1 cup apple cider
        • 1 cup water
        • 1 cup sugar
        • 1/2 teaspoon ground cinnamon
        • 2 tablespoons unsalted butter
        • 1 tablespoon lemon juice
        Instructions
        1. Combine the cider, water, sugar and cinnamon in a medium saucepan. Bring to a simmer over medium-high heat until thickened and reduced to 1 and 1/2 cups.
        2. Off heat, whisk in the butter and lemon juice. Drizzle over apple dumplings and serve. (If making this ahead, refrigerate after step 1. Follow step 2 just before you're ready to serve, warming the sauce on the stove top first while the dumplings are baking.)
        Powered by Recipage

        Saturday, February 8, 2014

        Easy Three Step Strawberry Cream Pie


        Sweet strawberries enveloped by billowy whipped cream create a dreamy pie that is a cinch to make. If you want to impress a special someone for Valentines Day with a fabulous home cooked meal, top it off with this sinfully sweet treat. Of if you're just looking for a new pie flavor to shake things up for Sunday night dinner, this one is delightfully easy.


        There's only three simple steps to create this pie~ stirring, folding and freezing. Frozen strawberries are stirred together with sweetened condensed milk, a jar of strawberry preserves, and a touch of lemon juice to blend the flavors.


        Then you fold in an entire container of thawed whipped topping. Remember, folding is not stirring~ use a spatula and scoop along the sides of the bowl, gently and repeatedly folding over the top center of the whipped cream so it doesn't deflate.


        When there's no more streaks of red or white, spoon it into store bought graham cracker crusts and freeze it to firm up. Just before you're ready to serve it, pull it out of the freezer and let it soften for about 10 minutes. I like to top it off with additional whipped cream, strawberries or chocolate curls for a garnish. I hope you truly enjoy this recipe!


        Strawberry Cream Pie

        by The Goldilocks Kitchen
        Prep Time: 10 minutes
        Cook Time: freeze for 6 hours
        Keywords: dessert Strawberries pie
        Ingredients (2 pies, 12 servings each)
        • 1 (18 ounce) Jar of strawberry preserves
        • 1 (14 ounce) can of sweetened condensed milk
        • 1 (10 ounce) bag of frozen strawberries
        • 1 tablespoon lemon juice
        • 1 (16 ounce) container of frozen whipped topping, thawed
        • 2 ready made graham cracker crumb pie crusts
        Instructions
        1. Thaw the strawberries in the microwave. Place them in a strainer over a sink or bowl and mash them, pressing the liquids out.
        2. Combine the strawberries in a large bowl with the sweetened condensed milk, jar of strawberry preserves, and lemon juice and thoroughly combine,
        3. Fold in the whipped topping gently (do not stir) until evenly combined. Spoon the filling into the ready made pie crusts and freeze for six hours or until firm. Before serving, let the pie soften at room temperature for about 10 minutes and add additional whipped topping and fresh strawberries or chocolate curls if desired to garnish.
        Powered by Recipage

        Friday, November 22, 2013

        Chocolate Pecan Pie

        This Recipe for easy southern chocolate pecan pie is the best homemade dessert for any party or holiday celebration! A classic with a chocolate twist. Because everything is better with chocolate. Top with caramel flavored whipped cream for the perfect garnish!

        Holiday pie made from scratch? There is rarely a thing in the world more delicious or rewarding!
        I am the type of person who feels chocolate can make anything better, especially pie :0) Adding chocolate to Pecan pie just takes it to a whole new level! Plus a dollop of Caramel whipped cream on top puts this pie over the top. (See recipe below.) It's the perfect complementary flavor for the pecans and the caramel matrix in which they lay.
        This Recipe for easy southern chocolate pecan pie is the best homemade dessert for any party or holiday celebration! A classic with a chocolate twist. Because everything is better with chocolate. Top with caramel flavored whipped cream for the perfect garnish!

        I will never forget the first time I had a slice of Pecan pie. It was just after I had moved to Kingston, Ontario Canada. Some friends of mine had me over for a lovely dinner. Afterwards, I was offered a piece of pee-can pie.
        "What's that?" I said.
        My friend stared at me for a moment with eyebrows raised.
        "You've never heard of pee-can pie before?!"
        "No, I really haven't. I'm thinking it must be a Canadian dish?"
        "I'm pretty sure people from the states eat it too...here, try it."
        She place a slice of Pecan pie on my plate. Boy I felt stupid then!
        "Oh!" I said. "Pecan pie! I was totally confused~ you guys just pronounce it differently here, ha ha, My bad."
        I was mentally kicking myself the rest of the evening; feeling so stupid for not picking up on that! And I guess some in 'the states' pronounce it that way too :0) Even as I ate the pie that night, I decided I wasn't a huge fan of Pecan pie. I've just never been one to love nuts in my food. (Unless it's chocolate cashew or peanut clusters, I love them! See there's that whole adding chocolate to stuff makes it better thing :0)

        This Recipe for easy southern chocolate pecan pie is the best homemade dessert for any party or holiday celebration! A classic with a chocolate twist. Because everything is better with chocolate. Top with caramel flavored whipped cream for the perfect garnish!

        Anyway, I naturally gravitate towards the chocolate pies during the holidays or whenever I have a choice of pie. So when I was watching an episode of Cake Boss on Netflix and saw them making Chocolate Pecan Pie (among other pies), my curiosity was piqued. I'd never herd of chocolate pecan pie before. I had to try it! And there, in one of my baking books I found a recipe for it. Bada-bing, bada-bang, bada-boom! After I tasted the first bite I wanted more and more!

        I also think I enjoyed this pie so much because the pecans are roasted in the oven, softening them a bit and adding a new dimension of flavor. They are also chopped, which texture I preferred to whole nuts. Plus, adding in three different types of chocolate, semi-sweet, milk and white really was a delight for my taste buds. An important note: an instant read thermometer is essential to creating this pie. If you don't have one, see if you can borrow one from a friend!

        Want to know a great trick for creating a gourmet pie? Flavor your whipped cream topping! Yes, a simple but delightful addition of flavored whipped cream can complement just about any pie. I love Caramel flavored Whipped Cream on my Pumpkin and Pecan pie. Whip it up just before you are ready to serve your slices. Find the recipe following the one below for Chocolate Pecan pie.


        Chocolate Pecan Pie

        by The Goldilocks Kitchen
        Prep Time: 30 minutes
        Cook Time: 55 to 65 minutes
        Ingredients (8 to 10 servings)
        • 1 recipe for prebaked Pie Shell
        • 1/3 cup of semi-sweet chocolate chips
        • 1/3 cup of milk chocolate chips
        • 1/3 cup of white chocolate chips
        • 3 tablespoons unsalted butter, cut into 1 inch pieces
        • 3/4 cup packed dark brown sugar
        • 2 large eggs
        • 1/2 cup light corn syrup
        • 1 teaspoon vanilla
        • 1 cup pecans, toasted and chopped into small pieces
        Instructions
        1. While preheating your oven to bake the pie shell, roast the whole pecans on a rimmed baking sheet for about 5 to 7 minutes. Watch carefully so they don't burn and stir them every couple minutes. Chop them up when they have cooled sufficiently.
        2. Follow the directions for partially baking the pie crust. Melt the butter in the bowl of your stand mixer by placing it in a pot of water set over medium low heat. The water should not simmer.
        3. Remove the bowl when the butter is completely melted and mix in the sugar and salt with a wooden spoon. Stir until all the butter is absorbed. Attach the bowl to the stand mixer. With the whisk attachment, beat in the eggs, then corn syrup and vanilla.
        4. Return the bowl to the pot of hot water and stir the mixture until it reaches 130 degrees on an instant read thermometer. This can take anywhere from 10 to 15 minutes. (The mixture should be shiny and hot.) Remove from the heat and stir in the toasted chopped pecans.
        5. When the pie shell comes out of the oven, pour the pecan mixture into the pie shell. Sprinkle the chocolate chips over the pie filling and use the back of a spoon to push them down into the filling. Adjust the oven temperature to 275 degrees and move an oven rack to the middle position. Bake the pie for 55 to 65 minutes, when the filling is set but soft when pressed with the back of a spoon. Transfer to a wire rack to cool for 4 hours.
        Powered by Recipage


        Caramel Whipped Cream

        by The Goldilocks Kitchen
        Prep Time: 5 minutes
        Cook Time: about 3 to 5 minutes
        Ingredients (8 servings)
        • 1 1/3 cup whipped cream
        • 1 tablespoon brown sugar
        • 1 tablespoon of Torani Caramel syrup or other flavor or liquor of your choice
        Instructions
        1. Chill bowl and beater(s) in a freezer for about 10 minutes. Add all ingredients into the bowl and whip at low speed for about 30 seconds, or until the mixture gets frothly with bubbles. Increase the speed to medium for another 30 seconds. Then turn the speed to high and whip until the cream is nearly doubled in volume, smooth, thick, and soft peaks form when you remove the beaters or whisk, about 1 to 2 minutes. (Soft peaks are when the point of the peak falls over and touches the whipped cream. A stiff peak will stand up strait.)
        Powered by Recipage

        Friday, November 15, 2013

        Pumpkin Pie From Scratch


        Pumpkin pie. The iconic American holiday dessert. What more can be said about it that hasn't already been said?


        Well, a lot! Have you ever tasted a store bought pumpkin pie? With it's soggy crust and grainy, overbearing one note flavor? Oh pumpkin pie, how you have fallen! This desert was once a light creamy custard with a crisp crust and a symphony of flavors harmonizing with the pumpkin puree. It's time to restore this quintessential holiday dessert back to it's former glory. It starts by creating your own at home in the kitchen. If you'd like to know how, read on!

        Let's start with the crust.
        You can purchase ready made single-crust pie dough, make your own favorite recipe. Better yet, try my favorite Foolproof Pie Crust.


        I like to use a french style rolling pin for pie dough because it's long enough to roll up the pie dough and still have space on the ends. But any longer-style rolling-pin will do. Rolling the dough onto your pin and then rolling it out over the pie plate will help keep the dough from ripping. If you are using my Foolproof Pie Dough recipe, sprinkle at least two tablespoons of flour onto the surface where you will be rolling out the dough. It's more moist that traditional pie dough. I also make sure my rolling pin is dusted with flour to ensure that the dough won't stick. You'll need to work quickly, when the dough is pliable but still cold. If it warms too much it will become sticky even if you use a lot of flour.

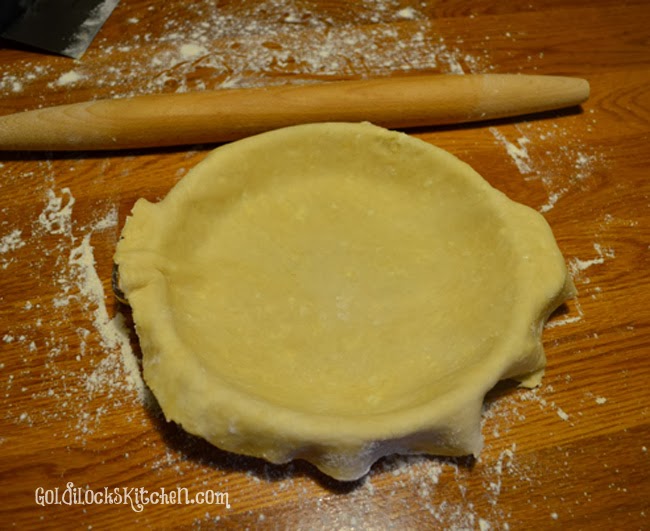
        Following the pictures, place your pie dough in the the plate and create a decorative edge. Set it in the fridge for 30 minutes while your oven is heating. You can move on to prepping the ingredients for the filling.

        Slowly roll the pastry dough onto your rolling pin. A bench scraper comes in handy if the dough sticks to the surface.

        Gently unroll the dough over the pie plate. There should be at least 1/2 inch over hang all around.
        Trim any overhanging dough that is longer than 1/2 inch.

        Tuck or fold the edge of the dough under 1/2 inch.

        Create a decorative fluted edge all around with the index finger of one hand and
        the thumb and index finger of your other hand, as shown.

        In order to achieve a properly crunchy pie crust that will stay that way, the dough needs to be pre-baked while you're creating the filling. This way, the warm pie shell and hot filling you pour in will set the custard quickly and prevent it from soaking into the crust and making it soggy.

        When you're pre-baking a pie shell, you must way the down the dough or it will dome up in the middle and shrink down the sides when it's baking in the oven.(In other words, turn into a disaster. Ask me how I know...) Some traditional methods suggest you use beans or rice. I would avoid these, as they don't conduct heat well and are not as heavy. Your best options for weight are pie weights (which you can find at most stores) or coins. Yes, that piggy bank full of pennies can be useful!


        Cover the shell in foil, folding the edges over the pie plate. Place the weights inside and bake your crust according to the recipe. You'll want to remove the weights shortly before the pie crust is finished baking so the bottom can brown up a bit too.


        Onto the Filling
        For this recipe, once again there are some surprise secret ingredients that come to your aid. Pumpkin puree is cooked on the stove with candied yams. The yams (or sweet potatoes) complement the pumpkin well, tasting very similar but adding a depth of flavor. Why first cook the filling on the stove top? The heat will reduce the amount of liquid in the potato puree, concentrating the flavor. Also adding heat to the spices and fresh grated ginger will 'bloom' the flavor of these ingredients, building more complex flavors to complement the pumpkin.


        When your pie shell and stove top cooking are done (hopefully around the same time), the pumpkin mash is mixed thoroughly with a custard base and strained through a fine mesh strainer. Pour the strained liquid filling directly into the warm pie shell and bake! Ooh la la, you have just baked a pumpkin pie from scratch! Note that you'll remove the pie when the center is still jiggly. The residual heat will finish cooking the pie through.

        I can't eat pumpkin pie without a good sized dollop of whipped cream. Chocolate curls don't hurt for a lovely garnish either. Why not serve a special whipped cream on top of a special pie? Mixing in a bit of brandy or my personal favorite, Torani Caramel flavoring syrup, can be a very tasty top note garnish to a pumpkin or pecan pie. See my simple recipe for Caramel Whipped Cream. (Also coming very soon.)


        Holiday Pumpkin Pie From Scratch

        by The Goldilocks Kitchen
        Prep Time: 45 minutes
        Cook Time: 35 to 45 minutes, cool 2 hrs.
        Keywords: bake dessert Pumpkin Christmas Thanksgiving pie winter
        Ingredients (8 -10 Servings)
        • 1 recipe for single-crust pie dough
        • 1 cup heavy cream
        • 1 cup whole milk
        • 3 large eggs plus 2 egg yolks
        • 1 teaspoon vanilla extract
        • 1 (15 oz) can of pumpkin puree
        • 1 cup drained candied yams from a 15 oz can (can substitute
        • regular yams if candied are not available)
        • 3/4 cup of sugar
        • 1/4 cup maple syrup
        • 2 teaspoons minced or grated fresh ginger
        • 1 teaspoon salt
        • 1/2 teaspoon ground cinnamon
        • 1/4 teaspoon ground nutmeg
        Instructions
        1. Move an oven rack to the lowest position and set oven to 400 degrees. Place a foil-lined rimmed baking sheet on the lowest rack to heat in the oven.
        Roll one disc of dough out on a lightly floured (about 2 tablespoons) work surface to approximately 12 inches in diameter. The dough should be about 1/8 thick. (If the dough becomes soft and sticky return it to the fridge to firm up again.) Roll the dough around a rolling pin and unroll it over a 9 inch pie plate. There should be at least 1 inch overhanging on all sides. Gently lift the edges and lower the dough down against the sides of the pan.
        2. Trim the overhanging dough to 1/2 inch overhang, then fold it underneath itself so the edge of the dough is flush with the edge of the pie plate. Flute the edges with your fingers, cover the whole thing with plastic wrap and refrigerate until firm, about 30 minutes.
        3. Remove the pie shell from the fridge and poke a few holes around the bottom of the dough using a fork. Line the chilled dough with heavy duty aluminum foil and fold the edges over the crust. Fill the pie plate with weights or pennies and place the pie on the preheated baking sheet in the oven. Bake for 15 minutes (25 if using my Foolproof Pie Dough recipe). Remove the weights and foil from the pie shell and continue to bake until golden brown and crisp, 5 to 10 minutes more. Remove the pie plate and baking sheet from the oven. Leave the oven on.
        4. While you're baking the pie shell, Whisk the cream, milk, eggs, egg yolks, and vanilla together in a mixing bowl. In a large pot, combine the pumpkin puree, yams, sugar, maple syrup, ginger, salt, cinnamon and nutmeg. Simmer the mixture (more like sputter), mixing constantly and mashing the yams, for about 10 to 15 minutes. It should be thick and shiny.
        5. Remove the pot from heat and whisk in the egg milk mixture well. Strain the mixture through a fine mesh strainer set over a large mixing bowl, pressing on the solids to extract as much liquid as possible. Pour the strained custard into the warm pie shell. Keeping the rimed baking sheet under the pie, place the pie into the oven. Bake for 10 minutes.
        6. Reduce the heat to 300 degrees, carefully rotate the baking sheet, and bake for an additional 20 to 35 minutes longer. The edges of the pie should be set, and the middle 2 inches jiggly. The internal temp at the center should reach 175 degrees on an instant read thermometer. Cool the pie on a wire rack for 2 to 3 hours at room temperature. Cut and Serve.
        Powered by Recipage

        Tuesday, September 17, 2013

        My most favorite dessert ever is...

        This recipe for Triple Chocolate Mousse cake is created with a base layer of dark chocolate mousse cake, followed by layers of rich milk chocolate and white chocolate mousse. A decadent indulgence :0)
        Gluten Free Triple Chocolate Mousse Cake

        Manna from heaven. Seriously. This is the dessert of all desserts!
        Recently I was asked to cook two cakes for a BSA (Boy Scouts of America) cake auction and this cake sold for the highest amount...$135! I was so happy to help out, and the folks that took this cake home said it was worth every penny.
        You will feel like you've died and gone to heaven when you take your first bite of Triple Chocolate Mousse Cake, which happens to be gluten free.
        I will always remember when I discovered this ultimate chocolate masterpiece while dining at one of my favorite restaurants in New Mexico. I thought that it was a one-of-a-kind restaurant creation until years later I stumbled across a recipe for it by Cooks Illustrated.  I was thrilled; then I read the instructions. A stand mixer was a requirement, and unfortunately I didn't own one. However, having this recipe in hand was certainly motivation to purchase one! Just last Christmas I finally added a KitchenAid stand mixer to my kitchen counter top and christened it with this recipe.

        This recipe for Triple Chocolate Mousse cake is created with a base layer of dark chocolate mousse cake, followed by layers of rich milk chocolate and white chocolate mousse. A decadent indulgence :0)

        This dessert is a real showstopper and absolutely a crowd favorite. Your friends and family will be so impressed with your cooking abilities when you serve them a slice! The base is made of modified chocolate souffle/flourless cake, sturdy enough to hold up the milk chocolate and white chocolate mousse layers on top. Again, a stand mixer and a springform pan are required for this recipe. So get the equipment you need and make it!


        Triple Chocolate Mousse Cake

        by The Goldilocks Kitchen
        Prep Time: 45 minutes
        Cook Time: 3 hours
        Ingredients (16 slices)
          Bottom Layer
          • 6 tablespoons of unsalted butter, cut into several pieces
          • 7 ounces of semi-sweet (or bittersweet, same thing just different names) bakers chocolate, chopped up/broken into small pieces
          • 1 and 1/2 teaspoons of vanilla extract
          • 4 large eggs, separated
          • a pinch of table salt
          • 1/3 cup of packed light brown sugar (crumble with fingers to remove any lumps
          Middle Layer
          • 2 tablespoons of cocoa powder
          • 5 tablespoons of hot water
          • 7 ounces of semi-sweet (or bittersweet) bakers chocolate, chopped up/broken into small pieces
          • 1 and 1/2 cups cold heavy cream
          • 1 tablespoon of granulated sugar
          • 1/8 teaspoon table salt
          Top Layer
          • 1 teaspoon powdered gelatin
          • 1 tablespoon of water
          • 6 ounces of white chocolate chips
          • 1 and 3/4 cups cold heavy cream
          • Chocolate curls or strawberries to garnish (or both)
          Instructions
          First Layer
          Spray a 9 and 1/2 inch springform pan generously with cooking spray. Adjust your oven rack to the middle position and preheat the oven to 325 degrees. Melt the butter and chocolate together in a heatproof bowl over a pot of just simmering water, stirring occasionally. The pot should only have about 1 inch of water.(The water should NOT touch the bottom of the bowl, or it will scorch the chocolate.) The steam from the simmering water gives the right amount of heat. When smooth, remove from heat and let it cool for about 5 minutes. Then whisk in the vanilla and egg yolks.
          In a stand mixer, beat the egg whites and salt with the whisk attachment at medium speed until lots of bubbles appear about 30 seconds. This texture is called 'frothy'. Add half the brown sugar and mix for another 15 seconds or so. Then add the remaining brown sugar and switch the speed to high, beating until soft peaks form when whisk is lifted, about a minute to minute and a half. Scrape down the bowl with a spatula half way through if needed. Watch carefully so as to not over-whip to stiff peaks.
          Using a whisk, gently mix one-third of beaten egg whites into the chocolate mixture to lighten it. Switching to a rubber spatula, and fold (do not mix) in the remaining whipped egg whites until no white streaks remain. Gently poor the mixture into the springform pan and smooth the top with an offset spatula.
          Bake for 13 to 18 minutes, when the cake has risen, is firm around the edges and the center springs back after a gentle touch of the finger. Remove from the oven and cool on a wire rack for about an hour. The cake will collapse as it cools and pull away from the edge of the pan. This is normal, don't freak out :0) Wash your stand mixer and whisk attachment for the next layer.You're done with the first layer!
          Middle Layer
          Mix the cocoa powder into the hot water and set aside. Melt the chocolate in a heatproof bowl and stir the chocolate occasionally until completely melted and smooth. Remove from heat and set aside to cool. While waiting, whip cream, granulated sugar and salt with the whisk attachment at medium until frothy. move speed to high and whip until soft peaks form when whisk is lifted, about a minute. This goes fast so watch carefully!
          Next, whisk the cocoa powder-water into the melted chocolate until smooth and shiny. Then using a whisk, fold 1/3 of the whipped cream into the chocolate mixture to lighten. With a rubber spatula, gently fold in the remaining cream until no white streaks remain. Gently pour the mousse into the springform pan over the bottom layer and tap the bottom on the counter a few times to remove any air bubbles. Smooth the top and refrigerate at least 15 mins while preparing the top layer. Wash your stand mixer equipment again.
          Top Layer
          In a small container, sprinkle the gelatin over the water. Place white chocolate into a medium sized mixing bowl. Bring 1/2 cup cream to simmer in a small saucepan over medium-high heat, stirring constantly. Remove from heat and mix in the gelatin mixture. Stir until fully dissolved. Pour the cream over the white chocolate and stir until melted and smooth. Cool to room temperature, mixing occasionally.
          Whip remaining cream in the bowl of your stand mixer at medium speed until frothy, and then increase the speed to high and whip until soft peaks form when whisk is lifted, about one minute. Using a whisk, fold 1/3 whipped cream into white chocolate mixture until thoroughly combined. Then using a rubber spatula, gently fold in the remaining whipped cream until fully incorporated. (It's a little hard to tell since you're mixing white into white essentially, just do your best to watch it and not fold to much or it will deflate.) Gently pour out onto the middle layer and smooth the top. Refrigerate until set, approximately 2 and 1/2 hours.
          +To remove and serve+ Run a thin knife between the cake and the side of the springform pan. Remove the side of the pan. Run a clean hot knife along the outside of the cake to smooth the sides. Use a clean hot knife or wire to slice and serve with a garnish of chocolate curls or strawberries.
          Powered by Recipage
          09 10