Home
Showing posts with label entree. Show all posts

Thursday, March 13, 2014

Savory Mushroom and Onion Shepherd's Pie


Savory Mushroom and Onion Shepherd's pie is a recipe that I grew up on. My mother would often make this for Sunday dinner and we'd hoover it up~ vegetables and all. It's not what I'd call a 'from scratch' recipe, but it does have a few secret ingredients that make it live up to its' savory name :0)

For really delicious tasting shepherd's pie, it's important to use homemade mashed potatoes. I have made the mistake of using instant potato pearls in the past, and ended up with...well...blech. My homemade mashed potato recipe is flavored with not only butter, salt and pepper; half and half and cream cheese make the potatoes fabulously creamy and delicious tasting on their own.

One ingredient that really makes this shepherd's pie great is instant onion soup mix. (I'd almost call it a secret ingredient; I use it often to season beef.) Sprinkled over the ground beef when it's browning in the skillet. It makes the beef mmm mmm good! This is the only onion in the recipe, no wiping away tears while dicing fresh onion.

The 'mushroom' in the title comes from condensed cream of mushroom soup, which the vegetables are mixed into to form the second layer. I love the way it flavors the veggies, and sinks down to flavor the ground beef even more when it's baking in the oven. I personally load the shredded cheese on the top of this casserole, but you can cut back to whatever your taste preference. Just make sure you don't skip it all together, cheese makes everything taste better, and in this recipe cheddar cheese pulls all the flavors together and makes this recipe over the top delicious. Enjoy it!


Shepherd's Pie

by The Goldilocks Kitchen
Prep Time: 40 minutes
Cook Time: 35 minutes
Ingredients (8 servings)
  • 3 medium size russet potatoes
  • 1/3 cup half and half
  • 4 tablespoons salted sweet cream butter or margarine
  • 1/4 cup (about 1/3 a package) of cream cheese
  • 2 lbs ground beef
  • 2 tablespoons powdered onion soup mix
  • salt
  • pepper
  • 1 can of condensed cream of mushroom soup
  • 1 and 1/2 cups frozen peas
  • 1 can (15 oz) whole kernel corn
  • 1 can (15 oz) sliced green beans
  • 1 and 1/2 cups grated cheddar cheese
Instructions
1. Peel and cut the potatoes into approximately 1 inch chunks. Place in a pot and fill with water to 1 inch above the potatoes. Generously salt the water and set over a medium high burner. Boil the potatoes until soft, about 10 to 15 minutes. Drain. Place in a stand mixer, or using a hand held mixer, whip the potatoes with the half and half, butter, cream cheese salt and pepper. Set aside.
2. While the potatoes are cooking, brown hamburger in a large skillet using a wooden spoon to break into small pieces. Sprinkle the onion soup mix and salt and pepper over to season the meat. Stir often and cook until no pink spots remain. Drain excess fat from pan if necessary. Pour into a 9 X 13 inch baking dish.
3. Set your oven to 375 degrees. In a large mixing bowl, mix together the condensed onion soup mix with the peas, corn and green beans. Spread out over the hamburger layer in the baking dish.
4. Spread the mashed potatoes evenly over the vegetable mixture all the way to the sides of the dish. Sprinkle the grated cheese over the potatoes and place in the oven for 30 minutes. Serve.
Powered by Recipage

Friday, March 7, 2014

Barbecued Dry-Rubbed Chicken


Wow! This has got to be one of my new favorite recipes, and will definitely be my go-to recipe for barbecued chicken. This Barbecued Dry-Rubbed Chicken recipe seasons the meat with a rub that ends up melting as the chicken cooks and turning into an incredibly savory glaze.

It's truly incredible chicken. Rubbing meat with spices is an excellent way to season meat for the grill. But then you miss out on the sticky, savory glaze that screams 'barbecue'. Basting your meat with barbecue sauce gives you that great glaze and sticky fingers, but the glaze doesn't have time to really penetrate and season the meat. With this recipe you get the best of both worlds! It's mmm mmm good, and I don't think I'll ever buy a bottle of store bought barbecue sauce again.

I have a confession to make. Every time I used our grill (previous to this recipe), epic fails resulted. Every time. I have stomped and thrown fits and wanted to throw our grill on some train tracks somewhere. (Are you sensing my frustration here?) I would follow the recipe instructions exactly~ and end up with black lumps of coal for food. So I relegated all the grilling to my husband.

When this recipe came along, I made up my mind to figure out how to use our gas grill. No matter how many times I had to make it, I wouldn't give up. The third time was the charm, and this is what I ended up with! A whole plate full of YUM!


Gas and charcoal grills operate very differently and I"m not going to get into all of that. But I will share with you what I learned about using my gas grill. I finally figured out that I needed to let my grill temperature fall to the desired range after preheating before placing my food on it. I was placing food on the grill when it was still almost 500 degrees. DUH! Plus there is a lot of fat rendered from the skin on the chicken. I had a major grease fire in my grill at one point too. That also blackened my food very quickly.
Lessons learned: 1. Check the grill temperature. 2. Watch for grease fires. 3. Wait for the grill to cool some after preheating.

Every delicous bite is well worth the effort to learn your grill and have Barbecued Dry-Rubbed Chicken on your dinner plate tonight! I hope you enjoy this recipe as much as I do. Please let me know how it goes, I always love feedback!


This recipe adapted from


Barbecued Dry-Rubbed Chicken

by The Goldilocks Kitchen
Prep Time: 40 minutes
Cook Time: 40 to 50 minutes
Keywords: grill entree July 4th American spring summer fall
Ingredients (4 to 6 servings)
    Dry Rub
    • 3 tablespoons dark brown sugar
    • 2 teaspoons chili powder
    • 2 teaspoons paprika
    • 1 and 1/2 teaspoons pepper
    • 1 teaspoon dry mustard
    • 1 teaspoon onion powder
    • 1 teaspoon salt
    • 1/4 teaspoon cayenne pepper
    chicken
    • 3 pounds bone-in, skin-on chicken pieces
    • (breast pieces halved crosswise and drumstick and thigh separated)
    Instructions
    1. Prepare the chicken by blotting dry with paper towels. Combine all ingredients for the dry rub and divide evenly in two separate bowls. Set one bowl aside. Rub the other bowl of seasoning all over chicken pieces and under the skin.
    2. Cover and refrigerate seasoned chicken pieces for at least 30 minutes or up to an hour.
    3. While chicken is in the fridge, preheat your grill. Scrape clean and oil the grate. When the grill has reached a temperature of about 325 degrees, (low or medium low) it's ready for the chicken pieces. (Each grill is different, whether you use charcoal or gas. I burned three batches of chicken before I figured out I had to let my gas grill cool down for 20 minutes after preheating to come to the proper low temperature.)
    4. Place the chicken skin side down and grill until the skin is crisp and well browned, about 15 to 20 minutes.
    5. Dredge the skin side of the partially cooked pieces in the second bowl of seasoning and return to the grill, skin side up. Grill, covered, until the internal temperature has reached 160 degrees for white meat, and 175 for dark. The rub will melt and turn into glaze on the chicken. Remove, tent with foil for about 5 minutes, and serve.
    Powered by Recipage

    Tuesday, February 25, 2014

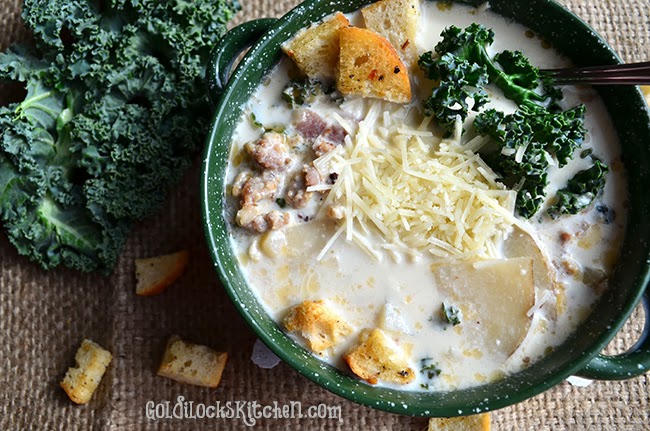
    Zuppa Toscana Soup


    Zuppa Toscana (Tuscan Soup) is one of the best recipes for soup that I've ever eaten. Ever. The ingredients are simple enough~ and there's nothing fancy about the way you cook them. But when they come together magic happens in your mouth. Even thinking about it now causes some cravings; I'm probably going to have to make up another batch after I write this post!


    This recipe originated from 'The Olive Garden' restaurant. It was so popular people started to experiment at home to see if they could come close to cooking up a batch that tasted like the original. In doing research for this recipe, I came across a few variations. This one I'm sharing with you in my opinion, is the most accurate.


    The ingredients for this soup are simple, yet lovely together. Italian sausage, bacon and minced onion are sauteed and combined with chicken stock, potato slices, coarsely chopped kale and cream (half and half). I will admit: I don't eat kale very often, but this is one recipe that it is perfect for. Don't leave it out! All these flavors combine to create a savory and flavorful soup that you just can't get enough of. Seriously.


    A few tips: I have written the recipe instructions so that you slice the potato while the meat is cooking on the stove top. I noticed that if I did it before I started cooking, during recipe prep, that the potatoes had started to turn brown before I got them in the pot. Just remember while slicing the potato, to take some time to stir your sauteing meet around frequently, so it cooks evenly.

    Also a word about olive oil: In this recipe the olive oil called for is not Extra Virgin Olive Oil (or EVOO). It is the less refined plain old 'olive oil' as stated below. There is a difference. When a recipe calls for olive oil and you're not sure which one to use, check to see if it's going to be cooked. You don't want to heat EVOO. Yep Rachel Ray, I said it. EVOO is extra extra refined (hence the name) and is made to be served at room temperature. Because it's so refined, it burns at a much lower temperature that regular olive oil.  If you'd like to use olive oil to saute your meets or veggies~ that's great. Just make sure you have a bottle of 'olive oil' on hand to use. The smoking point is higher (the point at which it's the correct temperature to add your ingredients to saute) and it's made for cooking. EVOO is best in vinaigrette, salad, bread dipping, or drizzled over your Italian entree just before serving for an extra dimension of flavor.
    Whew. I'll get of my soap box now :0) 

    If I could jump out of the screen and tell you to try this soup today, I would! I love it and it's my new favorite. I truly hope you enjoy it as much as I do. Give it a try!


    Zuppa Toscana Soup


    by The Goldilocks Kitchen
    Prep Time: 10 minutes
    Cook Time: 45 minutes
    Keywords: saute soup/stew Italian
    Ingredients (6 to 8 servings)
    • 2 tsp olive oil
    • 1 pound Italian sausage, hot or mild
    • 4 oz bacon, diced into 1/2 inch pieces
    • 1 small onion, minced
    • 5 cups low sodium chicken broth
    • 2 cups water
    • 2 medium russet potatoes, skins washed
    • 1 1/2 tsp sugar
    • salt and fresh ground pepper
    • 2 1/2 cups half and half
    • 1 cup packed kale chopped into bite size pieces
    • 1 cup finely shredded Romano cheese for serving
    Instructions
    1. Heat olive oil in a large dutch oven over medium heat until shimmering. Crumble sausage (remove casings) and cook, breaking large clumps apart, until sausage is fully cooked and browned. Remove with a slotted spoon onto a paper towel lined plate or bowl. Remove all but 1 teaspoon fat from the pan. Add diced bacon and saute for about 5 minutes. Add onion and sprinkle with a pinch of salt. Saute until the bacon is cooked through (not crunchy) and onions are soft, about 5 minutes more.
    2. While the sausage and bacon cook, slice the potatoes lengthwise, and slice each half lengthwise again. Slice each portion crosswise into thin slices approximately 1/8 inch thick.
    3. Add the chicken broth, water, sliced potatoes, sausage, kale, sugar, salt and pepper to the bacon/onion mixture. Bring soup just to a boil, then reduce heat to medium low and simmer, covered, for 20 minutes or until the potatoes are very tender. Remove excess fat from the surface with a large spoon or ladle. Stir in the half and half. Season with salt and pepper to taste. Sprinkle about 1 tablespoon of cheese over individual servings. Garnish with seasoned croutons if desired. Serve.
    Powered by Recipage

    Thursday, February 20, 2014

    From the Freezer Stuffed Bell Peppers


    Freezer meals are fantastic for quick and easy eating, but the harsh environment of the freezer can have a real impact on taste. This recipe avoids the freezer burn and is packed with great flavor! And what's even better~ It makes 12 servings, so you do the work once and it will feed you several times over.


    Green bell peppers are the norm for stuffed bell pepper recipes, but in this one you'll ditch the unripened pepper's harsher taste for ripe peppers' sweeter taste and great color. The filling flavors have to be able to withstand the freezer's harsh conditions and still be great tasting once's they've been cooked. Ground meat combined with Italian sausage and fresh herbs does the trick and can withstand the freezer and still have bold delicious flavor.


    You may have noticed that these peppers are sliced a bit differently than most recipes~ They are sliced pole to pole. There's a good reason for this~ they stay put. There's more flat surface area to keep them from rolling around when they are laying face down, especially on a broiler pan, which is the preferred way to cook them.

    Strait from the freezer, still wrapped.
    Stuffed bell peppers can often be soggy, and this is remedied by cooking them pepper-side up. The filling is held in place by a layer of tin foil poked with a few holes to allow steam to escape out. This way the peppers can roast properly and their flavors can really shine along with the rest of the ingredients. 

    Once unwrapped, a smaller piece of foil sprayed with cooking spray is placed over the filling.
    It's then poked with a skewer a few times to vent.
    Peppers are then placed filling side down, and
    brushed with olive oil. A couple generous pinches of salt and pepper
    are sprinkled on the bell peppers.
    When the peppers are done baking, they are turned over and the
    foil removed. Heap lots of Mozzarella cheese on top and pop them back in
    the oven to melt it. They are done!
    I hope you enjoy them! Please let me know about your experience, I'm relatively new to recipe blogging and I'd love the feedback :0)

    From-the-Freezer Stuffed Peppers


    by The Goldilocks Kitchen
    Prep Time: 40 minutes
    Cook Time: 35 minutes
    Ingredients (12 servings)
      Peppers and Stuffing
      • 1 tablespoon olive oil
      • 1 medium onion, chopped fine
      • 8 ounces ground beef
      • 4 ounces Italian sausage, hot or mild
      • 2 tablespoons Salt and Pepper each
      • 4 garlic cloves, minced or pressed
      • 2 cups cooked long grain rice
      • 1 (14.5 oz) can diced tomatoes, drained
      • 1 cup shredded mozzarella cheese
      • 1/2 cup grated Parmesan cheese
      • 3 tablespoons fresh minced parsley leaves
      • 6 orange, red, or yellow bell peppers
      For Serving
      • 2 tablespoons olive oil
      • Salt and Pepper
      • 1 and 1/4 cups shredded mozzarella cheese
      Instructions
      1. Heat oil in large skillet over medium high heat until shimmering. Cook onion until soft and lightly browned. Add beef and sausage and season the meet with a pinch of salt and pepper. Cook, breaking meat into small pieces with a wooden spoon, until the meat is browned. Mix in the garlic and cook just for 30 seconds. Remove from heat and drain mixture in a colander for at least 1 minute.
      2. Transfer the meat to a large mixing bowl and mix in the rice, both cheeses, tomatoes, parsley and 1/2 teaspoon salt and 1/4 teaspoon pepper. Place in the fridge and chill for at least 20 minutes. (If you are cooking the peppers right away, skip the fridge and wrapping the peppers in step 3.)
      3. Spoon filling into each half pepper. Wrap each pepper in two layers of plastic wrap and one final layer of tin foil. Place in the freezer until firm. The peppers can then be placed in large zip lock bags and stored for up to three months.
      4. When ready to serve, adjust oven rack to middle position and heat oven to 450 degrees. Unwrap the bell peppers and save a couple pieces of foil. Cover filling sides with cut or torn pieces of foil that are sprayed with cooking spray (so the cheese in the stuffing won't stick). Using skewer or fork, pierce the foil with a few holes to vent. Place them foil side down over the vents of a broiler pan-top or, if you don't have a broiler pan handy, on a wire rack set inside a baking sheet. Brush the peppers with olive oil and season generously with salt and pepper.
      5 Bake until the peppers are spotty brown, about 25 to 35 minutes. Flip them over with tongs and remove the foil. Cover the filling with shredded mozzarella and return to the oven for about 5 minutes, or until the cheese is melted and bubbly. Let rest 5 minutes before serving.
      Powered by Recipage

      Saturday, January 18, 2014

      Skinny Oven-Fried Fish with Tartar Sauce


      This popular dish is great if you're looking for lots of flavor, but not lots of calories. Typical oven fried fish have anywhere from 500 to 700+ calories per serving and 50 grams of fat! This recipe for Skinny Oven-Fried Fish with Tartar Sauce is just 260 calories and 8 grams of fat per serving (two fillets and 3 tablespoon serving of tartar sauce). Gotta love it!

      If you can afford the Halibut this recipe calls for, then go for it. (it's dad gum expensive!!) It's nice and meaty and doesn't release a whole lot of juice when baking, which can sometimes make a crust soggy. Personally I would go with a less expensive alternative like cod or Haddock. The photo above happens to be Swai, since it was on sale that day :0)

      Skinny Oven-Fried Fish with Tartar Sauce cuts on the calories and fat in several ways. The fish is only breaded on the top and sides, since the bottom inherently will get soggy anyway, it's just eliminated. Next, the homemade tartar sauce is made with low-fat mayonnaise, and flavored fantastically with sweet pickles, capers, Worcestershire sauce, lemon juice and shallot. It's by far my favorite tartar sauce and I usually double it so I have lots left over for other fish recipes. The fish is then coated with the tartar sauce before being coated with the bread crumbs, so the sauce acts like a barrier to keep the moisture of the fish from ruining the crunchy baked crust. Plus the flavors of the sauce lend themselves to the fish too.

      If you've never cooked with capers, or have never even heard of them,
      then let me introduce you! I love discovering new foods, and capers
      are one of my new favorites. Capers are little edible flower buds that are picked and pickled (by Peter Piper along with his peppers ha ha ha :0). They can be found growing all around the Mediterranean and are a popular ingredient for many ethnic dishes. They have quite a distinct taste, and I especially love them in this recipe and another I make for breaded lemon chicken (which will be appearing soon on the The Goldilocks Kitchen). Don't be afraid to try them! I find them in little jars along side the roasted red peppers and pickles at the grocery store. Make sure you purchase the ones in a brine solution, not packed in salt.

      This is a great recipe to practice your chopping skills, since there are a lot of ingredients that need to be chopped finely. Use a very sharp chef's knife. It's actually safer than using a dull one. The blade is less likely to slip and cut you.

       Here is my fish operation: 1. Prepared Fish, 2. Flour Dredge, 3. Egg-Tartar sauce mixture, 4. Bread crumbs
      This recipe can also double as a great make ahead freezer meal. Once you've breaded your fish, lay them out flat on a baking sheet lined with parchment or wax paper and place them in the freezer. Once they are frozen you can then gently place them in ziplock freezer bags. Bake them on the wire rack as instructed in the recipe, changing the temperature to 425 degrees and baking them for 30 to 35 minutes or until the fish is fully cooked. Here's a handy food temp chart courtesy of the FDA:


      I hope you love this recipe and that it becomes a regular on your table. It's big on taste and small on calories. Enjoy it!


      Skinny Oven-Fried Fish with Tartar Sauce

      by The Goldilocks Kitchen
      Prep Time: 40 minutes
      Cook Time: 10 to 12 minutes
      Ingredients (4 to 6)
        Tartar Sauce
        • 1 cup low-fat mayonnaise
        • 2 tablespoons finely chopped sweet pickles, plus 2 teaspoons juice
        • 1 tablespoon drained capers, minced
        • 2 teaspoons lemon juice
        • 1 teaspoon minced shallot
        • 1/2 teaspoon Worcestershire sauce
        • Salt and pepper
        Oven-Fried Fish
        • 3 slices hearty white sandwich bred, torn into pieces
        • 1/2 cup all-purpose flour
        • 2 large egg whites
        • 1 tablspoon Dijon mustard
        • 2 teaspoons finely chopped fresh parsley
        • 1/8 teaspoon cayenne pepper
        • 1/4 teaspoon salt
        • 1/8 teaspoon pepper
        • 1 1/2 pounds Halibut or other white meat fish
        Instructions
        1. Whisk all ingredients for tartar sauce together in a bowl, adding a pinch of salt and ground pepper.
        2. Pre-heat oven to 400 degrees. Pulse the bread in a food processor to make your own bread crumbs. Bake the bread crumbs on a rimmed baking sheet in the oven for about 6 to 8 minutes watching carefully and stirring often until golden.
        Transfer the toasted bread crumbs to a shallow dish. In another shallow dish, combine 1/4 cup of tartar sauce, 1/4 cup of flour, egg whites, mustard, parsley, and cayenne pepper until fully incorporated. In a third dish, place the remaining 1/4 cup flour, salt and pepper and stir to evenly incorporate.
        3. Once you are done baking the bread crumbs, raise the oven temperature to 450 degrees. Prepare to bake the fish by lining a rimmed baking sheet with aluminum foil. Place a wire rack inside the baking sheet over the foil and spray lightly with cooking spray. (Don't forget this step; it's important!)
        Pat the fish dry with paper towels. One at a time, dredge fish fillets lightly in flour, then top and sides in the tartar-egg mixture, and lastly press top and sides into the bread crumbs. Transfer the fillet to the wire rack (crumb side up) and continue with the rest of the fillets. Just before popping them in the oven, spray them all lightly with cooking spray. Bake until the crumbs are golden brown and the fish is cooked through, 10 to 12 minutes. Serve with the remaining tartar sauce.
        Powered by Recipage
        09 10