Home

Friday, September 27, 2013

Perfect scrambled eggs

How hard can scrambled eggs be? Crack some eggs in a mixing bowl and whisk together right? Have you added water, milk, both or neither? Do you add salt and pepper? What kind of pan do you use and where does butter fit into all this? I must say, in the past I have been very sloppy with my scrambled eggs and have just thrown eggs and whatever ingredients I had on hand into the mixture. Here's a bold statement: There's no wrong way of making scrambled eggs. But there is a perfect recipe out there that yields just right scrambled eggs every time. And I'm going to teach it to you :0) There are some tricks involved, so read on!
Fluffy scrambled eggs, just right :0)

There are a couple of cookware items that are essential to this recipe. The first one is an 8 inch nonstick skillet or frying pan. A really good one. Not one where the Teflon is peeling off the bottom. Throw that away if you have one like that! I'm not saying go out and buy a brand new 'egg' pan, but make sure the coating is nice and taken care of. If you cook the eggs without a nonstick pan, good luck scrubbing that thin layer of glued-on egg off the bottom, it's horrible! (Ask me how I know.)
Next, we'll match the cooking surface with the proper utensil. You'll need a heat proof spatula which can be found just about anywhere, from your local supermarket to Wal-Mart.
Here's an important rule to remember~ Never use a metal cooking utensil in a nonstick pan or pot! It is harder than the surface and will scratch the nonstick coating off. You do not want that stuff in your food! Match your cooking surface and your cooking utensil. Use metal with metal, and nonstick with nonstick (i.e. soft silicon coated or wooden). You will greatly extend the life of your pots and pans :0)

So I mentioned tricks. Yes, trade secrets given away for free here :0) I love to share (obviously, hence the blog) in the hopes that others can eat better food! The first secret to perfect scrambled eggs is to add a couple of extra yolks to your mixture. This really helps the eggs to become creamy. And the thinning agent to add~ not water or milk, but half and half. This also helps add a fantastic creaminess and flavor to the eggs. And with just the right amount of salt and pepper you're well on your way. Once you've sufficiently melted your butter in your pan, add the eggs and stir gently and constantly with your heat proof spatula. Don't worry, it won't take long for them to cook; you won't be nursing a sore arm from stirring :0) And the last secret in this recipe; turn the heat to low just before your eggs reach desired doneness. The residual heat in the pan will continue to cook the eggs. This way they don't get overcooked and dry or rubbery!


Perfect Scrambled Eggs

by The Goldilocks Kitchen
Prep Time: 5 minutes
Cook Time: Approximately 5 minutes
Ingredients (4 servings)
  • 8 large eggs + 2 large yolks
  • 1/4 cup half and half
  • salt and pepper
  • 1 Tbsp unsalted butter, chilled
Instructions
1.Beat the eggs, yolks, half and half, 3/8 tsp salt and 1/4 tsp pepper in a medium mixing bowl just until color is pure yellow. You don't want to over beat them.
2.Heat the butter in a nonstick skillet over medium high heat until the butter stops foaming. Don't let it brown. Swirl the pan to coat evenly with the melted butter and gently pour in the egg mixture.
3. With your heat proof spatula, firmly scrape along the bottom and sides of the pan constantly until you see the eggs start to clump. Your spatula will start to leave a trail on the bottom of the pan. This will go quickly, 1 1/2 to 2 1/2 minutes.
4. Reduce the heat to low and continue to stir eggs until clumped and slightly shiny or wet, 30 to 60 seconds. Imediately transfer the eggs to warmed plates. Serve and season with salt and pepper to your tasting.
Powered by Recipage

Thursday, September 26, 2013

Orange Glazed Pork Tenderloin

As the seasons change and fall arrives, warm comfort food brings us inside as we start to bring out our sweaters and jackets. Sandals are put away and pumpkins magically appear on almost every corner. I love Autumn and all it's colors. So why not celebrate the brilliant colors with a few slices of this pork tenderloin on your dinner plate?


You will love this because it's ridiculously simple to cook ~ and what a bang! Mouthwatering intense flavor in every bite. This main course would be excellent with steamed veggies or cheesy potatoes AuGraten. And you don't want to skip out on the chives, they really add the perfect complementary flavor for this dish.


Working with pork tenderloin you will probably notice one side covered in something called 'silverskin'. This is a thin layer of fat that is tough to eat and is easily removed with a sharp knife. A pairing knife works best but a chef's knife will work just fine too. To remove it, just slip your knife right under it and gently work your knife back and forth towards the end of the meat. It helps if you start in the middle and work your way outward. Also you can take it off in a few smaller strips instead of trying to get it off all at once. This will help you from cutting out a lot of good meat.
When sauteing your meat in the pan, you'll need to brown the sides as well as the top and bottom for this recipe. If you have a good pair of tongs, stack two or three medallions on top of one another, then grab the ends of the stack with your tongs and brown the sides all at once. Some medallions may not want to sit nicely on their sides to brown (they just fall over) and this trick will help brown the sides efficiently!

For a milder version:
If you like spicy food, but your digestive system doesn't, (or your kids) just omit the hot sauce and add a teaspoon more of the orange juice.

Orange Glazed Pork Tenderloin

by Goldilocks Kitchen
Prep Time: 10 minutes
Cook Time: 15 minutes
Ingredients (4 to 6 servings)
  • 1/3 cup orange marmalade
  • 2 tablespoons orange juice
  • 1 tablespoon hot sauce
  • 1-2 pork tenderloins, 1 1/2 to 2 pounds total
  • salt and pepper
  • 2 tablespoons vegetable oil
  • 2 tablespoons finely chopped fresh chives
Instructions
1.Trim excess fat and dry pork tenderloins with paper towels. Using a sharp knife, slice crosswise into 1 1/2 inch pieces (medallions). Season lightly with a pinch of salt and pepper. Heat oil in a large skillet over medium high until just smoking. Cook pork medallions until well browned all over, including sides, about 10 minutes.
2.While pork is browning, whisk marmalade, orange juice, and hot sauce together in a small bowl.
3.When pork is nice and golden brown on all sides, turn the heat to medium and pour the marmalade mixture over pork. Cook, flipping the medallions occasionally until meat registers 145 degrees, 3 to 5 minutes. Transfer the pork to a platter and sprinkle with chives. Serve.
Powered by Recipage
Monday, September 23, 2013

Chicken Pomodoro

This dish is easy to prepare and takes less than 30 minutes, perfect for a weeknight supper. Yet it's also fancy enough for preparing for company. I've prepared it several times for my friends and family!
Simple and Delicious weeknight meal.
Juicy white chicken breast topped with a tomato, cream, and basil sauce.
Chicken Pomodoro is a great teaching dish for beginners, as it uses all fresh ingredients. There is just no comparison for food created with fresh ingredients. The Chicken breast meat is patted dry and lightly seasoned with salt and pepper, then cooked in a saute pan until deep golden on both sides. This step is not to cook the chicken through, but to create fond, the little brown bits on the bottom of your saute pan. These little bits are full of flavor and help to give depth to pan sauces. You'll finish cooking the chicken in the prepared sauce at a later step in the recipe.
See the brown bits on the bottom, and
mixed with the onion? That's the fond!
Here, the ingredients are used to build a chunky pan sauce, and then the browned chicken is braised in the creamy mixture with a little kick of red pepper flakes.

Here's the finished sauce, minus the
 fresh basil. (Which goes in just before serving.)
When cooking this recipe, prepping all ingredients beforehand is a must. It goes fast, and you won't have time to be chopping up veggies and herbs and cooking at the same time. 


Chicken Pomodoro

by The Goldilocks Kitchen
Prep Time: 10 minutes
Cook Time: 20
Keywords: entree
Ingredients (4 servings)
  • Ingredients
  • 2 boneless, skinless chicken breasts (about 1.5 lbs total)
  • salt and pepper
  • 3 tablespoons of olive oil (not extra virgin)
  • 1 onion, chopped fine
  • 4 garlic cloves, minced or pushed through a press
  • 1 tablespoon fresh oregano, minced
  • 1/4 teaspoon red pepper flakes
  • 1 14.5 oz. can diced tomatoes
  • 1/3 cup heavy cream
  • 1/4 cup chopped fresh basil
Instructions
Instructions
Pat chicken dry with paper towels. Using a sharp knife (preferably a chef's knife) slice each breast horizontally in half. It's easiest when you place you hand, fingers close together, flat on top of the meat to secure it and slice through the meat horizontally with your knife, under your hand. You should have 4 total breast shaped cutlets approximately 1/2 inch thick. heat 1 tablespoon of the olive oil in a large skillet or saute pan over medium-high heat until just smoking. Cook chicken until golden, about 3 minutes per side. Transfer to a plate.
Heat the remaining two tablespoons of olive oil in the empty skillet over medium-high until the oil has spread out over the entire bottom of the pan. Cook the onion until softened, about 5 minutes. Add the garlic, oregano, and pepper flakes and cook until fragrant, about 30 seconds. Then stir in the tomatoes, cream and 1/4 teaspoon of salt and bring to a boil. Nestle the chicken and any accumulated juice into the pan. Simmer, covered, until the chicken is cooked through, about 8 minutes.
Transfer chicken to a platter and tent with foil. Simmer sauce, uncovered, until slicktly thickened, about 5 minutes. Off heat, stir in the basil and season with salt and pepper as needed. (Don't forget to always TASTE your sauces before serving, and add salt accordingly.) Pour finished sauce over chicken and serve over your choice of rice, pasta or even polenta!
Powered by Recipage

Saturday, September 21, 2013

Steak de Burgo

If you're like me, I really like to sink my teeth into a great steak now and again. Now, think of the best steak you've ever had and the tender juicy meat with the mouthwatering flavor of flame grilled deliciousness...
Ah. Stake de Burgo. A recipe you'll go to time and again when you want to treat yourself to steak at home. You will love it's simplicity, and feel like a pro chef every time you make it. I know I do :0)
My husband's plate featuring Steak de Burgo. This steak is cooked medium well. See how dark the char crust is?
The ingredients are simple and fresh and frankly, indulgent. Fresh herbs in a buttery sauce with a bit of heavy cream top off your flame grilled, or pan fried slab of perfection.
Every once in a while I enjoy getting out of the kitchen and heading for fine dining. It's nice to be treated to a great meal without the work. But I have never, I repeat never, had a steak as good as this at a restaurant. If you try this recipe at least once you will fall in love with it!
My plate featuring Steak de Burgo. The rib-eye steak shown here is cooked rare, much lighter char that shown above.


This is definitely a recipe in which you want to have all ingredients prepared before hand. I like to place a teaspoon of salt and freshly ground pepper in a small bowl before working with raw meat. Then I can pinch the salt and pepper out and apply it to the stake quickly without contaminating my salt and pepper shakers, or stopping to wash my hands.  Always pat meat dry with paper towels before frying or grilling. The moisture from the packaging will steam your meat and not allow it to reach an optimum browning temperature (no crust=no flavor)!  Remember, no color no flavor...

Don't have a grill handy? No problem! Begin by heating a large skillet and 1 tablespoon of vegetable oil on the stove. Once steaks are seasoned with oregano mixture, pan fry them to desired doneness. Remove, and proceed with adding the garlic right into the same pan, without adding any additional vegetable oil. Continue to build your sauce, scraping up the browned bits in the pan. The brown bits are called 'fond' and add tons of flavor to your sauce!


Steak de Burgo

by The Goldilocks Kitchen
Prep Time: 15 minutes
Cook Time: 25 minutes
Ingredients (4 servings)
  • 1 teaspoon dried oregano
  • 1/2 teaspoon garlic powder
  • Salt and Pepper
  • 1 tablespoon of vegetable oil
  • 4 Rib-eye or strip steaks of similar thickness
  • 2 cloves of garlic, peeled and halved
  • 1/3 cup chicken broth
  • 1 teaspoon of white wine vinegar
  • 5 tablespoons cold unsalted butter, diced into cubes
  • 1 tablespoon of heavy cream
  • 1 tablespoon of chopped fresh basil
  • 1 tablespoon of chopped fresh oregano
Instructions
1. Preheat your grill. Mix dried oregano, garlic powder, a pinch of salt and a pinch of freshly ground black pepper in a small bowl. After you have dried your steaks with paper towels, rub the mixture all over the meat. Place them on the grill and cook to desired doneness. Remove from heat and tent with foil. While the steaks rest, proceed to step 2.
2. In a large skillet, heat vegetable oil on medium heat.You'll know it's hot when the oil spreads out over the bottom. Add garlic cloves and cook until fragrant, about 30 seconds. Carefully stir in the chicken broth and vinegar. It will boil immediately upon entering the pan so be careful. Now whisk in butter, cream, basil and fresh oregano and cook about 2 minutes. Pluck out the garlic and discard it. Season with salt and pepper. Pour sauce over your steaks and serve.
Powered by Recipage


Thursday, September 19, 2013

Great Zucchini Bread


This is my go to recipe for Zucchini Bread. The great thing about it - there are a few tricks to intensifying the flavor, making this recipe unique and extra delicious.

If you haven't done it before, growing a Zucchini plant in your yard is quite easy!(If you happen to have a yard. Right now I don't.) One plant will give you all the zucchini you could ever want all summer long. The 'fruit' can grow up to 3 feet long, but I don't recommend letting them stay on the plant that long, the fruit will turn fibrous and have less flavor if it gets too big. Zucchini is usually harvested when 8 to 12 inches long, as the seeds are still immature and soft. When preparing the zucchini for this recipe, the skins need to be washed and the seeds scooped out like this:

I use a food processor with the shredding blade to shred the zucchini.
If you don't have a food processor, you can simply use a box grater or cheese grater to shred the zucchini. In this recipe, you will wring out some of the water held in the zucchini, which is over 90% water! This helps to prevent soggy bread. (Which happens often in zucchini bread.) The moisture is replaced with ingredients that have flavor, making this recipe unique.


Did you know that Zucchini flowers can also be eaten? They are often stuffed, deep fried or even cooked into quesadillas! Zucchini is low in calories and a good source of folate, potassium, and vitamin A.


Great Zucchini Bread

by The Goldilocks Kitchen
Prep Time: 25 minutes
Cook Time: 50 minutes
Ingredients (1 loaf)
  • A 1 pound zucchini, or two smaller zucchini equaling about a pound, seeds removed and shredded
  • 2 cups of all-purpose flour
  • 1 teaspoon of baking soda
  • 1 teaspoon of baking powder
  • 1 teaspoon of ground cinnamon
  • 1 teaspoon of ground allspice
  • 1/2 teaspoon salt
  • 1 and 1/2 cups sugar
  • 1/4 cup of plain yogurt
  • 2 large eggs
  • 1 tablespoon lemon juice
  • 6 tablespoons of unsalted butter, melted and cooled
Instructions
Adjust the oven rack to middle position and heat to 375 degrees. Generously coat a 9 by 5 inch loaf pan with cooking spray. Wrap up the shredded zucchini in a thin kitchen towel and squeeze or 'wring' the juice out of the zucchini.You'll need some 'elbow grease' for this :0) Use a towel that you don't mind getting stained. This removes the excess water and concentrates the flavor.
Whisk flour, baking soda, baking powder, cinnamon, allspice and salt in a medium bowl.
Whisk sugar, yogurt, eggs, lemon juice, and butter in a bowl until combined. The yogurt replaces the water lost from the zucchini and adds flavor to the batter.
Gently fold the yogurt mixture and zucchini into the flour mixture until no flour streaks remain. Transfer the batter into the prepared pan and bake until golden brown and knife or skewer inserted in the center comes out with a few crumbs attached, 45 to 55 minutes. Cool for 10 minutes in the pan, then turn out onto a wire rack to cool for about an hour.
Powered by Recipage

Wednesday, September 18, 2013

Italian roast chicken


This recipe is a perfect example of how beautiful and simple Italian cooking can be. You will be able to work with fresh rosemary, personally my favorite herb. I love the beautiful, clean, vibrant fragrance. If you've never cooked with fresh herbs, this is a great beginner's recipe. If you don't have a rosemary bush growing in your yard, no worries! Most supermarkets now sell prepackaged fresh herbs in the produce section. Cooking with fresh herbs really takes your food to the next level. I now always try to use fresh herbs instead of dried, unless dried is specified in the recipe. One teaspoon of dried herbs = one tablespoon of fresh. Simple and easy enough to remember, right?!

I love black olives, don't you? If you're my dad, don't answer that question :0) My dad hates olives. Only person I know. However, my mom loves them and she would bring home the occasional can. I was the kid who put the pitted olives over the end of all five fingers, happily waving them around and eating them off one at a time. Is it just me or did everyone do this as a kid? Whenever I see veggie trays with olives, I load up. If there is a bowl of olives passed around the Thanksgiving table, I load up. When I serve myself a helping of this recipe I pick out a few extra olives for my plate. Terrible, I know. Well, it's out there now so don't judge me :0)
A few words about the recipe:
Did you know that fruit sometimes is given a thin wax coating? I always wash my lemons in hot water to melt away any wax, and to make sure the zest is clean for eating.
I don't know how I managed to get through life without an instant-read food thermometer! I feel it's an essential piece of equipment for any home chef. While practiced chefs can often judge the doneness of meats by sight and touch, I think it's so much safer (and easier!) to use a thermometer. No guesswork!
Also don't skimp on the extra-virgin olive oil and buy cheap stuff. Some generic brands can taste downright awful. I use Colavita brand. It's a great taste and doesn't break the pocket book. Plus it's been a proven favorite of taste testers :0)


Italian Roast Chicken

by The Goldilocks Kitchen
Prep Time: 40 minutes
Cook Time: 50 minutes
Ingredients (10 servings)
  • 10 to 12 boneless, skinless chicken thighs
  • 1 large lemon
  • 1/2 cup of extra-virgin olive oil
  • 6 garlic cloves peeled and sliced
  • 1 onion, peeled and thinly sliced
  • 1 bunch of fresh rosemary
  • 2 and 1/2 pounds of potatoes, peeled and cut into about 1 inch pieces
  • salt and freshly ground black pepper
  • 1 can large pitted black olives
Instructions
Preheat your oven to 400 degrees. Trim the fat off the chicken thighs and place them in a shallow dish large enough to hold them in a single layer. Zest the lemon and sprinkle half the zest over the chicken. Save the rest. Cut the lemon and squeeze the juice over the chicken, toss to coat well and let it marinate for 10 minutes.
Transfer the chicken to a large roasting pan. Add the rest of the lemon zest, the sliced onion and garlic, and half the rosemary sprigs. Drizzle the olive oil over and toss gently. Now let it marinate for about 20 minutes.
In the mean time, place the potatoes in a large pot and cover them with water; 1 inch above the top of the potatoes. Lightly sprinkle with salt and bring to a boil. Cook for 2 minutes, then drain well and add to the chicken. Season with salt and fresh ground pepper.
Roast the chicken in the preheated oven for 50 minutes, turning frequently or basting, or until the chicken is cooked. (175 degrees on an instant-read thermometer.) Just before the end of cooking time, discard the cooked rosemary, and replace with fresh sprigs. Add the olives and stir. Serve immediately with steamed vegetables. (I recommend carrots and zucchini.)
Powered by Recipage

Tuesday, September 17, 2013

My most favorite dessert ever is...

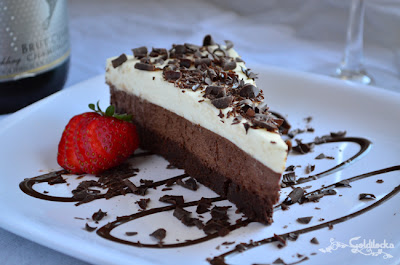
This recipe for Triple Chocolate Mousse cake is created with a base layer of dark chocolate mousse cake, followed by layers of rich milk chocolate and white chocolate mousse. A decadent indulgence :0)
Gluten Free Triple Chocolate Mousse Cake

Manna from heaven. Seriously. This is the dessert of all desserts!
Recently I was asked to cook two cakes for a BSA (Boy Scouts of America) cake auction and this cake sold for the highest amount...$135! I was so happy to help out, and the folks that took this cake home said it was worth every penny.
You will feel like you've died and gone to heaven when you take your first bite of Triple Chocolate Mousse Cake, which happens to be gluten free.
I will always remember when I discovered this ultimate chocolate masterpiece while dining at one of my favorite restaurants in New Mexico. I thought that it was a one-of-a-kind restaurant creation until years later I stumbled across a recipe for it by Cooks Illustrated.  I was thrilled; then I read the instructions. A stand mixer was a requirement, and unfortunately I didn't own one. However, having this recipe in hand was certainly motivation to purchase one! Just last Christmas I finally added a KitchenAid stand mixer to my kitchen counter top and christened it with this recipe.

This recipe for Triple Chocolate Mousse cake is created with a base layer of dark chocolate mousse cake, followed by layers of rich milk chocolate and white chocolate mousse. A decadent indulgence :0)

This dessert is a real showstopper and absolutely a crowd favorite. Your friends and family will be so impressed with your cooking abilities when you serve them a slice! The base is made of modified chocolate souffle/flourless cake, sturdy enough to hold up the milk chocolate and white chocolate mousse layers on top. Again, a stand mixer and a springform pan are required for this recipe. So get the equipment you need and make it!


Triple Chocolate Mousse Cake

by The Goldilocks Kitchen
Prep Time: 45 minutes
Cook Time: 3 hours
Ingredients (16 slices)
    Bottom Layer
    • 6 tablespoons of unsalted butter, cut into several pieces
    • 7 ounces of semi-sweet (or bittersweet, same thing just different names) bakers chocolate, chopped up/broken into small pieces
    • 1 and 1/2 teaspoons of vanilla extract
    • 4 large eggs, separated
    • a pinch of table salt
    • 1/3 cup of packed light brown sugar (crumble with fingers to remove any lumps
    Middle Layer
    • 2 tablespoons of cocoa powder
    • 5 tablespoons of hot water
    • 7 ounces of semi-sweet (or bittersweet) bakers chocolate, chopped up/broken into small pieces
    • 1 and 1/2 cups cold heavy cream
    • 1 tablespoon of granulated sugar
    • 1/8 teaspoon table salt
    Top Layer
    • 1 teaspoon powdered gelatin
    • 1 tablespoon of water
    • 6 ounces of white chocolate chips
    • 1 and 3/4 cups cold heavy cream
    • Chocolate curls or strawberries to garnish (or both)
    Instructions
    First Layer
    Spray a 9 and 1/2 inch springform pan generously with cooking spray. Adjust your oven rack to the middle position and preheat the oven to 325 degrees. Melt the butter and chocolate together in a heatproof bowl over a pot of just simmering water, stirring occasionally. The pot should only have about 1 inch of water.(The water should NOT touch the bottom of the bowl, or it will scorch the chocolate.) The steam from the simmering water gives the right amount of heat. When smooth, remove from heat and let it cool for about 5 minutes. Then whisk in the vanilla and egg yolks.
    In a stand mixer, beat the egg whites and salt with the whisk attachment at medium speed until lots of bubbles appear about 30 seconds. This texture is called 'frothy'. Add half the brown sugar and mix for another 15 seconds or so. Then add the remaining brown sugar and switch the speed to high, beating until soft peaks form when whisk is lifted, about a minute to minute and a half. Scrape down the bowl with a spatula half way through if needed. Watch carefully so as to not over-whip to stiff peaks.
    Using a whisk, gently mix one-third of beaten egg whites into the chocolate mixture to lighten it. Switching to a rubber spatula, and fold (do not mix) in the remaining whipped egg whites until no white streaks remain. Gently poor the mixture into the springform pan and smooth the top with an offset spatula.
    Bake for 13 to 18 minutes, when the cake has risen, is firm around the edges and the center springs back after a gentle touch of the finger. Remove from the oven and cool on a wire rack for about an hour. The cake will collapse as it cools and pull away from the edge of the pan. This is normal, don't freak out :0) Wash your stand mixer and whisk attachment for the next layer.You're done with the first layer!
    Middle Layer
    Mix the cocoa powder into the hot water and set aside. Melt the chocolate in a heatproof bowl and stir the chocolate occasionally until completely melted and smooth. Remove from heat and set aside to cool. While waiting, whip cream, granulated sugar and salt with the whisk attachment at medium until frothy. move speed to high and whip until soft peaks form when whisk is lifted, about a minute. This goes fast so watch carefully!
    Next, whisk the cocoa powder-water into the melted chocolate until smooth and shiny. Then using a whisk, fold 1/3 of the whipped cream into the chocolate mixture to lighten. With a rubber spatula, gently fold in the remaining cream until no white streaks remain. Gently pour the mousse into the springform pan over the bottom layer and tap the bottom on the counter a few times to remove any air bubbles. Smooth the top and refrigerate at least 15 mins while preparing the top layer. Wash your stand mixer equipment again.
    Top Layer
    In a small container, sprinkle the gelatin over the water. Place white chocolate into a medium sized mixing bowl. Bring 1/2 cup cream to simmer in a small saucepan over medium-high heat, stirring constantly. Remove from heat and mix in the gelatin mixture. Stir until fully dissolved. Pour the cream over the white chocolate and stir until melted and smooth. Cool to room temperature, mixing occasionally.
    Whip remaining cream in the bowl of your stand mixer at medium speed until frothy, and then increase the speed to high and whip until soft peaks form when whisk is lifted, about one minute. Using a whisk, fold 1/3 whipped cream into white chocolate mixture until thoroughly combined. Then using a rubber spatula, gently fold in the remaining whipped cream until fully incorporated. (It's a little hard to tell since you're mixing white into white essentially, just do your best to watch it and not fold to much or it will deflate.) Gently pour out onto the middle layer and smooth the top. Refrigerate until set, approximately 2 and 1/2 hours.
    +To remove and serve+ Run a thin knife between the cake and the side of the springform pan. Remove the side of the pan. Run a clean hot knife along the outside of the cake to smooth the sides. Use a clean hot knife or wire to slice and serve with a garnish of chocolate curls or strawberries.
    Powered by Recipage

    Tuesday, September 10, 2013

    Em's Chili Recipe

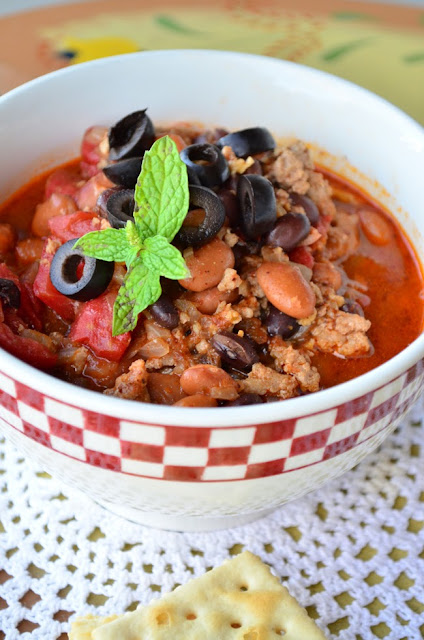
    Turkey Chili recipe from the Biggest Looser campus. Absolutely the easiest and tastiest 'Healthy' food I've ever had!
    Hot bowl of Em's Chili
    "Mmmm, smells great, what are you cooking!?"
    This is what you'll hear when you make a pot of this super easy and deceptively healthy Em's Chili. The delicious aroma will fill your home, and it's under 200 calories per serving!!

    You will love making this quick and easy recipe I adapted from a Biggest Looser program because you simply chop an onion and mince some garlic. The rest of the ingredients are in a can or box.
    I've learned a valuable lesson when it comes to cooking delicious food so it comes out just right every time. The trick is~ prepare my ingredients beforehand! Chop up that onion, press that garlic, measure out your chicken broth and spices before you start cooking. Especially when making a new recipe. Then you can pay attention to actually cooking the food. Really essential for just about everything. (Except for some instances when baking or cooking with fresh herbs, you don't want to chop them too early or they'll turn brown.) Once you know a recipe well, you can decide to cut corners and understand when you might have some time to prep food while cooking. But this takes practice :0)


    Em's Chili Recipe

    by The Goldilocks Kitchen
    Prep Time: 10 minutes
    Cook Time: 30 minutes
    Ingredients (6 servings)
    • 1 onion chopped
    • 1 1/4 lbs lean ground turkey
    • 1 14.5 oz. can of roasted diced tomatoes, undrained
    • 1 15 oz. can of pinto beans
    • 1 15 oz. can of black beans
    • 2 cups low sodium chicken broth
    • 2 tablespoons of chopped (or pressed) garlic
    • 2 tablespoons of chili powder
    • 1 teaspoon dried oregano
    • 1 teaspoon of ground cumin
    • 1 teaspoon of mustard powder
    • 1/2 cup sliced black olives to garnish
    Instructions
    1.Coat a large Dutch oven with a few sprays of olive oil or other cooking spray. (You can use a large saucepan with a lid if you don't have a dutch oven.) Heat on medium-high and add the onion. Season with a pinch of salt and saute until soft and just browning a bit.
    2. Add ground turkey and cook, breaking apart the turkey until no pink remains- 6 to 8 minutes.
    3.Then add all other ingredients except for the olives into the pot or saucepan and stir to combine. Turn the heat to high until boiling and then turn to low. Cover and simmer for about 20 minutes. Remove from heat and serve into1 cup servings and top with a few olives.
    Approx 150 calories and 16 grams of protein per serving! And Delicious!
    Powered by Recipage

    Monday, September 9, 2013

    Spiced Plum Jam

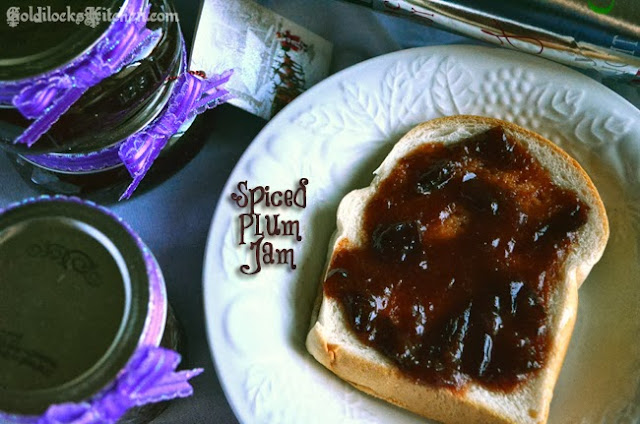
    Italian plum recipe: Homemade plum jam cooked with Christmas spices. A jam full of love for a holiday dessert. Small mason jars would be a lovely wedding favor if plum is one of your colors! Or a thank you gift for your holiday party hostess :0)

    My first official blog post! I am so excited to share with you my most delicious recipes and why they work~ my goal is to help YOU to become the best home cook possible. I really, really love eating amazing food. How would it make you feel if your kids (or future kids) said one day, 'my mom is the best cook I know' or 'nothing beats mom's home cooking'. This is what I strive for. Even now I want my family to actually look forward to one of my meals or treats. Great cooking takes practice, yes. But you're half way there if you have a good recipe with detailed instructions. I've learned so much in striving to achieve my goal. I am zealous to share what I know, and continue to improve and share with you as we learn together.

    As for my first recipe, Spiced Plum Jam, let me take you back...

    Italian plum recipe: Homemade plum jam cooked with Christmas spices. A jam full of love for a holiday dessert. Small mason jars would be a lovely wedding favor if plum is one of your colors! Or a thank you gift for your holiday party hostess :0)
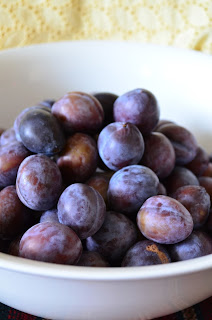
    Italian plums for Spiced Plum Jam


    As a child, I will never forget how my dad would boil prunes on the stove to eat. Yes. Boiled prunes. Why?! Perhaps this is one of the great mysteries of the universe. I gave myself a good blister when I was three by burning my little arm on the lid of the boiling pot. I was trying to look inside. I never much liked prunes after that.

    I recently lived in a very old house with a large backyard and a plum tree growing right in the middle. I really didn't know what to do with the plums or what kind they were. So I just threw them away. (Sad, I know!) Well, I wasn't interested in prunes. Then the next year I discovered a wonderful use for the Italian Plum tree; Spiced Plum Jam!

    This year, sadly, I moved away from the little old house into an apartment with no yard. But I was able to harvest a few plums before I left, shown above for one last batch of jam.

    You can use any kind of plums from the grocery store (or a tree if you know of one) for this small batch of jam, just make sure they're ripe. You want a nice deep color on the peel; no green at all. And they should give a little when you squeeze them gently.
    Italian plum recipe: Homemade plum jam cooked with Christmas spices. A jam full of love for a holiday dessert. Small mason jars would be a lovely wedding favor if plum is one of your colors! Or a thank you gift for your holiday party hostess :0)


    Take a small knife and slice all the way around the plum from pole to pole. Do not remove the peel. Italian plums will be greenish on the inside. Twist open and remove the pit. You should be able to just pluck it out with your fingers. If it's difficult to remove, the plum(s) may not be ripe enough. Unripened plums won't break down when cooking and will remain as green chunks in your jam. Slice the halves into quarters and place them into a large pot or dutch oven. Sprinkle the sugar and spices over and stir it in. Cook on medium-high heat for several minutes, stirring very often. (I would hang out in the kitchen and not try to do any side projects) after a while it will start to look like jam. place a spoon in the freezer and let it get nice and cold. You'll need this to check the jam to see if it's done cooking. Pull the spoon out and drop a bit of jam on it. If the jam sets up and doesn't drip off in a hurry, it's done. It is possible to over cook this jam. Ask me how I know. So be careful and check it often, probably after 10 mins or so of boiling.

    Once your jam sits in a nice little blob on the spoon it's done cooking! Remove from heat and stir in the final ingredient, vanilla extract. Remember your batch of jam will thicken up a bit when it cools. Now you're ready to eat, freeze or can your Christmas in a jar!

    For more info on Stone fruit, and why on earth it's called that, see Stone fruit.

    Spiced Plum Jam

    by The Goldilocks Kitchen
    Prep Time: 45 minutes
    Cook Time: 10-15 minutes
    Ingredients (3 pint jars)
    • Four pounds of plums, washed, pitted and chopped
    • 2 cups of sugar
    • 1 teaspoon cinnamon
    • 1/4 teaspoon of nutmeg
    • 1/4 teaspoon powdered ginger
    • 2 teaspoons of Vanilla extract
    Instructions
    1.Place chopped plums in a large pot with non stick coating or enamel coated dutch oven. Add sugar, cinnamon, nutmeg and ginger. Place over medium-high heat and stir very often until the plums have released their juices and flesh has broken down, approx 15-20 mins. Test for doneness with a chilled spoon after 10-12 minutes of continuous boiling.
    When done, remove from heat and stir in vanilla. Your jam is now ready for canning. (Or eating!)
    Powered by Recipage
    09 10